Catching Up With Goals
Growing up on a farm, we always had a dog or three running around. My parents had a thing for Brittany Spaniels, so inevitably one of those dogs was a Brittany. In order to keep things easy, and because they always got orange and white coloured males, the Brittany was usually named Freckles.

These days, the Brittany is a liver and white female, named Trixie. She is the best behaved and mannered Brittany we’ve ever had. The middling human loves her.
I think it was Freckles III who used to chase cars and trucks on the gravel road that set the property line of the front field. He was terrible about it, getting SO CLOSE to that front tire we were always afraid he’d get hurt or killed. I always wondered what he was thinking and what he would do if he actually caught that fast-paced goal.
I’m starting to think I know what that feels like…
If you have sincerely followed me for any significant length of time, whether through my blog, my FB account, or Instagram, then you know I have a penchant for words. Lots of words. Too many words, some might say.
So do you know how AWESOME it feels, then, to have a magazine editor come to you with an idea for a regular column in their new magazine that includes MY words? Just the way they are, even?
To the moon, Alice. To. The. Freaking. Moon!!
So… there’s this new woodworking magazine out now, called Quercus Magazine. It focuses on hand tools, mostly, and is edited/published by Nick Gibbs, who has been involved in such British magazines as Living Woods, British Woodworking, and Good Woodworking, for over 25 years. And I have a regular column in it!
Go check it out, please! They currently have digital versions of their first edition HERE and subscriptions/print issues will be available through the Quercus Magazine website later this week. Right now it is a quarterly publication, but that could change (let Nick know if you think I’m not writing enough words)!
Nick has fought through some challenges to get back to publishing woodworking magazines. And now he’s added even more by asking me to write for him! But I’ll do my best to come up with articles you’ll want to read and to stay on top of things so Nick doesn’t regret his decision.
Also… I’m on the front cover of the first issue.

Quercus Magazine – Woodworking By Hand; Issue 1, Summer 2020
My first article covers the Wheeler patented countersink depth gauge, offered by Stanley for many years in the late 1800s and early 1900s.

The Wheeler patented countersink with depth gauge.
*deep breath*
Alright, let’s go catch that car!
TKW
Funding My Long Strange Trip

I wrote some words the other day! You can read them on Teak&Timber’s Blog! Teak&Timber is a Seattle-based company that supports local woodworkers through their online marketplace. Their goal is to empower woodworkers to build beautiful furniture while letting Teak&Timber handle the marketing and customers. It’s sort of a unique take on the cooperative community. Having worked at a cooperative software company for the last 19 years, I’m very interested in this concept.
So when Daniel McConnell, the CEO, and Alena Peterson, the Content Creator, contacted me about writing a guest blog post for their website, I was interested to hear more. And that resulted in the blog post.
So go there. Read some words I wrote. And I promise I will start doing a better job of putting more words that I write here on my own website for you to read. There aren’t enough hours in the day, but… lately I find myself with a little bit of extra time (thanks COVID-19!), so I should be able to get a few blog entries out!
Oh, and I got a new Maker’s stamp a while back. It was made by Tim Purdy at Steel Stamps Inc. I think it looks rather smart.
Stay safe. Stay home. Read more blog posts.
TKW
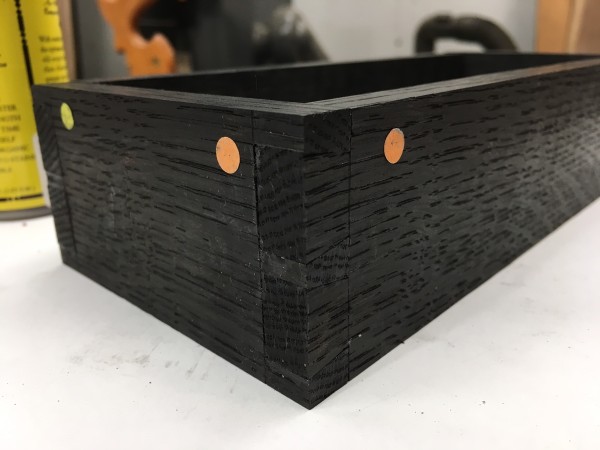
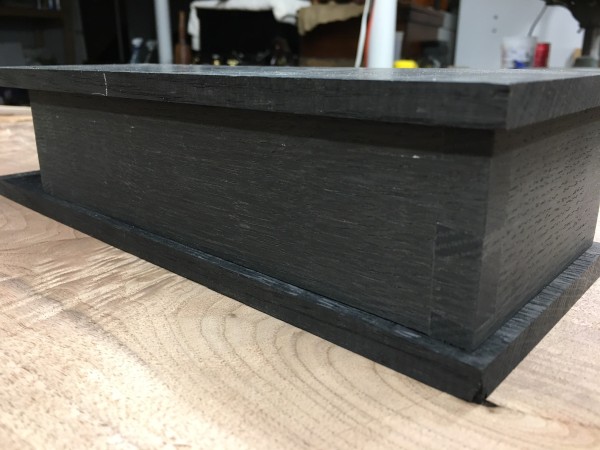
Ailsa Craig Box Completed
Wow, I’ve really neglected my blog! I feel terrible! But the only thing to do about it is to just pick right back up with it and make some posts, right? Let’s start with the finished Ailsa Craig box!
After the dovetails were fitted and tuned properly, I worked on the lid – shaping it and inlaying the Ailsa Craig stone cabochon. I really like this sort of detailed work…

Centering the stone onto the lid.

Removing waste…

This is the variety of detail tools I use for this sort of task.
Hmmm… I don’t appear to have a picture of the lid with the cab inlaid but no finish yet, so we will just move on. And really all that was left was to inlay my stamp into the bottom, a bit of final sanding, the glue up, and the finish! I decided to go with a blond shellac finish that I knocked back to a matte sheen and then a coat of Alfie Shine, an all-natural wax based on a recipe from the 1800’s, I believe (which also makes a great beard wax).

Dovetail details

More dovetail details
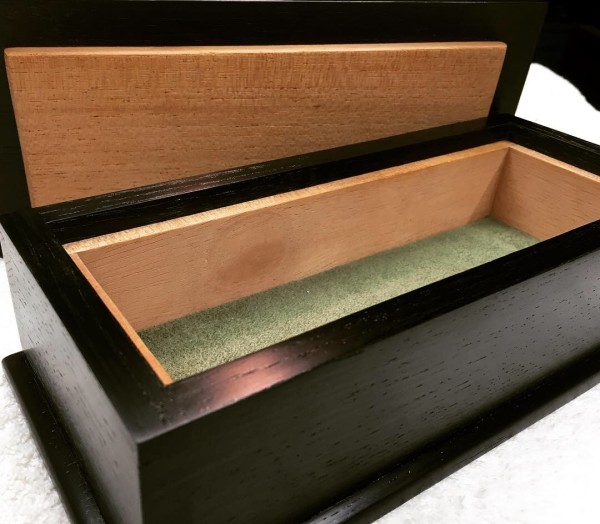
A picture of the interior, with green suede cloth on the bottom and Spanish Cedar lining.

Underside

Underside detail of my signature stamp
The stamp was made into the end grain of a piece of beech I harvested from a defunct Stanley Transitional plane that dated to the late 1800’s. I inlaid it into the underside of the box; I enjoy leaving my mark on the things I create, but I don’t think it should ever be in a prominent spot where it detracts from the overall design of the piece.
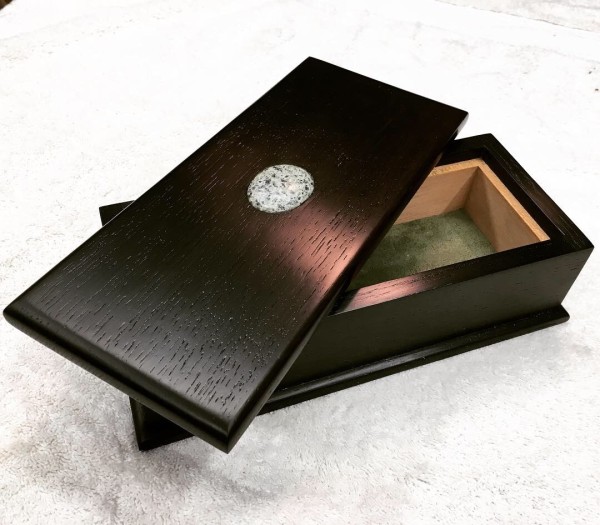
Completed Ailsa Craig Box
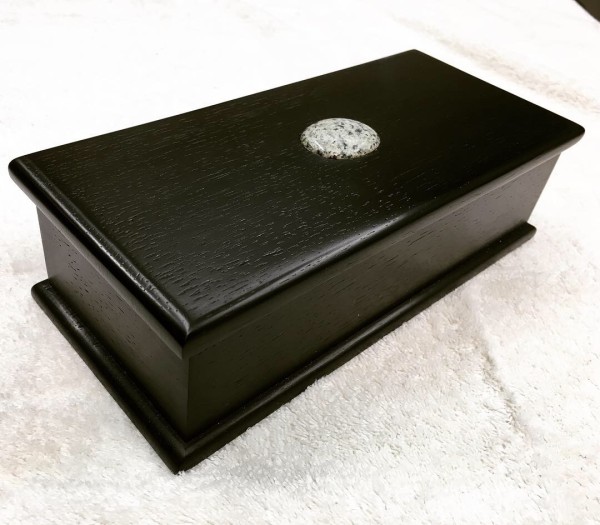
Clean, contemporary lines and classic construction techniques make for a subtle design that will appeal to many people.
The client contacted me immediately upon receiving the box to let me know it had arrived safely and just how pleased he was with the final outcome. He said it was better than anything he expected and was impressed with my packing skills (I double-boxed it, with foam packing material protecting the box inside the first packing box and between the first and second packing boxes; there was no way this thing was going to get damaged during transport).
This box was a great challenge for me. I was quite pleased with how well the dovetails turned out, especially since the bog oak was such a challenge to work with! I mean, if you think about it, the 100 year old reclaimed white oak I periodically use is more difficult to work with than contemporary white oak. Bog oak is white oak that is 50 times older than the reclaimed barn wood! But it’s still fun to work with and the end result is always worth it.
I believe for my next few boxes, I’m going to be finishing up some boxes I’ve had in my Incomplete Projects box for several years now. And maybe what I will do is try and finish a few boxes and try to sell them with a few minor customizations instead of starting from scratch when I get a commission.
TKW
Ailsa Craig Box Update…

(And now for a long overdue update on the Ailsa Craig box…)
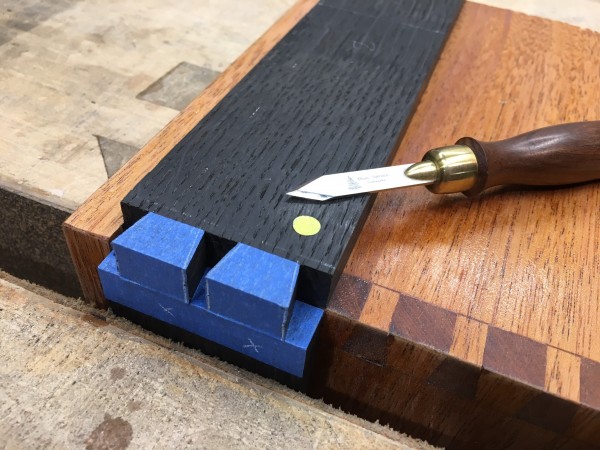
After letting the boards I’d ripped down rest for a bit in the shop, I cut them to length and width and squared the ends in preparation for dovetails. Because it’s been so long since I’ve cut dovetails, and because marks are hard enough to see in walnut, much less the black void of bog oak, I decided to use the blue tape trick. This is the first time I’ve tried it and, I have to say, it really made the task a lot easier.

I will forever mark my waste.

Always a joy to use the sash saw I made myself in a Matt Cianci class.

Using the Knew Concepts saw isn’t too bad, either!
I got to use my new dovetail marking board…
That dovetail marking board came in handy pretty quickly! And my Blue Spruce marking knife always comes in handy…
I also used a David Barron trick, which is to put little colored sticker dots on the matching corners of the boards. Like the blue tape trick, this one worked amazingly well and I was able to keep all of the boards oriented properly at barely a glance.

Colourful, innit?
And… they actually went together quite well, especially considering how hard this wood is. Compared to the air-dried walnut I’ve been working with lately, kiln-dried 5,000 year old bog oak works very much like ebony. In other words, chopping out my dovetails was a bit difficult, even after clearing away most of the waste with a coping saw.

Waste? No, I’m pretty sure I didn’t throw those offcuts away…
Are they air tight? No, but considering how few dovetails I’ve actually cut, and considering how difficult this wood is to work, I’m quite chuffed with these results!
I need to figure out the base and the lid still, but I thought I’d lay them out for some dimensions. I think I’ll probably plane a roundover or bullnose on the top edge of the base. Because I’m not going to hinge the lid, I’ll likely need to plane a rebate on the bottom of the top board to create a lip. This will allow the underside of the lid to fit into the box securely.

After a bit of “clean-up”, they look even better!
Boy, I don’t have a whole lot of wiggle room for the base. But that just means I won’t have to rebate too much to fit the lid, either.
Hopefully we’ll have some continuous warmer weather here in the Midwest soon. My shop has been sitting at about 52 degrees Fahrenheit, which isn’t terribly conducive for shop activity. I have several projects that are in progress and I’d really love to be able to finish them up.
I’d also like to try and update the blog a little more! Will work on that, as well. Apologies, gentle readers.
TKW
Bogged Down No More…
Sometimes I have so much going on that nothing ever seems to make progress. Right now, I’m working on… well, I’m working on several projects all at once, it seems. That’s not unusual, is it? One of them is another collaboration with my friend, Rab Gordon, of Rainnea Ltd. It’s an interesting project in that it is driven by form more so than function. The client recently had a sgian dubh made and wanted a reminder of it that he could put on his desk at work. My guidelines were to use a provided cabochon and bog oak – and that’s it.
Honestly, it can be challenging to build something with very minimal information! So it took me a while to figure out what I wanted to do.
And, of course, I had to go with something that would challenge me, right? I’ve made dovetail boxes before. And I’ve used bog oak plenty of times. I’ve yet to make a dovetail box out of bog oak, but that’s the plan. The goal, then, is to make a dovetailed desktop pen box out of bog oak with a lift-off lid that has the cabochon inlaid into the top of it.

I have an aversion to thick-walled boxes, so the first thing I needed to do was rip down some wood. I decided to give the new Luban 043 (copy of the Record 043) a try with the resaw attachment. I have to be honest with you, I wasn’t completely impressed by it, but I think I need to use it a few more times before coming out with a proper review. It served its purpose, though, and I was able to finish resawing the piece with my Ron Bontz rip saw such that it would require the bare minimum of cleanup afterwards.

A freshly sharpened Hock blade in my Stanley No7 made this clean-up an easy task. For being 5,000 year old wood, the bog oak planes wonderfully and the shavings look like curly black Shirley Temple ringlets.

Check out those medullary rays from the quartersawn oak! This really is some wonderful wood. But before I go any further with the bog oak, I want to brush up on my dovetails.

This first run is in mahogany.


Considering it’s been a few years since I’ve cut dovetails, I was pleased with the final result. Nice and square, very few gaps, and just one saw cut past the scribe line. I decided to be useful while I was practicing, so I took a page out of David Barron’s book and made a device to help line up the tail board to mark the pins.

But I want to get a few more done before I cut into the most expensive wood I have in my shop…
Stay tuned for more. And I’ll try to include an update on the other big project I’ve been working on. And the last batch of knives? And some other ideas I’ve been kicking around? I think it’s time to kick the blog back into activity…
Cheers,
TKW
A Woodworking Boone…

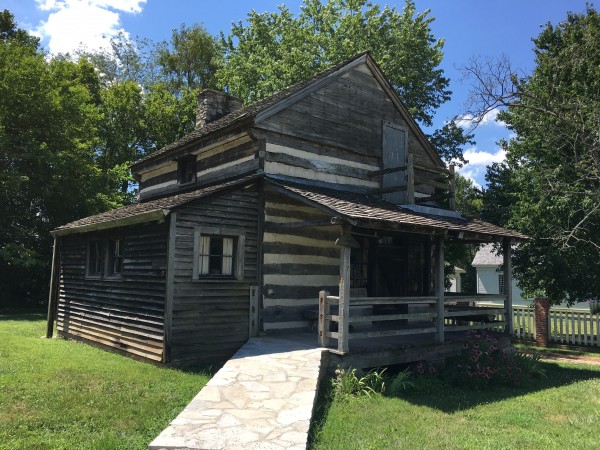
Almost all of the doors at the Daniel Boone Home are walnut, milled on-site.
Not far from our farm in Femme Osage, Missouri, is a national historic landmark – the residence of Daniel Boone. When I was little, my mom would take me to see it periodically. The middling human has been there several times now, as well. Even as a kid, I remember gawking at the wood floors and doors and built-in cabinetry, all made using local Missouri black walnut. I suppose even then I had an appreciation for the wood.

Staked Bench – maybe not period? But of the period. And still cool…
The DBH has changed ownership several times over the years. In 2016, it was gifted to St. Charles County by the then-owners, Lindenwood University. It has also grown a lot over the years. In addition to adding an entire village of buildings, including a blacksmith shop, a general store, several homes of varying sizes, a church, a pottery shop, and a wood shop, it now boasts a large and modern pavilion and a properly supplied gift shop.
Something the County started doing that interested me greatly was the addition of monthly artisan events to their event calendars. On any given month, one of the various shops or artisans would be open and available to demonstrate skills or answer questions from visitors.
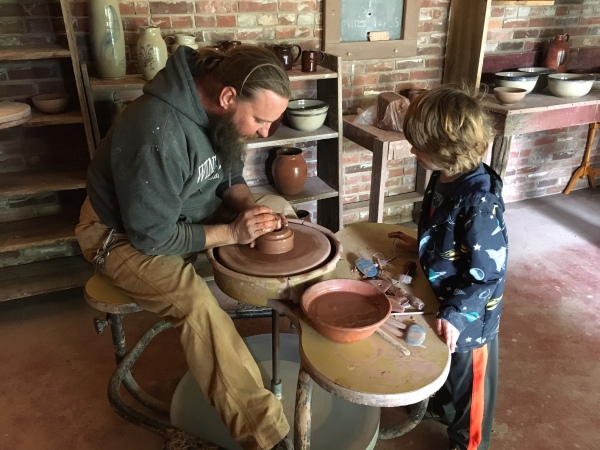
Middling Human learning about pottery on a kick wheel from Matt Brennecke.
A friend of mine, Matt Brennecke of 33&Burning Tree Studios, is one of the volunteer potters, so I took the middling human along with me during the pottery artisan event. He was pretty excited that got to use a kickwheel, under the supervision of a potter, and get dirty with clay. He has expressed an interest, so he might be getting lessons at some point.
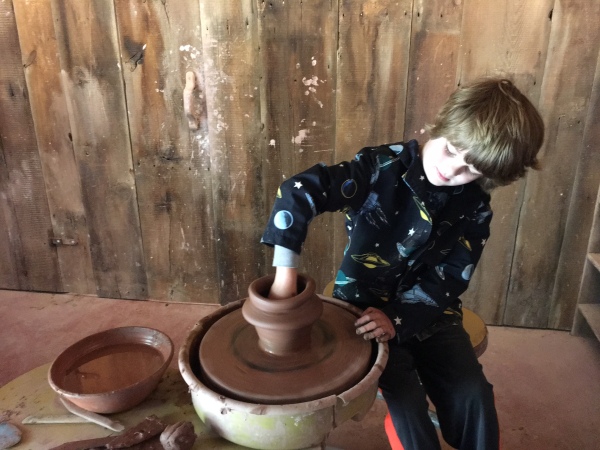
It’s a lot harder than it looks!
We had a good time there, but what I was really looking forward to was the woodworking artisan day, which was scheduled for late June! I was itching to see the inside of the woodshop and get a chance to talk shop with some more handtool woodworkers.
The woodshop at the Daniel Boone Home.
So you can imagine my surprise when I showed up for the woodshop artisan day and found a guy setting up a powered scroll saw! He apologized and said he was a fill-in because the normal volunteers couldn’t make it. We still had a fairly pleasant conversation, but I really wanted to visit with someone who was intimate with hand tool woodworking.
Chatting with my mom later that day, I started complaining about the lack of hand tool woodworkers participating in that event. After a minute, I realized what I needed to do was put my shavings where my mouth was. So I contacted the person in charge of volunteers and told her I wanted in.
We met a few weeks later and discussed the opportunity. I showed her some of my work and discussed my woodworking experience and skill level. And I got approval to be one of the volunteers!
So… on top of the other things I have on my plate, I’ve added “Volunteer Woodworker At The Historic Daniel Boone Home” to the list. My goal is to get into the shop there at least one 8-hour day per month. I think that is do-able. Now I just need to figure out a few things I can make while I’m there! I have some items in mind, but I was also planning on walking through the various buildings on-site to see if there are any period pieces from which I might draw inspiration.
One of the benefits of volunteering there as a hand-tool woodworker is that I get permanent venue in the gift shop for things I make and can likewise sell stuff out of the woodshop when I’m down there working. It was a completely unexpected bonus, but I won’t say no to the opportunity! Time to get business cards made up, as well, I think…
Stay tuned for updates on my volunteer work there in the future. Once I have a schedule and a plan worked out, I’ll be posting times when I will be in the shop working. Anyone in the St. Louis area (or visiting) is welcome to stop by for a visit!
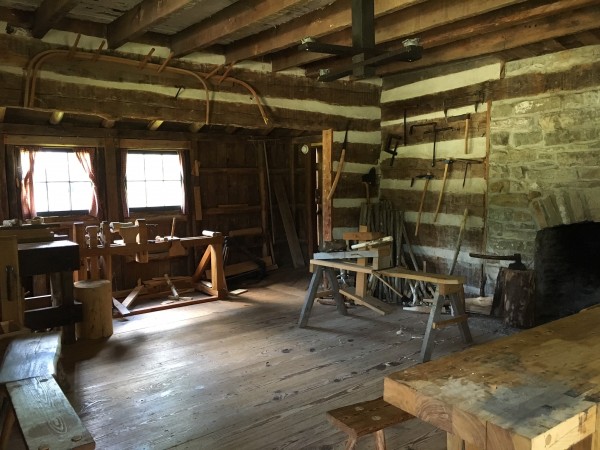
Interior of the woodshop

There IS a Roubo-style bench! It’s a little tall, but usable.
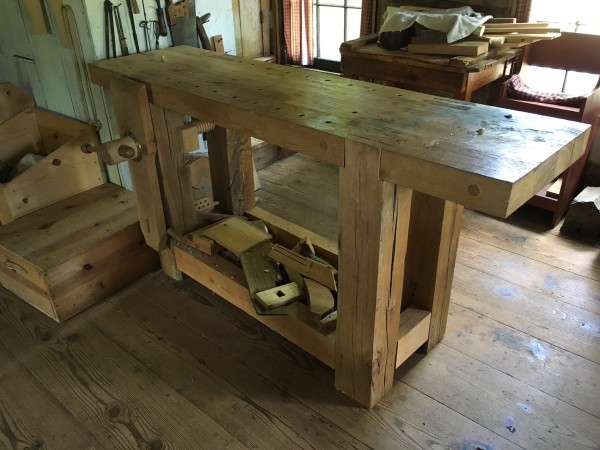
It has a nice leg vise, too!

There is a treadle lathe available, but it needs some fine tuning…
Not Bored Cutting
I recently had a need to make a cutting board for someone. I wanted to make something unusual, with some highly figured domestic woods – most likely maple and walnut. I prefer these species because their pores are closed (or at least very tiny), which I think is better for something on which food will be processed.
I had a really nice piece of curly walnut that was from the family farm. I also had some really great curly maple from Ohio – scrap wood I’d gotten from my ex-wife’s uncle several years ago when he built some shelves for their house. The problem with the walnut was that only part of it was highly figured; the rest was pretty plain. So I needed to come up with a design that took advantage of this.
In the end, I decided to cut the walnut into a wedge and then frame it with the curly maple.

When I posted pictures of it, someone asked me how I managed the angles. The big secret here is that I didn’t manage angles. I didn’t measure one angle! It looks a bit complicated at first blush, but it really isn’t. Hopefully you’ll agree after I explain.
Everything is just a straight measurement off of the center line. For the handle, the center line marked the point where I bored the hole. Then the shoulder measures out X” from the center line on both sides. Those points are connected to the center line at the end of the board to delineate the area of figured walnut I had available. Then the maple is also measured off the center line at the shoulder and then at the end.

I drew this all out on a template, cut it into three pieces, marked out my walnut and maple accordingly, then removed a wedge shape (overcutting to actually make two pieces) from the maple board so as to maintain grain continuity.
The cuts were all made with handsaws – panel saws for the straight cuts and a coping saw for the handle. The handle hole was bored out with a brace. I cleaned up and finessed the edges of the boards with my old Type 11 Stanley No 5.

When it came time to glue the three boards up, I knew I’d have a problem with the angles and the clamping pressure. My solution was pretty easy, though. I clamped the walnut board from handle to tip – not hard enough to crush the end, but just enough to make it sturdy. Then when I applied glue to the edges and clamped the boards across their width, the maple boards slid down until they hit the first clamp and then I was able to draw them tight.
I squared everything up with new measurements off the center line and trimmed it up with a backsaw and my Veritas low angle block plane. It was a fun exercise to do this all with hand tools, but if I make more in the future I’ll likely speed it up a little by using the drill press and bandsaw on some of the cuts.
I wanted to include some food safe wood butter with the cutting board and figured it would be a project the Tiny Human™ could assist me with. I pulled out my big block of bees wax, a bottle of food-safe mineral oil, and my double boiler kit (a hot plate, a handled pot, and a bowl with ring handles, all picked up at Goodwill for $5). We estimated about 2oz of wax (1/8th-ish of the 1lb block) and about 8oz of mineral oil, added both to the bowl and set the bowl in the pot (half filled with water) and turned the hot plate on medium.

After a while, the wax melted and the Tiny Human got to stir it all together. Then I poured it into small jars that used to contain delicious artichoke hearts. Once it cooled, it was ready to go.

After a bit of sanding, the board was ready for wood butter. I also added four little rubber sticky feet to the bottom of the board so it wouldn’t slide around in use.
I think the end result looks tops.
And as much as I enjoy working with wood, as much as I enjoy making things for other people, I REALLY love it when the recipient loves using the things I make for them.

Knife with zircote handle also by the Kilted Woodworker, by the way…
TKW
The Power Of The Fourth

I enjoy all aspects of a project – design, wood selection, construction, and finish. I like the fourth aspect best when it is hard to mess up. And you need to not mess it up because your finish can make or break your project! It’s important enough that many professionals send their pieces out for finishing. That leaves the rest of us to do it on our own.
If I’m not at all worried about the durability needed on the top of a dining table or end table, I’ve been using beeswax and a pollisoir when I can for a pleasant, tactile finish. But when it needs to have a bit more protection, I tend to go with a wiping finish of some sort – usually a varnish, but sometimes a 1lb cut of shellac.
When I have the option, I always go with the glossy version of a finish. It doesn’t muddy the figure in the wood and if you don’t want it to be glossy in the end, you can rub it out with 0000 steel wool (or the nylon equivalent) to bring it back to a semi-gloss or matte finish. You can never start off with a semi-gloss or matte finish and then try to make it glossy later. Well… you can make the top of it glossy, but you’ll have already lost some of the clarity of the final product.
Earlier this year, my best friend turned me on to Amazon’s prices for Birchwood Casey Tru-Oil stock finish. I picked up a 32oz bottle for under $20. This is one of those finishes that, if you follow the directions pretty closely, it’s hard to screw up. You can apply it with cotton rag or foam brush, you can re-apply after a few hours, and it builds up a protective, glossy finish in no time. Plus, it has a good shelf life, so I’ll easily use all 32oz before it goes bad.
If finishing a project has always been a challenge for you, you might consider picking up a bottle of it the next time you need to get some more finish. It’s hard to beat for the price.
TKW
* As with any oil finish, be aware that it will darken the wood just a bit and that you have to properly dispose of oily rags. Also, I don’t make any money from Amazon sales and I didn’t receive this finish for free or at any discounted price. Just piping up about a good deal.
Pangur Ban – The Scholar and His Cat

In the 9th Century, an Irish monk wrote a poem about his relationship with his white cat, Pangur Ban (Ban meaning “white” in Gaelic). There are several translations. I like this one the most…
(Translated by Robin Flower)
I and Pangur Ban my cat,
‘Tis a like task we are at:
Hunting mice is his delight,
Hunting words I sit all night.
Better far than praise of men
‘Tis to sit with book and pen;
Pangur bears me no ill-will,
He too plies his simple skill.
‘Tis a merry task to see
At our tasks how glad are we,
When at home we sit and find
Entertainment to our mind.
Oftentimes a mouse will stray
In the hero Pangur’s way;
Oftentimes my keen thought set
Takes a meaning in its net.
‘Gainst the wall he sets his eye
Full and fierce and sharp and sly;
‘Gainst the wall of knowledge I
All my little wisdom try.
When a mouse darts from its den,
O how glad is Pangur then!
O what gladness do I prove
When I solve the doubts I love!
So in peace our task we ply,
Pangur Ban, my cat, and I;
In our arts we find our bliss,
I have mine and he has his.
Practice every day has made
Pangur perfect in his trade;
I get wisdom day and night
Turning darkness into light.
And it seems an appropriate time to post such a thing, as I try to get back into my woodworking and writing and as we have added a new member to the kilted family.

This is Isabeau (named after the character in Ladyhawke), a mask-and-mantle bicolor tabby. She is just 5 mos old right now and seems to be adjusting well to her new surroundings. After a day confined to just a bathroom, I think I’ll give her a little bit of roaming room in the basement this evening. We will see about the rest of the condo later this week.


In the mean time, the Tiny Human (tm) is enjoying her and she seems to be doing quite good with him, as well. She has a solid motor on her and I’m hoping she won’t be too timid to be in the shop with me when I’m working with hand tools.

TKW
More Work With Studio D, Part 5
With the tops properly thicknessed, jointed, and cut to size, I began work on the butterflies. The first task was to make more butterflies. I began doing so with the remains of a small plank of bog oak I had left over from another project (a commission I have Caleb James, Planemaker working on). As I made some cuts to free butterflies from their matrix, I paused to admire how great a job my old bandsaw was doing.
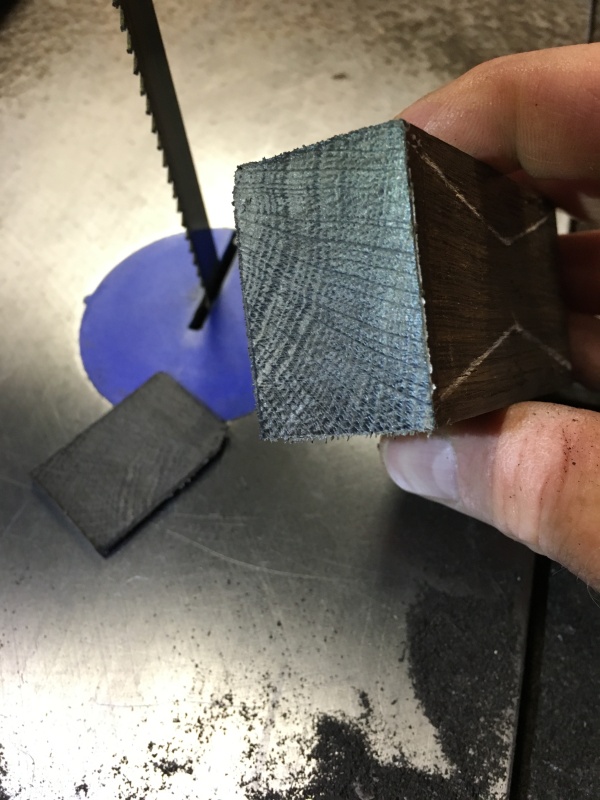
Nice, clean cuts!
Apparently Karma thought I was getting cocky, because not two minutes later my blade broke. ![]() The blade breaking was not in itself such a problem. It happens. It was an old blade and it broke at a patched weld. No, it was a problem because I had absolutely no idea where my other bandsaw blades were. At some point during my move into the condo, they were boxed up… and that’s all I knew.
The blade breaking was not in itself such a problem. It happens. It was an old blade and it broke at a patched weld. No, it was a problem because I had absolutely no idea where my other bandsaw blades were. At some point during my move into the condo, they were boxed up… and that’s all I knew.
I spent three hours looking through all of my boxes with woodworking equipment and tools for my other bandsaw blades – multiple times, actually – all to no avail. I growled in frustration and begrudgingly drove to Woodcraft to pick up a new blade.
An hour after installing the new blade, I found my other blades, in a box I’d checked three times but apparently hadn’t fully opened to see the blades quietly sitting on the top at the other end of the box.

Masters of ‘Hide and Seek’…
*sigh* Regardless, I was back in business and quickly made a kaleidoscope of butterflies…

A kaleidoscope of butterflies… (and some scrap off-cuts I probably won’t throw away)
After cutting them on the bandsaw, I use a bench hook and a sharp chisel to pare the sides smooth and add just the slightest chamfer towards the bottom of the butterfly on all sides. This chamfer is usually not more than one or two thousandths of an inch.
With butterflies all in order, I laid out some butterfly options to stabilize the split knot in the hall table. Everyone has their own methods for figuring out where to put these inlays – mine is to lay them out in various ways and take pictures, then examine and compare the pictures to see what looks best while also stabilizing the intended area.
In this case, I decided on two butterflies. Sticking them down in place with double-sided tape, I traced the bottom edges of the butterflies with my large Blue Spruce marking knife and then removed the inlays.

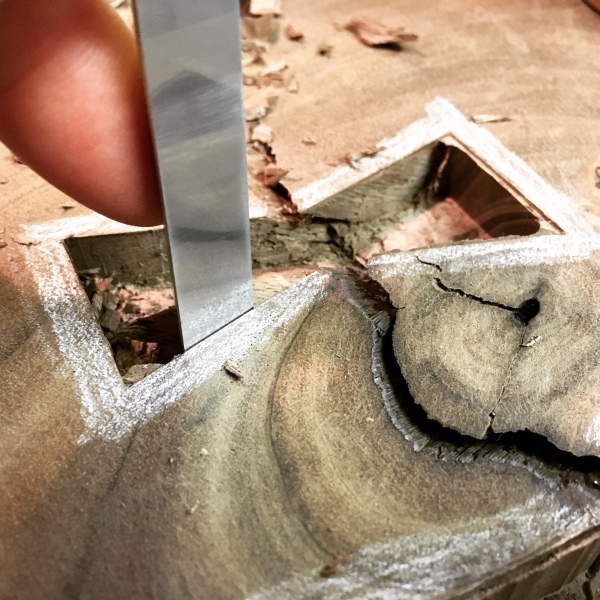
In order to properly delineate the edges of the mortises I needed to make, I chiseled out a wedge of wood along the entire border of each butterfly and used white pencil to highlight the wood to remain.

In preparation for removing the bulk of the waste with a (corded) router, I drilled a series of holes in each end of the butterfly. Chopping out the waste between the three holes leaves me a place to drop in my router bit. I have to do this because I’d rather use my smaller palm router, a Bosch 1608 edge trimmer, which does not have plunge capabilities, than my larger Bosch 1617.

After removing most of the waste with the palm router, I’m left with the smallest amount of wood along each edge.

This remaining waste is easily removed with a sharp chisel.
Once I have the waste removed, I fitted the butterflies in place and tapped them in about 1/8” or so to make sure they fit. They did, so I pulled them back out, added glue to all of the walls of the holes, and cautioned them to fall into place without a fight by showing them my joiner’s mallet. That didn’t work, so I had to resort to seating them with the mallet and a scrap of wood. They didn’t put up much of a fight and I could tell they were a very tight and pleasing fit.

They seated so well, in fact, that I didn’t wait but a minute to begin cutting them flush with my Veritas flush-cutting saw.

After a little bit of work with a block plane and some sandpaper, I’m left with this.

Not bad. I had a paper-thick gap on the end of the top butterfly and a tiny corner chip out on the near one; these things are easily fixed with a minor bit of epoxy later on.
Now to start on the smaller end table…
TKW

