(Blued the) Back In Black
(Hold on to your butts… I’ve had the Single Parent Pants on for a week now, and apparently sleep deprivation is cumulative.)
Blued the back
I made it black
Rusted too long I’m glad to bring it back
Yes the, handle’s loose
missing screws
Joe knows what he’s talkin’ about
Open windows up wide
Finish getting me high
Forgot Moses T’s uses turpentine
I’ve got, taper files
Slim styles
Sharpened teeth seen gleaming for miles
‘Cause the back
Yes, It’s black
The back is black
Blued the back to black
(I’m just going to let that soak in for a bit while Angus does his shuffle thing…
What’s that? You want to go back and re-read it now that you have the timing of the music? I’ll wait…
OK, better? I think we’re ready to move on. Even if we’re not, we probably should.)
Previously, on The Kilted Woodworker…
I found a miter box.
And a saw.
Fixed up the miter box.
Disassembled the saw.
Cleaned the brass.
Cleaned the tote.
Now on to the plate and the back…
Apparently, when someone discusses their steps for cleaning up a saw plate, they skip a lot. Or, maybe it’s just easier to say, “I sand both sides of the plate through the grits, using 180, 220, 320, 400, 600, and 800,” and leave it at that.
This is one of those “easier said than done” situations. I’m just glad I didn’t have to worry about saving an etching – there wasn’t one. Don’t get me wrong – it isn’t exactly complicated work. First you remove the tote. If you’re going to remove the back, then do that and find a nice flat surface to lay the plate on and get to it. I’d recommend using a cork-backed sanding block and some melamine for an easy-to-clean flat surface. If you’re not going to take the back off the plate (something I’m not comfortable with doing just yet), then it is slightly more complicated as you have to provide clearance for the back when laying the saw plate flat. I just laid it off the edge of the melamine board, so… maybe it wasn’t that much more complicated.
Then… start sanding. Lubricate with WD-40 or low odor Mineral Spirits or some such thing (WD-40 worked better for me).
Keep sanding.
And… more sanding.
(Seriously, it seemed to take forever.)
Still sanding.
You know you’re doing it right if you’re finishing up with that 600 grit, staring at the 800 grit, and thinking to yourself, “Psh… 600 grit looks juuuust fine.” Only pure dedication takes you through 800. We are hobbiests; don’t feel badly if you stop at 600.
I didn’t. (Feel badly, that is.)
Oh, and I sanded the back to those levels at the same time. It was easier that way (vs. doing the back later) because I already had the appropriate grits out and ready to go. I also took a steel brush and scrubbed at the teeth as best I could. I’m still not totally sure I did that properly, but… we’ll see.
Once you get the plate and back the way you like them, go put on a pair of the blue nitril gloves. I mean… take off the old blue nitril gloves you were OBVIOUSLY wearing for the first part (because nothing shows off dried, chapped, winter hands like a bit of grease slurry stain on your fingers and hands!) and replace them with some clean ones. If you weren’t wearing gloves before, just know it takes about five or so days for that staining to finally go away.
Then get out your bottle of Krud Kutter and spray everything down really well. I used the green mesh pad on the back at that point, because I wanted to get it as clean as I possibly could. Then wipe off every last bit of leftover grease and dirt and sanding detritus When you’re bluing the back, you want it clean – clean as you can get it – so the bluing doesn’t show off your fat thumb print right next to the words “Cast Steel”. (That’s one of those easy lessons I learned by reading how someone else did it wrong.)
I’m all about ease and convenience, so when it came time to get my bluing agent, I took the easy way out. I went to a local gun store and bought a gun bluing kit by Birchwood Casey. It cost me $14 and came with everything I needed, if I didn’t already have it – bluing/rust remover, degreaser, bluing agent (in paste form, which was easy to control), sandpaper, 00 steel wool, wool applicators, and a final rubbing cloth. (I used my own 0000 steel wool and sandpaper instead of the supplied material.) I should be able to blue the next 10 back saws I come across with the amount of agent I have left over.
If you have not removed the back, you have to tape off the plate. I used blue painter’s tape. I set it right where I wanted it and then pressed down hard several times to create a tight seam to keep the bluing off of the plate. Then you want to set everything up so you’re not scrambling for anything when you have bluing sitting on your back. I laid out fresh newspaper, tore off a few sheets of paper towels, used an old plastic lid to squeeze some of the bluing paste into it, and wiped down the back one more time. Then it was time for the moment of truth.
Deep breath. I swabbed the wool applicator through the bluing paste, held my breath, and started applying it to the back. I figured more was better, so I didn’t go easy on it (likewise, I didn’t paint it on, either). Make sure you don’t skip the two ends!
Then all you have to do is wait 30-60 secon… oh-shit-i-forgot-to-get-a-clock.
One Mississippi, two Mississippi, three Mississippi… I stopped roughly somewhere in the range of 45, just in case I was counting too slowly or too quickly.
Then I wiped off every bit I could with a shop towel and went over it very (VERY) lightly with the 0000 steel wool. Well, what do you know! It looked pretty damn good! There were a few little spots where it might be coated better, so I went ahead and did a second application (which was done much more calmly, since I didn’t think I could jack it up that much at that point). I counted again (since I still forgot to go get a clock), wiped it off, and went over it once more with the steel wool. And it looked REALLY good!
I removed the blue tape and was happy to see a nice clean line on both sides. Though I was excited to see how it looked put back together, I wanted to give it time to set, so I waited 24 hours before wiping the back down with an oiled cloth and reattaching the tote.
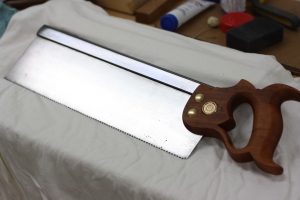
And there you have it, a mostly completely restored 100 year old back saw. Can’t wait to put it back to work! But… it’s not quite done.
In just about a month, I’ll be taking a Build A Backsaw Class with Matt Cianci. My plan is to hold off on sharpening this saw until I can get some one-on-one expert instruction from him during the class. I’ll be sure to give you an update at that time, though.
TKW
(Sorry about the Back In Black bit in the beginning. Hey, at least I wasn’t paraphrasing Beckett!)


Looks great. I’ve got my eye out for a couple of hacksaws. Now I have a good idea how to tackle the refurbishment.
LikeLike
Thanks for the reminder, Richard! I have an old Millers Falls No. 10 hack saw with a turned rosewood handle that I picked up at a garage sale for like $5 that I’ve been meaning to refurbish.
What is it with me and Millers Falls?
Let me know if you get one and work on cleaning it up! We can compare notes on them.
Thanks for reading!
TKW
LikeLike
I have the same saw and it is pretty much the same condition that yours was in when you started, and since I am now jealous of how awesome yours looks I think I know what I’m going to be doing within the next week or two. Great posts by the way, very informative!
LikeLike
Thanks, Chris! Would love to see it when it’s done!
Thanks for reading!
TKW
LikeLike
I would be remiss if I did not also mention Daryl Weir’s website, http://home.grics.net/~weir/saw_restoration.html, for information on saw restoration and sharpening.
The next saw I work on will be the 26″ (or is it 28″? It might be 28″) Disston miter box saw that came with my Millers Falls Langdon miter box. I’m pretty sure it DOES have an etch on it, so I’ll want to be sure and save as much of it as possible.
Also, I seriously need to do some research on this love affair I have with Millers Falls. What’s up with that?
LikeLike
Looks great. I just love the old growth apple grain. About the only think that silky these days is pear.
LikeLike
Thanks, Joe! And thanks for all of the help!
LikeLike
I would have liked to see a photo of the original condition so I can decide if I can make mine look as good.
LikeLike
Bob,
There is a photo of the miter box and saw in “as found” condition two entries back.
Here: https://thekiltedwoodworker.com/2013/02/25/a-momentary-lapse-of-anarchy/
Hope that helps!
Cheers,
TKW
LikeLike
I was interested in the condition of the saw plate. Was it pitted or already quite smooth? The one I have would probably require an attack with emery cloth.
LikeLike
Ah, I see.
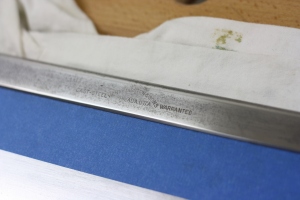
It was not heavily rusted. If you look at the first image in this entry…
… It shows part of the plate. That is pretty much what the whole thing looked like, though there were a few areas with a bit more pitting. They didn’t all sand out. But the only time you’re going to have a perfect plate is when you buy a brand new saw.
My recommendation would be to just start on it and see how it turns out. Take a leap of faith!
LikeLike