i heart pine.
Alright, so I’m finally able to carve enough free time out of my schedule to line up a few projects I want to tackle this year. The primary goal is to get my shop fully set up.
When it comes to our woodworking, I imagine we all have different dreams. Some want the latest tool, whether it is a cabinet saw with finger-saving technology or a made-in-the-USA handplane built to the highest standards, while others have an empty house they want to fill with things they’ve made themselves.
My woodworking dreams are maybe a little unusual. I dream about walking into a shop, bench clear and tools away. I quickly get to work, spending a few free hours on whatever project I have at hand. The cat sits off to one side, batting a curl of walnut shaving around when she gets bored with trying to get treats out of me. Then I put everything back in place before sweeping up and hitting the lights on the way out the door. The next time I get a few hours of shop time, I walk into the shop and pick up right where I left off without having to search through benches and shelves, looking for whatever tool it is I need.
In my dream, everything is nice and orderly. I can bring my 3-year-old son down to watch me work, even help me with a project, without being overtly concerned about his safety because I don’t have crap laying around everywhere. I dream of peace, calm, and serenity – someplace I can go that helps me reduce stress and frustration, not add to it.
Go big or go home, right? Well, let’s start with the heart of the shop and build my new workbench. Late last year, I stopped by fellow woodworker Scott Wunder’s shop/local lumber paradise to sort through some reclaimed heart pine beams he had in stock.

Antique heart pine, not quite fully reclaimed…
Ooooh! I heart reclaimed heart pine! He agreed to bring it all down to the same thickness before I took delivery, which I did this past weekend…

The top is on the bottom, the stretchers are on top, and the legs are in the back…
It isn’t quite ready for gluing up, though. One of the beams has a few (5) nails in it that broke off during the nail extraction process. I could try and work around them and/or bury them in the top, but I’m going to dig them out, instead. Some of the edges of the pieces I’ve selected for the top (the five boards set edge-to-edge towards the front) need a bit of jointing before they will come together properly, as well.
Honestly, it isn’t the prettiest wood. It has lots of character, to put it nicely, but that comes with working reclaimed lumber, right? I don’t mind if it’s a little rough on the legs or the stretchers or underneath the top, but I will probably end up chopping out a few of the spots that will interfere with a clean, flat bench top and inlay some dutchman patches. If anything, I can always use the additional inlay practice!
The end result should be a top that is about 3″ thick, 20″ or so wide, and just around 7′ long. That sounds rather nice…
Book Review: Hand-Applied Finishes

Hand-Applied Finishes
Hand-Applied Finishes
by Jeff Jewitt
There are books in my library I like to re-read every now and again, just to keep certain ideas or techniques fresh in my mind. If it has been a while since I’ve started a new project, one of the first books I’ll pull out is Jeff Jewitt’s book, Hand-Applied Finishes. I like to review the dog-eared pages in this book before I even pick out the wood I’m going to use.
Why? Because one of the most important aspects of your project is the finish you put on it. It’s the first thing anyone touches. It is the first thing anyone sees (or doesn’t see). It protects your project from abuse and the elements. And, to some degree, the finishing technique you want to use should play a part in determining which species of wood you use (or vice versa, if you’re dead set on using a specific species of wood).
One of the things I like about Jeff’s book is that it is easy to read. I don’t just mean the line spacing and page color/composition and slight serif text is easy on the eyes (which it is); I’m also referring to how clearly and concisely he writes. There isn’t a lot of fluff to muddy his ideas and the Contents page gives testament to how well the book is organized. You want to know about varnish? Turn to page 111. Need to control stain penetration? Page 60. Have a finish to repair? Page 169.
Each chapter focuses on a different finishing method. Each method is broken down further to (briefly) explain its chemical composition, go over when such a finish might be used, and then describe the best techniques for applying that finish. Most of the images in the book are used to help explain techniques, so I don’t mind that they are in black-and-white. The one exception to this is Chapter 3, which, appropriately enough, focuses on stains and dyes – that chapter does have color pictures.
For those of you who don’t ship your finished project out the minute the finish is no longer tacky, the last chapter on maintaining, cleaning, and repairing finishes will come in very handy. Of course, with a three year old running around, the section on repairing finishes still sees a lot of use in our house.
Hand-Applied Finishes, published by the Taunton Press, is neither large (standard 8”x10”) nor thick (under 180 pages). It is a perfect reference book for someone like me; that is, someone who doesn’t complete too many projects in a year, doesn’t like messing with spray finishes, doesn’t have the space for a separate spray booth or finishing room, and is always just a little nervous about one of the most important steps in completing your project. It is a highly-used and highly-recommended book in my library.
Bandsaw Tune-up – Part 2
In regards to the bandsaw tune-up, I decided to take a few more pictures, give you a brief description of each upgrade that was done to the bandsaw, and discuss any challenges we encountered along the way. You don’t mind more pictures, do you? Thought not…
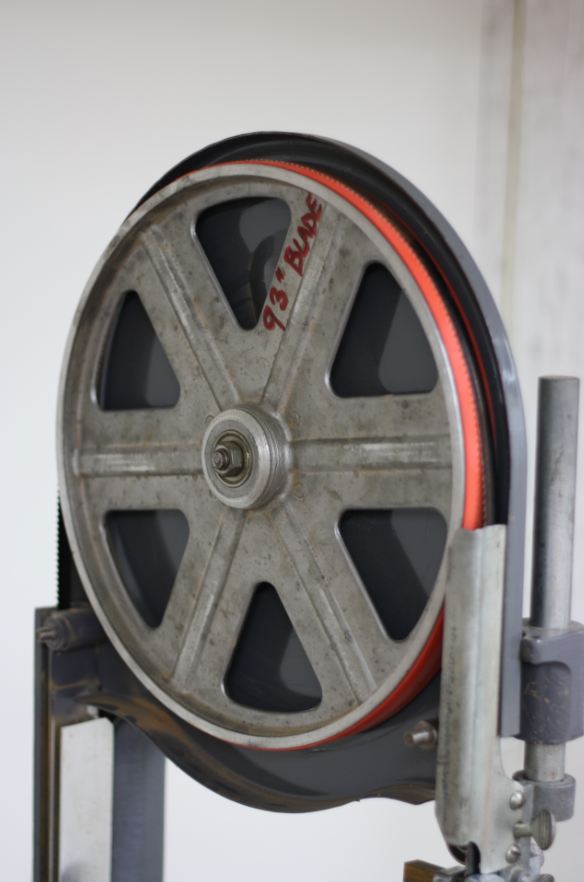
The top wheel with the new tire…
Dan worked on replacing the old rubber tires on the upper and lower wheels while I tackled the pulleys. A lot of the old rubber came off quite easily, but he needed a clean surface for the new tires to grip, so he had to get every last bit of it off. I tried to pay attention to what he was doing when I could, but I also didn’t want to get too distracted from my own tasks. So I can’t say it with 100% certainty, but it looked like he was pressing a flathead screwdriver to the wheel, then spinning the wheel, using the screwdriver like a scraper. That did a good job of removing the rest of the rubber and then he only had a few little bits here and there to deal with.
When it came time to put the new tire on, he was able to stretch it on without soaking it in hot water or heating it up in any way. Then, in order to equalize the tension in the tire all the way around the wheel, he inserted a small cylinder (in this case, it was a small baton-style flashlight) under the tire (i.e. between the tire and the rim) and ran that around the rim a few times. Both tires went on with relative ease. And because of the way they are designed, I didn’t need to do anything to give them a crown.
Here is the motor shaft pulley (also known as “the little pulley”)…
While Dan worked on that, I pulled off the old aluminium pulleys (which I gave to Dan, so I don’t have any pictures of them; sorry) and replaced them with the new cast iron ones. The only real problem I had was that someone had beat on the aligning pins with a metal hammer at some point, and they were both mushroomed out on the ends. This made getting the old pulleys off difficult and it made getting the new pulleys on pretty much impossible! But after a few minutes of work with a double-cut file, and an ample amount of WD-40, they slid on without any problems.

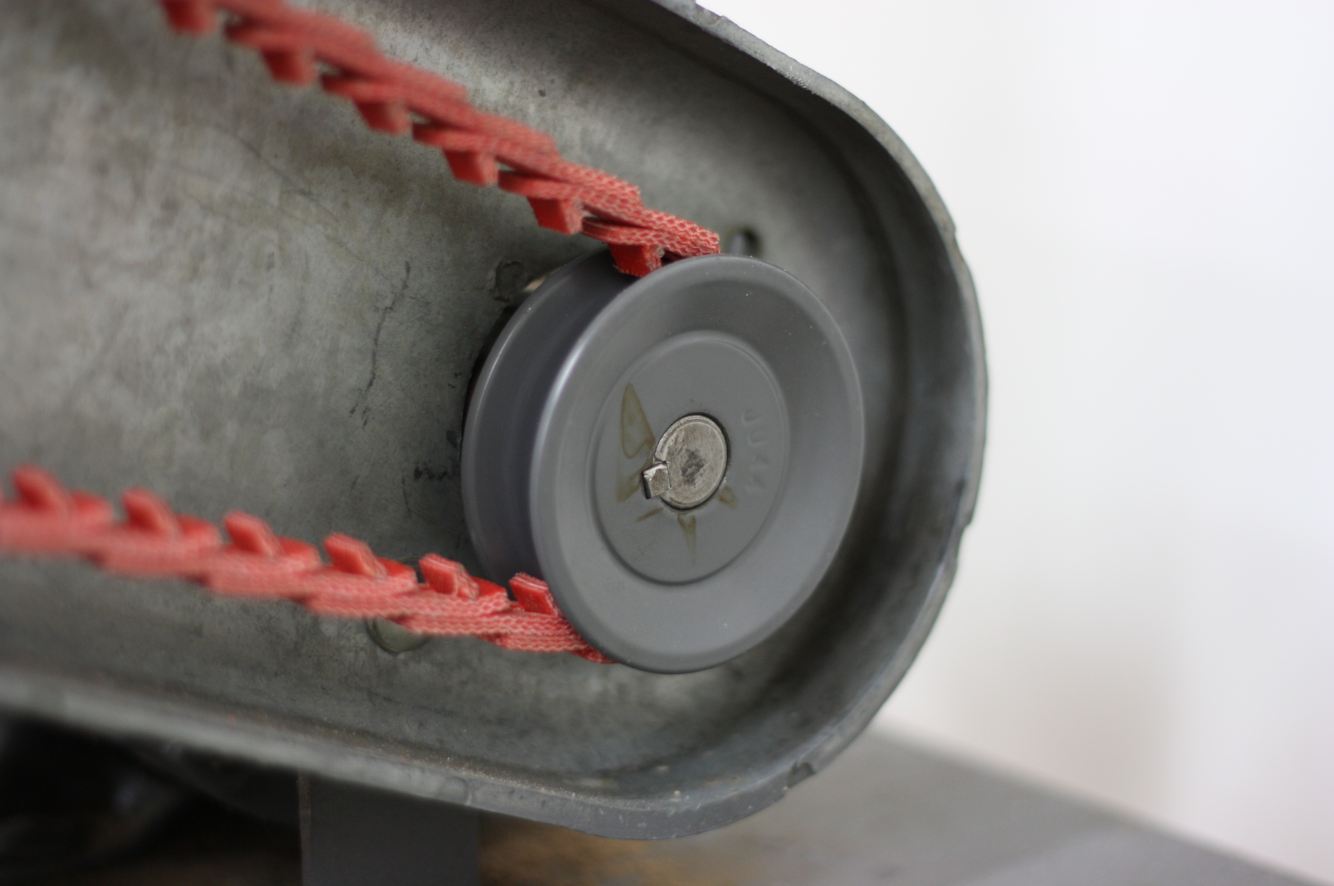
The link belt installed (also a good view of the lower wheel shaft pulley (or, “the big pulley”)…
Since I was already working on the pulleys, I went ahead and installed the Powertwist Link belt, as well. If you’ve never installed a link belt before, there are really only two things you need to know about them – the smooth side goes on the outside and there is a right direction and a wrong direction. It was easy to figure out which direction to install mine, since it had little arrows printed on the side every few inches. If your link belt does not have arrows, then just take note of the picture. The large pulley is spinning counterclockwise (as is the smaller pulley, funny enough), so you want the double-prongs of the Y-link to point in the direction the pulley spins. That’s easy to remember, right?
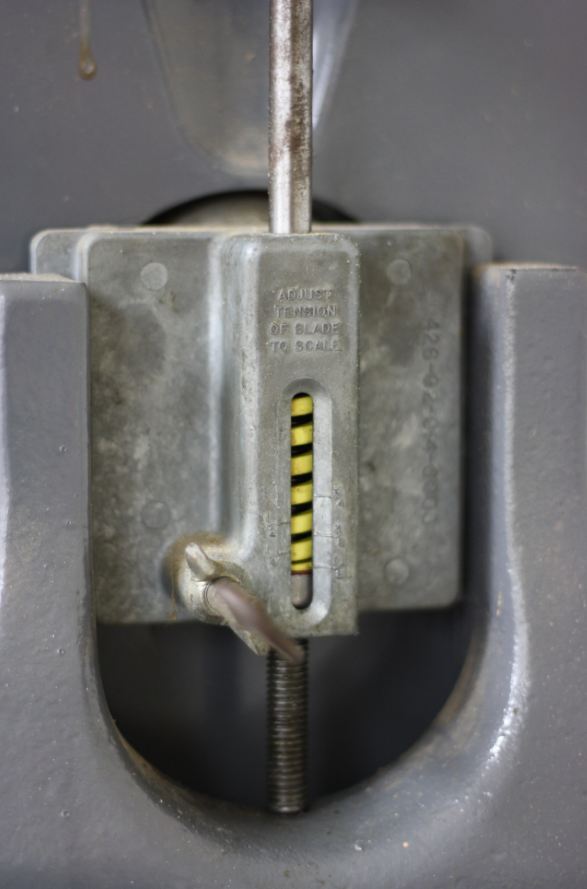
A stronger tension spring makes it easier to put things… under pressure.
If you can unscrew threaded rod, then you can replace the tension spring. Really, I’m not sure there is much I can say here but to remove the old tension spring and drop the new one in place. Do note that if you replace the standard spring with a much stronger high tension spring, like I did, then the factory tension marks on the window around the spring might not be accurate anymore.
The wheel brush was pretty simple to install; there was really only the one place where we had room and something to attach it to. In this picture you might also be able to tell the blade guard had snapped off at some point and was fixed with a piece of aluminium. That just made drilling the mounting hole a little easier.
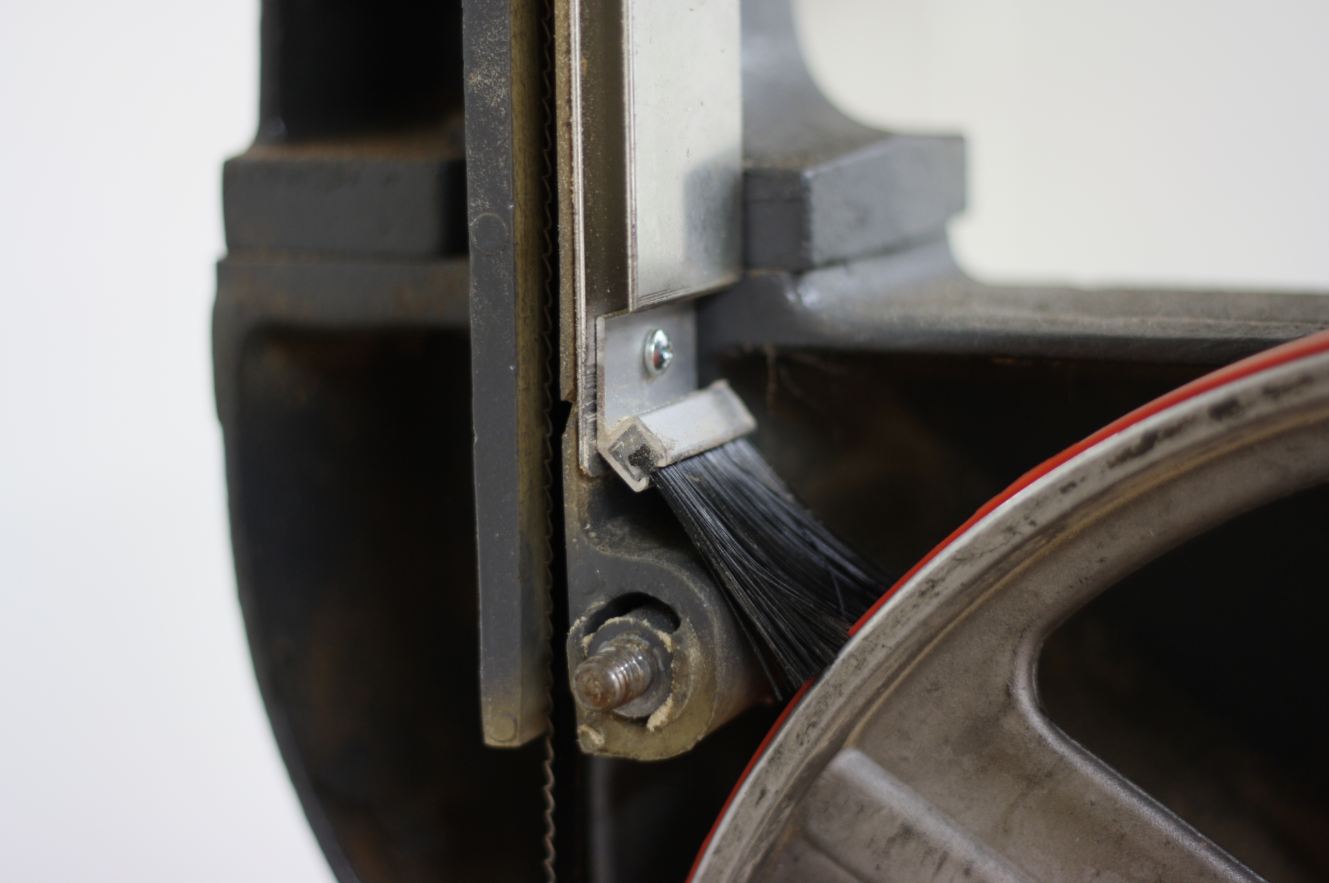
The wheel brush… helpful? Meh… probably not.
The last adjustment we made, the guide holder, was pretty straight forward, as well. You just have to loosen a thumb screw, pull out the old guide holder and slide the new one in place. Mine seems to be really close to the blade on the right; Dan didn’t think it was an issue, so I’m not going to worry about it. The nice thing about using wood for your guide blocks is that you can practically press them to the saw, counting on the saw to cut a small kerf for the tooth set the first time you start it up. After that, the self-lubricating lignum vitae should keep the blade running true for a long time.

A little snug on the one side, but it works…
There are a few things I still need/want to do to this thing before I call it “done”. Dan showed me where the original leveling pin had been broken off, so I need to replace it. The leveling pin is an adjustable stop that indicates when the table is 90 degrees to the blade. It makes it easy to return to level if you have to adjust the table angle for any reason (or remove it). While I’m ordering that part from Iturra, I figured I’d get a few of the phenolic inserts he sells so I don’t have to use the original metal one. I was thinking about getting one of the commercial tension adjusting handles that essentially ends up adding a crank wheel to the tension adjuster, above the level of the upper wheel house, so you don’t bang your knuckles on the back when you adjust the tension. Dan said I could save some money by just replacing the threaded rod with longer threaded rod and then locking the handle in place with double-nuts. I’m still undecided there. The last thing I want to eventually add to the table saw is a fence. I’m thinking I’ll go with the 18″ Kreg fence; it seems like it would be easy to install and adjust, and that suits me just fine.
Hope you find the extra photos useful. As always, though, if you have any questions, don’t hesitate to ask! If I don’t know the answer, I can always find out.
TKW
Bandsaw Tune-Up
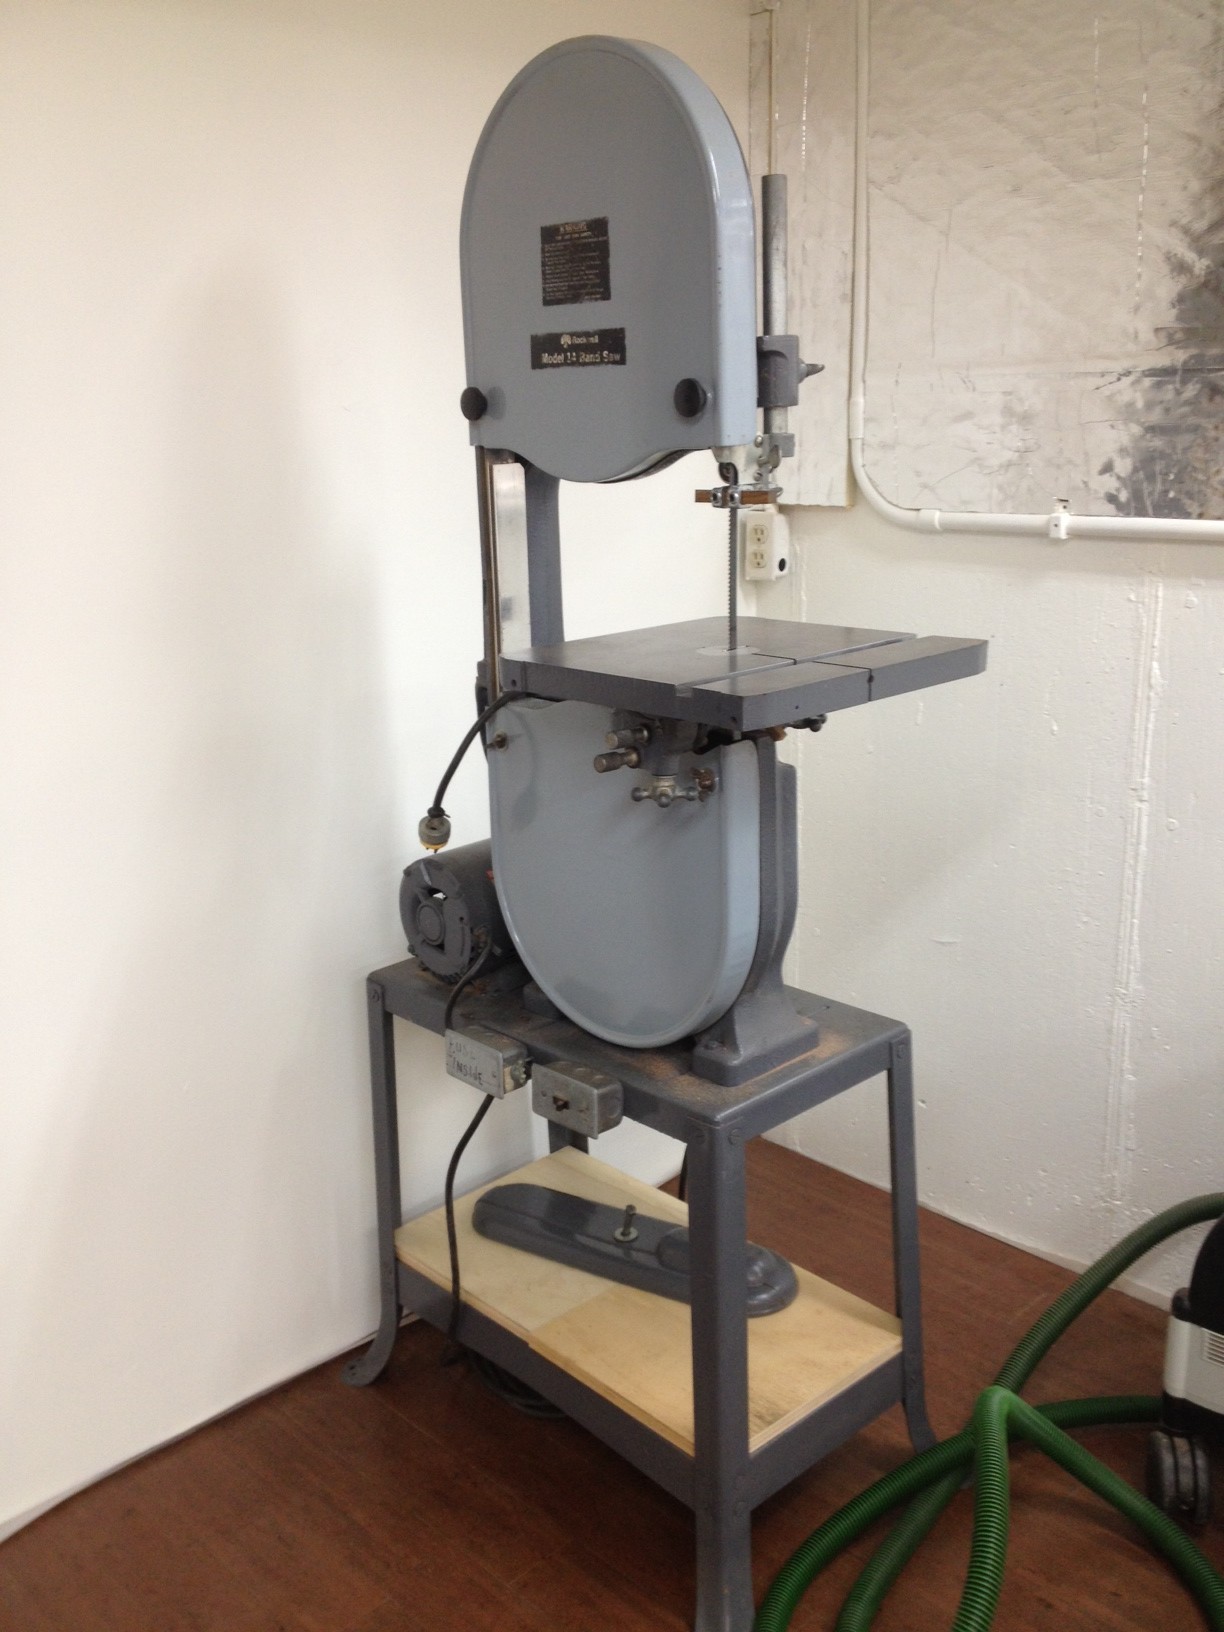
My 1970’s Era Rockwell/Delta Bandsaw…
A few weeks ago, I had a fellow member of the St. Louis Woodworkers Guild come over and help me tune up my late-70’s Rockwell/Delta bandsaw, a project that was some five years in the making. I bought the saw back in 2008, from the wife of my first woodworking mentor, who passed away in 2007. I probably spent too much for what I got, but I knew the money was needed, so I happily paid her asking price. But when I got it home and started it up, the bandsaw vibrated so much I almost couldn’t use it because I couldn’t see the blade properly!
I spent an hour one day checking it over to see what I would need to do to it to get it back in working condition. I noted both wheels had been balanced, which was good, but there were several things I thought I could do to improve performance. I jotted them all down, along with some dimensions I would need, and then started looking for a place from which I could buy replacement parts.

I guess they’re on the 15th Anniversary Edition by now…
I’m not sure who originally turned me on to the company (it might have been my first mentor, funny as that would be), but the first place I was told to contact was Iturra Design. They said it would cost me a few dollars ($8, I believe), but I was told it was completely worth the cost. So I called and had them send me a catalog. And it was worth the price! I wouldn’t call it a catalog so much as a treatise on how to tune up your bandsaw, that thing is so full of information! Of course, it also has information on any and every part you might need to replace on a bandsaw.
(Note: I should mention at this point that Louis Iturra is still a bit old-school, when it comes to his business. He does not have an on-line presence, other than an e-mail address. He has a phone number and offers excellent customer service, though, which is good enough for me.)
Though it lacks a Table of Contents or an Index (at least my version does), it was not too difficult to navigate. I found everything I was looking for in no time and called in my order. From what I can remember, shipping was quite fast and I had the parts within a week. Unfortunately, time mismanagement turned into procrastination and procrastination turned into a forgotten project; so there my bandsaw sat, untuned, for about five years.
Honestly, I didn’t really miss it all that much. When I needed it, I made do with what I had. But when I took Matt Cianci’s Build A Backsaw Class a few weeks ago, I had the opportunity to use an old Rockwell bandsaw to rough out my tote. Man, was that nice. It made me want to get mine running again, so I called Dan, a guild member who was a retired high school shop teacher, and asked for assistance. He offered to come over on a Saturday and help get my saw back in working condition.
He showed up a few weekends later and looked over the bandsaw first thing. Then he said we could do some stuff to it that day, but we’d need to order a few parts in order to make most of the changes it needed. I said, “You mean these parts?” and pulled out the box from Iturra Design. We looked through them to make sure I’d ordered the right parts (I had) and then got to work.
About 90 minutes later, we’d replaced both aluminium pulleys with cast iron versions, changed out the guide holder (the old one had been modified to hold custom circular steel guides), replaced the thrust bearing, switched the old tensioning spring with a high-tension spring, removed the cracked rubber tires and added new urethane bandsaw tires, mounted a wheel brush, and tossed out the old belt in favor of a Powertwist Link belt.

Lignum Vitae Guide Blocks…
When it came time to put new guide blocks in, Dan peeked in the shipping box, then turned it upside down, looking for the replacements I’d ordered. But I hadn’t ordered any; instead, I pulled out a small ½” thick block of quartersawn lignum vitae and told him I wanted to use wood, instead. He shrugged his shoulders, took the block, and went over to the tablesaw to cut some blocks to size. He cut the entire block of wood up into blanks, which left me with a few spares, should I ever need them. After a quick cut with a miter saw for one of the bottom blocks, he installed them and we were ready to give it a try.
Upon startup, the saw was still a little loud for my tastes, but… the vibration was completely gone. We ran a few test cuts through and noted there was no measurable drift in the cut and the surface it left was quite smooth – nothing a few swipes with a jointer plane wouldn’t clean up.
After Dan left, I removed the saw from the base and carried all the pieces down to the basement and re-assembled it in the workshop. It is one of the few power tools I’ll bring into the shop (the other being the drillpress, which will require disassembly for moving, as well). I’ve had a chance to use it a few more times since I moved it down, and I am still 100% pleased with the improvements we’ve made. The only thing I might still modify is to mount it up on hockey pucks to further reduce the vibration (and keep the feet of the base from digging into my cork floor).
If you are looking to make upgrades to a bandsaw you currently own, or want some great advice/information on what bandsaw to purchase before you buy, you should definitely pick up an Iturra Design catalog. You can reach Louis by phone at 904-642-2802 or by e-mail at KALLL@comcast.net.
A Quick Review Of Hand Works 2013
(I apologize for the tardiness of this post. I had a number of important things on my plate that needed clearing before I could get back to writing some blog entries. Honestly, I still have a few priority items to work on, but at this point I can safely divide my time.)
Rather than extol the virtues of Hand Works with extended prose, I’ve decided to try and point out the highlights of the event (my highlights, anyway) in a more abbreviated format…
Why you should consider attending Hand Works (assuming it happens again):
Put A Face To A Name – This is a great opportunity to finally meet some of those people you’ve chatted with via e-mail or whose blog posts you’ve read for the last two years. I was able to finally put a face to a name for fellow blogger, Marilyn Guthrie (SheWorksWood.com), as well as Raney Nelson (Daed Toolworks) and Jason Weaver.

Vendors abound!
Avoid Shipping Charges – After I made plans to attend Hand Works (when it was first announced, back in November of 2012), I looked at the list of vendors that were going to be there and started saving up some money for things I knew I wanted to pick up in the next year. While I was there, I bought a Gramercy saw vise and curved rasp, a Knew Concepts fret saw with a handle by Elkwood, and a Lost Art Press cap, all without paying any shipping charges.
Make Contacts – For one of my woodworking side ventures, I need to start making contacts with people who are in the tool business, whether it is making tools, designing tools, or using tools for a living. It is always easier to begin making these contacts in person. At Hand Works, I was able to spend a little time with Bob Zajicek of Czeck Edge Hand Tools, Ron Bontz of Bontz Saw Works, Raney Nelson of Daed Tool Works, and Tim from Tools For Working Wood.

Don Williams ponders a question…
Learn Techniques – I spent just as much time watching as I did talking that weekend. One place in particular where I spent a bit of time was Don Williams’ table. He did demonstrations throughout the day (both days) and was happy to discuss techniques and tips and such. I got to watch his techniques for using the polissoir in person and also got to see him use a tacking iron to melt wax onto a surface, then clean it up with a wax scraper before buffing it out with a flannel cloth for a super-quick and safe finish. I’ll be giving this technique a try in the near future, so keep an eye out for it in an upcoming blog entry.
I also spent a bit of time watching Raney show someone some tips for setting a miter plane. That will be good information to have for something I have coming my way in the next week or two. (This, too, will most likely show up in a blog entry in the near future.)
Try Out Tools – One of the main reasons to go to Hand Works is because you get a chance to visit a large number of hand tool vendors and makers, all in the same weekend, to try out the tools you are interested in before you spend your hard-earned money on them. Just as importantly for the business end of things, you also got the opportunity to try out some things you have thought about getting before, but never seriously considered. As I walked past Jameel Abraham’s Benchcrafted table, I reached out and gave the glide leg vise (with the Crisscross) a spin. And then I stopped in my tracks. I must have spent the next half hour there, poking and prodding that vise (and the bench), trying it out and picturing putting it to use in my own shop. That right there was enough to sell me on it. (Guess what I’m now saving up for!) I also got to play around with a Brese plane set up on a Tiko Vogt shooting board. Talk about a sweet setup! Unfortunately, it is a bit cost prohibitive for me. Still, it’s nice to see how well something like that works, and it helps to generate ideas I can afford to do in my own shop.
Awesome Door Prizes – Wow, I’ve never seen such an amazing list of door prizes! Anywhere! There were Brese and Daed Toolworks hand planes, Blue Spruce chisels, a Knew Concepts titanium fret saw, a Benchcrafted vise, and the list goes on and on. Rarely have I heard a crowd of 300 people get as quiet as when they were announcing another winner. The only bad thing about the door prizes is that I didn’t win any of them. Ah, well.
Witty Presentations – The lecture/drool fest that took place first thing on Day Two (Virtuoso: The Tool Chest of H.O. Studley) was worth the price of admission alone (if there had been an admission charge, that is, so… actually, it was worth a lot more, like 10x the price of admission). For about an hour, Chris Schwarz and Don Williams presented facts, opinions, and pictures gathered from their complete and almost exhaustively thorough examination of what is probably the most well-known (and lusted-after) tool chest in woodworking history – the one belonging to H.O. Studley. Chris and Don have examined and photographed every single tool and tool location in the chest, in preparation for a book that will be released by Lost Art Press in the not-too-distant future.
Conclusion:
All said and done, I spent about $300 total on food, gas, and lodging for the weekend. Obviously, that doesn’t include tools purchased and your costs will vary, depending on where you live in the country in relation to Amana, Iowa. But it was time and money well spent. I learned a lot, met up with some old friends, made new friends, avoided shipping costs, and had a great time mingling with others in the woodworking community.
I don’t know if it is something I would be able to (or want to) attend every year, but it might be a great thing to alternate with the Woodworking In America conference in Cincinnati. Or maybe I could do a three-year cycle of seeing one, then the other, and then taking a year off from travel for conferences. In any case, if it comes back around, I’ll be sure to attend. And, who knows… maybe someday I’ll be on the other side of one of the tables.
Sam Cappo’s Community Project Complete!
Re-Posting Sam’s last blog entry for his community project…
So glad to see it end up in the hands of one of our nation’s best – someone who puts his life on the line to help protect the freedom the rest of us so thoroughly enjoy but don’t always appreciate.
Congratulations, Albert!
TKW
Book Review: The Woodwright’s Shop
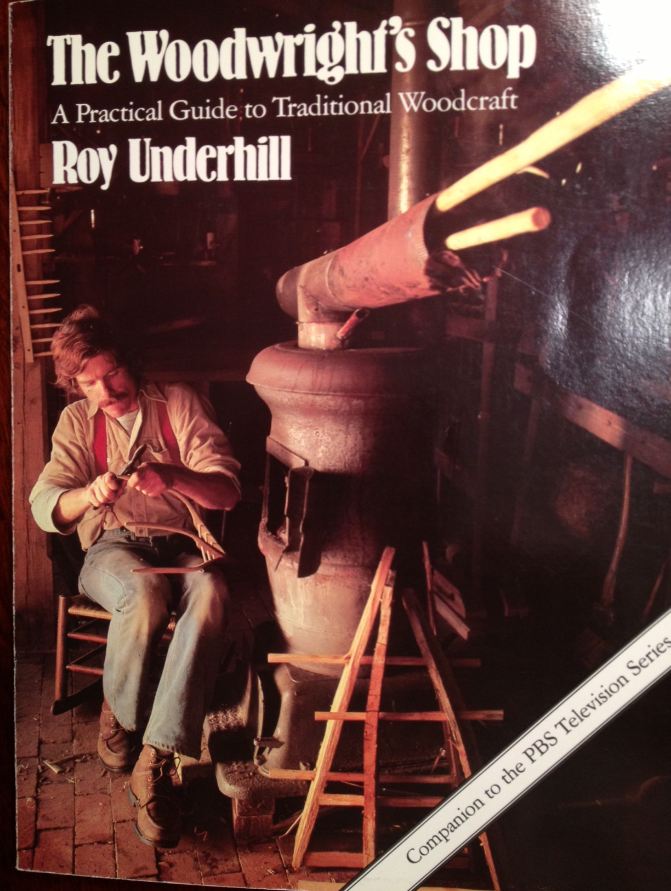
The Woodwright’s Shop
The Woodwright’s Shop
by Roy Underhill
In honor of Roy Underhill’s 30th season on PBS with The Woodwright’s Shop, I thought I’d write a little something about the companion book, under the same name, this month. For those of you who don’t know, The Woodwright’s Shop is often filmed in just one take, with no going back to correct any errors or mistakes or to clarify something that might be confusing. I imagine this is partially done in order to save money, but it also perfectly exhibits one of the more important lessons one can pick up from watching and reading Roy Underhill. Go. Do. Make mistakes. Learn from them, but do not focus on them. And then try again. The show also tries to pack a whole lot of information into each 30 minute episode.
Because of these techniques, the TV show isn’t exactly a complete source of information for making a shave horse or rocking chair or dovetail box. Lucky for us, Roy put out a companion book! The book follows the first season (which, incidentally, is available from Shop Woodworking, along with the second through the thirteenth seasons) in the scope of projects and techniques taught, but takes more time to explain everything in greater detail. It should also be noted that Roy is a bit more nervous in the filming of this first season than he appears now in his 30th one. Again, the book is useful for getting clarification in some of the places where his information on the show may have come across as confusing or where he was misspoken.
Just as importantly, though, the book gives you a healthy dose of Roy’s humor, as well as some great old stories in side bars. Aside from the pure comedic value, this helps to ground the book and instills the impression that you’re just sitting in a room, chatting about woodworking with a friend, instead of having a lesson preached to you about how you should do some technique a certain way. This technique of keeping the book more casual and conversational works well for me; it’s why I enjoy Roy’s books so much. (It’s probably why I like reading Chris Schwarz’s books, too, for that matter.)
The main idea behind The Woodwright’s Shop is to return your mind and spirit back to a time when we were more self-sufficient, a time when we couldn’t just hop in the car and go pick something up at WalMart or Target or a big box store. Starting with just an axe and a tree, we (the collective historical “we”) made our own tools and farm implements (mauls, gluts, shave horses, rakes, and hay forks), we created our own creature comforts (chairs, baskets, and bowls) and we built the house we lived in and the shed in which we stored our tools!
How is this subject helpful to today’s woodworker? In developing a better understanding of these processes, we create a more intimate connection with our primary material – the wood we are using. We begin to learn what species of tree has better qualities for a specific function, whether you are chopping out a glut to help split a log (dogwood) or weaving the seat for your new rocking chair (white oak) or making a maul (hickory). This knowledge of wood properties is easily applied to the project in your garage, whether you are building it with a hand saw or a table saw. And this isn’t just a reading guide; it is a DOING guide! If you were to follow through the book and make every project from this season, you would touch upon pretty much every essential skill in woodworking. I’m sure most of us won’t go through the entire book, making every project Roy covers, but you should consider at least doing a few of them!
For the most part, there is a chapter for every show of the first season. Obviously, there will be some overlap on some of the subjects covered, and a few of the subjects from the first episode (trees and tools) got their own chapters, as the topics are important enough on their own. Otherwise, it is easy to follow along with book and DVD.
Speaking of… In addition to the book, something you might want to consider buying is the first season of the show on DVD. The book is marketed as a companion to the show, but maybe the show should be a companion to the book! Reading about a technique is good. Reading about it, and then seeing that technique in action, is better.
The Woodwright’s Shop has many editions in print at this point; my copy is the 6th edition. This is a good thing, as it means it is plentiful and inexpensive. As of this writing, you can pick it up used off of Amazon for $5 plus shipping. While you’re at it, you might want to consider getting The Woodwright’s Companion, which is based on the second and third season of his PBS show. I’ll cover that book another day.
TKW
Becoming More Green And… Shiny?
We recently had an Energy Specialist come into our house for an evaluation of how efficient our house is and what we can do, if anything, to improve upon it.
The man, let’s call him Tom (mostly because it is his name), spent about two hours on the evaluation. He started in the basement and worked his way up to the attic, checking for specific things and using a thermal imagery video camera to highlight “areas of opportunity” (that’s a phrase I learned back at MCI in the late 90’s; it means “problem”, but sounds nicer on a performance review).

Cold Nose = Happy Shop Cat
The analysis report took a few weeks to turn around. When it was finally ready, Tom provided us with an 18 page document, replete with color photos and descriptive text of problem resolution. It started by indicating the overall efficiency of our house. We have an air leakage rate of 0.19 air changes per hour (the ideal rate is 0.35), which is like the equivalent of having a 10” x 10” opening in the side of our house, 24 hours a day (but one the cats can’t get through). He said that was pretty darn good, considering some people have air leakage rates that are equivalent to a 10’ x 10’ opening (!!!).
I was not completely surprised by these results. The existing efficiency of our house was one of its main selling points for us. Still, it is nice to hear it from a professional.
The document also showed us the primary areas of heat/cold exchange and indicated how we could make improvements to increase efficiency. Interestingly enough, he cautioned us about making the house too efficient, which would require us to figure out ways of occasionally exchanging the air in the house with fresh air.
We had some of the usual suspects, like:
Seals on exterior doors…
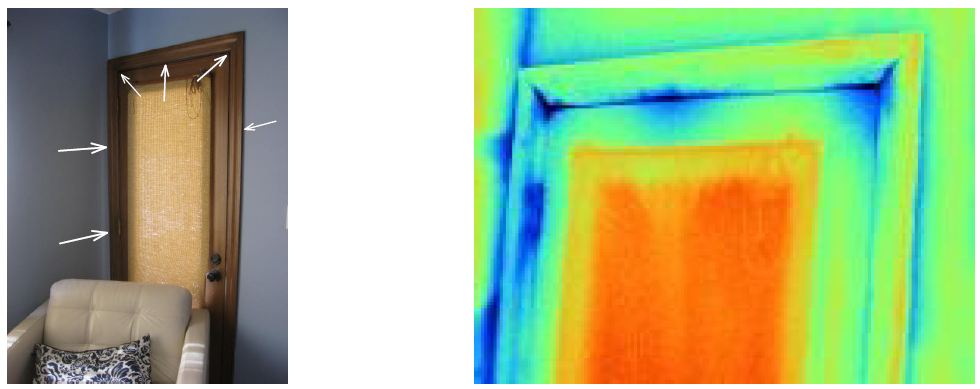
Exterior Door Leaks
… outlets in exterior walls…

Exterior Wall Outlet Leaks
… attic access doors…

Attic Access Door Leaks
… and the fireplace chimney.

Fireplace Chimney Leaks
One interesting item was an HVAC return that was pulling hot/cold/dirty air in from the attic space where the return connected to the top plate of the wall.

HVAC Return Leaks
Most of these leaks were easily addressed with some manual labor, a good amount of silicone caulk, and expanding spray foam insulation. We also replaced two of our bathroom vents (which were so old they were venting absolutely zero air) and insulated the duct work for the vents to prevent condensation in the attic space. We replaced wooden floor registers with metal ones that did not restrict the air flow and added little directional caps to some of the floor vents to prevent them from just blowing air up into the curtains.
One of the Secondary Priority Items Tom recommended doing (which would also make my workshop in the basement more comfortable, thus bumping it up to a Primary Priority Item) was to insulate the top half of the basement walls that were above the frost line with Dow Thermax insulation panels.

Basement Wall Exposed Foundation
I went ahead and had him do this, along with some of the items that involved work in the attic. He was finally able to stop by this last weekend and get that insulation added. I was out of town with Finley, so I didn’t get to see the finished work until later that night. But… I guess I didn’t really think about what that might look like when it was done.

So shiny!
Oh, um…
THAT was unexpected. I suppose it could be worse. Tom said I could paint it or cover it with contact paper, though that would slightly reduce its effectiveness. I don’t know; I’d almost rather leave it the way it is than paint it. So after three days of pondering, I’ve come up with a couple ideas:
- Add some UV lights to my ceiling and tan while I work.
- Purchase two dozen rolls of plaid contact paper and make this place a swanky 1970’s BBC sitcom workpad.
- Pick up a set of the Millers Falls Buck Rogers-style tools and start wearing rope lights while I work.
- Start taking up donations of scrap PSA veneer and slowly create a Studley Workshop.
What do you think? Anyone out there have any ideas? Good or bad.
TKW
(Oh, and as an aside, I am in the process of working on a write-up of the Hand Works event. I also have two book reviews to work on, some information on the Stanley #3 I’m restoring, a saw bench to make, and I need to spend some time with my new Gramercy saw vise so I can review it, as well! But I have a lot of other stuff on my plate right now, so I’ll have to fit them in when I can.)
Handworks is almost here!
Just a reminder that this next weekend, May 24th and 25th, is the first ever (of many, hopefully) Handworks event in Amana, IA.

Photo courtesy of benchcrafted.blogspot.com
At this point, if you’re just now deciding to go, you should seriously consider bringing a tent, because Amana is already a long-weekend destination and this is Memorial weekend. I’m sure most places are completely booked.
If you are headed there, and you know you won’t be spending the entire 16 hours of the event in that huge barn, then you probably want to know what else there is to do in Amana, right?
Well… I’ve no idea. Sorry.
But Jameel does.
http://benchcrafted.blogspot.com/2013/02/handworks-and-amana-experience.html
At the bottom of that blog post is a list of links you might also want to check out.
I fully expect the antique stores to take a hit on their hand tools this weekend. What do you think?
When you’re at Handworks, if you see a red headed guy with white sideburns, wearing an Eager Beaver t-shirt and a kilt (or… just a red headed guy with white sideburns; who knows if I’ll kilt up the entire time – probably not Friday, as I’ll be coming in from a 4-hour road trip and sitting in a car for four hours in a kilt isn’t exactly fun), furiously chatting the ear off some unfortunate soul, stop me and say, “Hey!”
Seriously, I don’t bite.
TKW
Frustration to the Nth Degree…
Flarn Filth Flarn Filth!
Have spent several hours yesterday and today trying to fettle this sod of a plane and if cast iron burned, it would be in my fireplace right now, going up in smoke!
The blade: It seems to sharpen up OK. In fact, I have some nice razor rash free bare spots on my left arm to back this statement up. But after doing some test passes, I’ll examine the edge again and twice now have noted chips in the edge! (Just testing it on a small cutoff of poplar I had laying around, the rest of which never gave me any problems.) It isn’t exactly crumbling, but I don’t think the steel in this blade is good, for some reason.
The plane: It isn’t adjusting properly. The lateral adjuster keeps catching in the slot in the blade, which makes it hard to adjust left or right, and I can’t get it to NOT catch. There is too much slack in the tab in the frog that extends/retracts the blade. Can’t seem to get it reduced in any way and it takes about three or four full revolutions of the adjuster knob to take up the slack when you reverse the direction.
After having spent a few hours trying to figure out how to resolve these issues, I’m starting to think I won’t even bother with it. Happy to offer it up as a parts plane to anyone who wants it, or for anyone who thinks they can fix it. But I’m not going to give such a plane to someone who is new to the craft as their first smoothing plane. That just isn’t right.
So… Tonight I’ll start on Plan B, which is a Stanley #3 (type 13-ish? I’ve not yet properly looked it up, but it is around there; I’ll get the details on it shortly). I’ve had it sitting around for such a project for a while now, as well.
My love affair with Millers Falls is officially exclusive of their hand planes at this point.
First person to ask for the mf’ing MF No. 9 POS can have it, whether it is for parts or torture. For free (well… I won’t pay money to ship it, so you’d have to cover that part or I’d be happy to bring the thing to Handworks next weekend, if you want it and are attending).
Damn… That was a lot of wasted time. BAAAAHHHHH!!
TKW

