Getting A Handle On My Limitations
My friends on Facebook say I always take great pictures. I enjoy such comments, but it is not quite the truth. The truth is, I always take a very large number of pictures and I just post some of the few good ones.
I think, more often than not, woodworkers tend to update their blogs in much the same way. We discuss, photograph, and write about our creations, achievements, and the positive things going on in our shops and do not spend as much time going over the ideas and projects that did not work out. It is not that way because we are trying to deceive, but because we would prefer to talk about our successes rather than our failures.
This is to our detriment, however, as we can learn from mistakes. I try to learn from the mistakes of others; that way, I don’t have to make those same mistakes myself. I am happy to point out and discuss my failed woodworking attempts. I offer these in the hopes that you will offer reciprocity.
In this case, it might be better articulated as a lacking of skills, rather than a failure of process. Or maybe it is a combination of both. In any case, as hard as I tried, I was unable to properly drill the larger holes needed to handle the 3/16 alignment pins.
I only have a few power tools in my shop – a bandsaw, a drill press, and now a lathe (more on that later). The drill press is a bench-top model 15-000 from the early 1960’s. I bought it from the original owner, who kept it in fine condition. Unfortunately, it does not have the capacity to handle a 6 ½” blank along with a 5” long drill bit, so I have been trying to drill the holes by hand with a brace.

I did not have a problem with the 13/32″ holes, so drill bit size probably played a role. I suspect some of the other reasons for my failure are situational, as well, and that I might find it easier to drill a perfectly perpendicular hole were I a) drilling into face grain instead of end grain and b) using a brad point or self-driving bit instead of a twist bit. But the holes, by nature, must be drilled into end grain and I had a hard enough time trying to find a 17/32” twist bit; I don’t know if the other styles are even an option for that size.
Attempt after attempt, I was left with holes that were off-center and just off of perpendicular in the blanks. The result was either a poorly fit or misaligned handle or I would expose the other end of the hole when I was cutting the taper in the blank.

And so, after wasting about six blanks and gaining some incredibly sore shoulder muscles, I put the larger drawbore pin project on hold, just until this weekend when I can get access to a floor-model drill press. I figured while I had the use of the drill press I would go ahead and drill out a few extra blanks and make some additional drawbore pins. Maybe I’ll give away a pair through the blog. Or make a pair for Finley to use when he’s older. Or both.
The other day, I spent some time in the shop with my protégé. (For the record, he suggested wearing his kilt all on his own. Also for the record, I did tear up a bit.) He wanted to make some boats. I showed him how to use the coping saw and we cut a piece of pine into a boat shape.

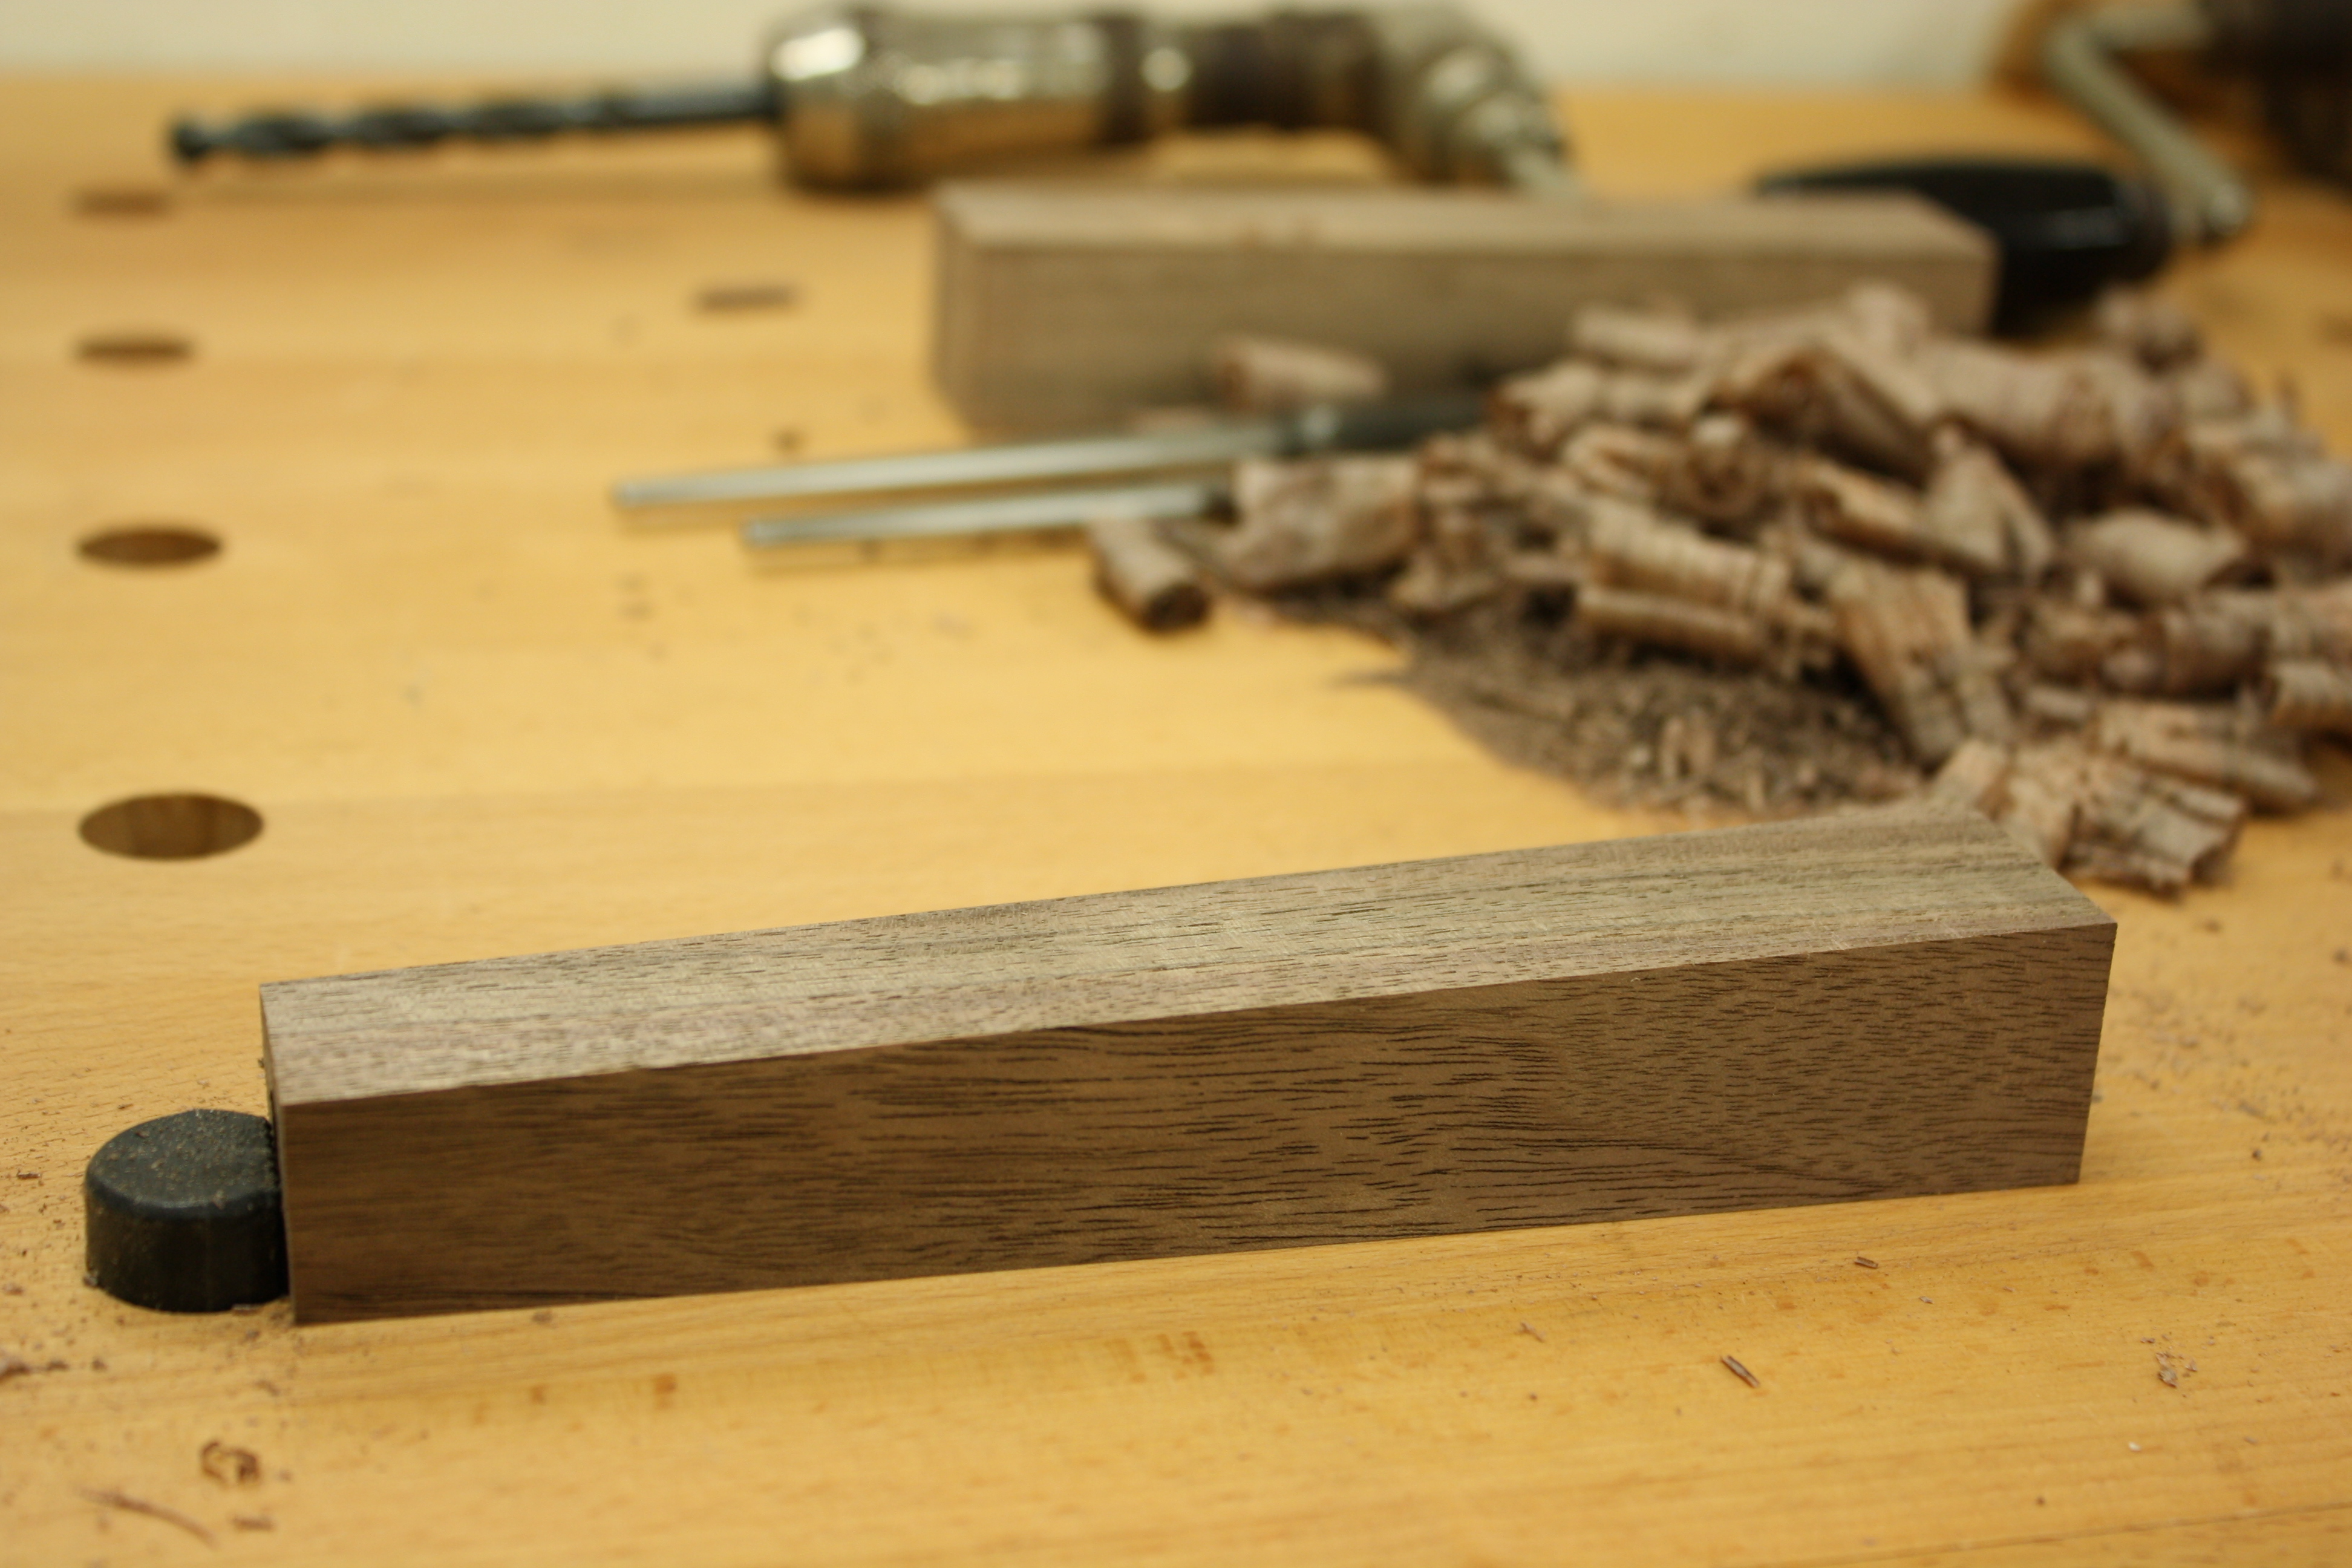
Then we cut up some small blocks of pine, walnut, mahogany, and cherry to use for cabins and such. He went through the box of wood trash I keep near the shop door and grabbed a few additional pieces with shapes he liked. For speed and simplicity, we glued everything together with hot glue. As you can see in the above picture, a piece of tapered and chamfered walnut from one of the failed attempts at the drawbore pin handle got repurposed into the cabin for the large boat.

I couldn’t get him to not make a goofy face. He was very excited to be down in the shop with me, if you can’t tell.
Last night I started prepping a few more handle blanks.
WARNING: If you have any love for the Stanley transitional planes, you might want to stop reading this entry now.
A while back, I saw an eBay listing for a Stanley transitional jointer plane. It was missing the blade and lever cap and the casting was broken. But it had a starting bid of $1.99 with no reserve and I had an idea, so I bid on it. If you can imagine, I was not shocked when I won the plane for $1.99 (plus shipping). When I made my payment, I asked the seller if they would remove the metal parts and just send me the wood, because all I really wanted was the beautiful quartersawn beech I knew was hidden under a layer of filth and dirt.

I figured it would come in handy for making repairs to saw totes. As I was looking through my stash of wood last night, I spied this hunk of wood and realized it would also make for fine drawbore pin handles…


I left it as an oversized block for the time being and gathered up a few other choice pieces of wood.

The two pieces of wood with the white lines along the faces are teak. Back in 2003, I attended a conference for the Society of Technical Communicators (Oh, it was as exciting as it sounds) in Baltimore, MD. I had a chance to visit relatives in Silver Springs and while I was walking down one of the many streets of shops there, I came across a box of wood next to an open door. It was a woodworker’s shop and he made teak patio furniture. The wood in the box was chair and table legs with blown mortises or broken tenons and free for the taking. I had no idea what I would do with it at the time, but I grabbed the largest chair leg I thought I could fit into my suitcase. It sat in my shop for 11 years until I came across it last night and figured a pair of teak handled drawbore pins might be nice. The white lines indicate the two non-tapered faces, which was useful information when I had it on the miter box and likewise will be useful when I’m cutting them down to proper dimensions on the band saw.
The figured mahogany is… well, it’s just some figured mahogany I picked up somewhere. Happens to be big enough for handle blanks and I like figured mahogany, so I thought I’d give it a try. I might root around for a few other pieces of wood this evening.

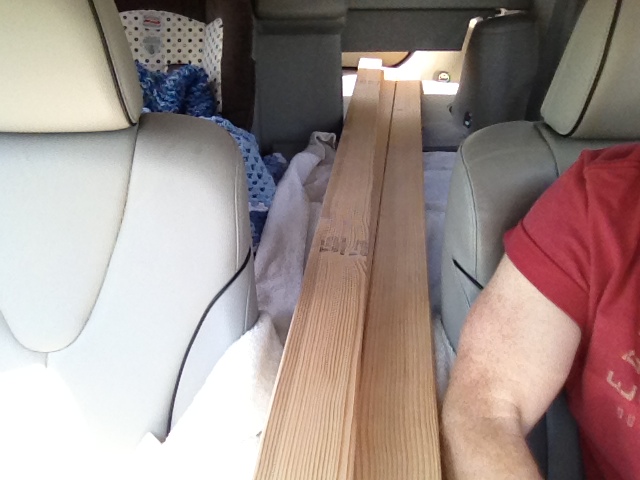
Anyone with keen eye sight AND amazing powers of observation might notice I have located another piece of heart pine beam that is long enough for the bench top (second from the right)! So I don’t need to make any fancy transitions or explanations as to why my bench top has a weird shape. This makes thekiltedwoodworker very happy.
Getting A Handle On Interruptions
A common occurrence for me is that my current project gets a temporary reprieve because there are other, smaller projects I need to finish in order to make the tools I need for the current one. In this case, I want to drawbore the leg joinery for the two workbenches, so I need some drawbore pins.
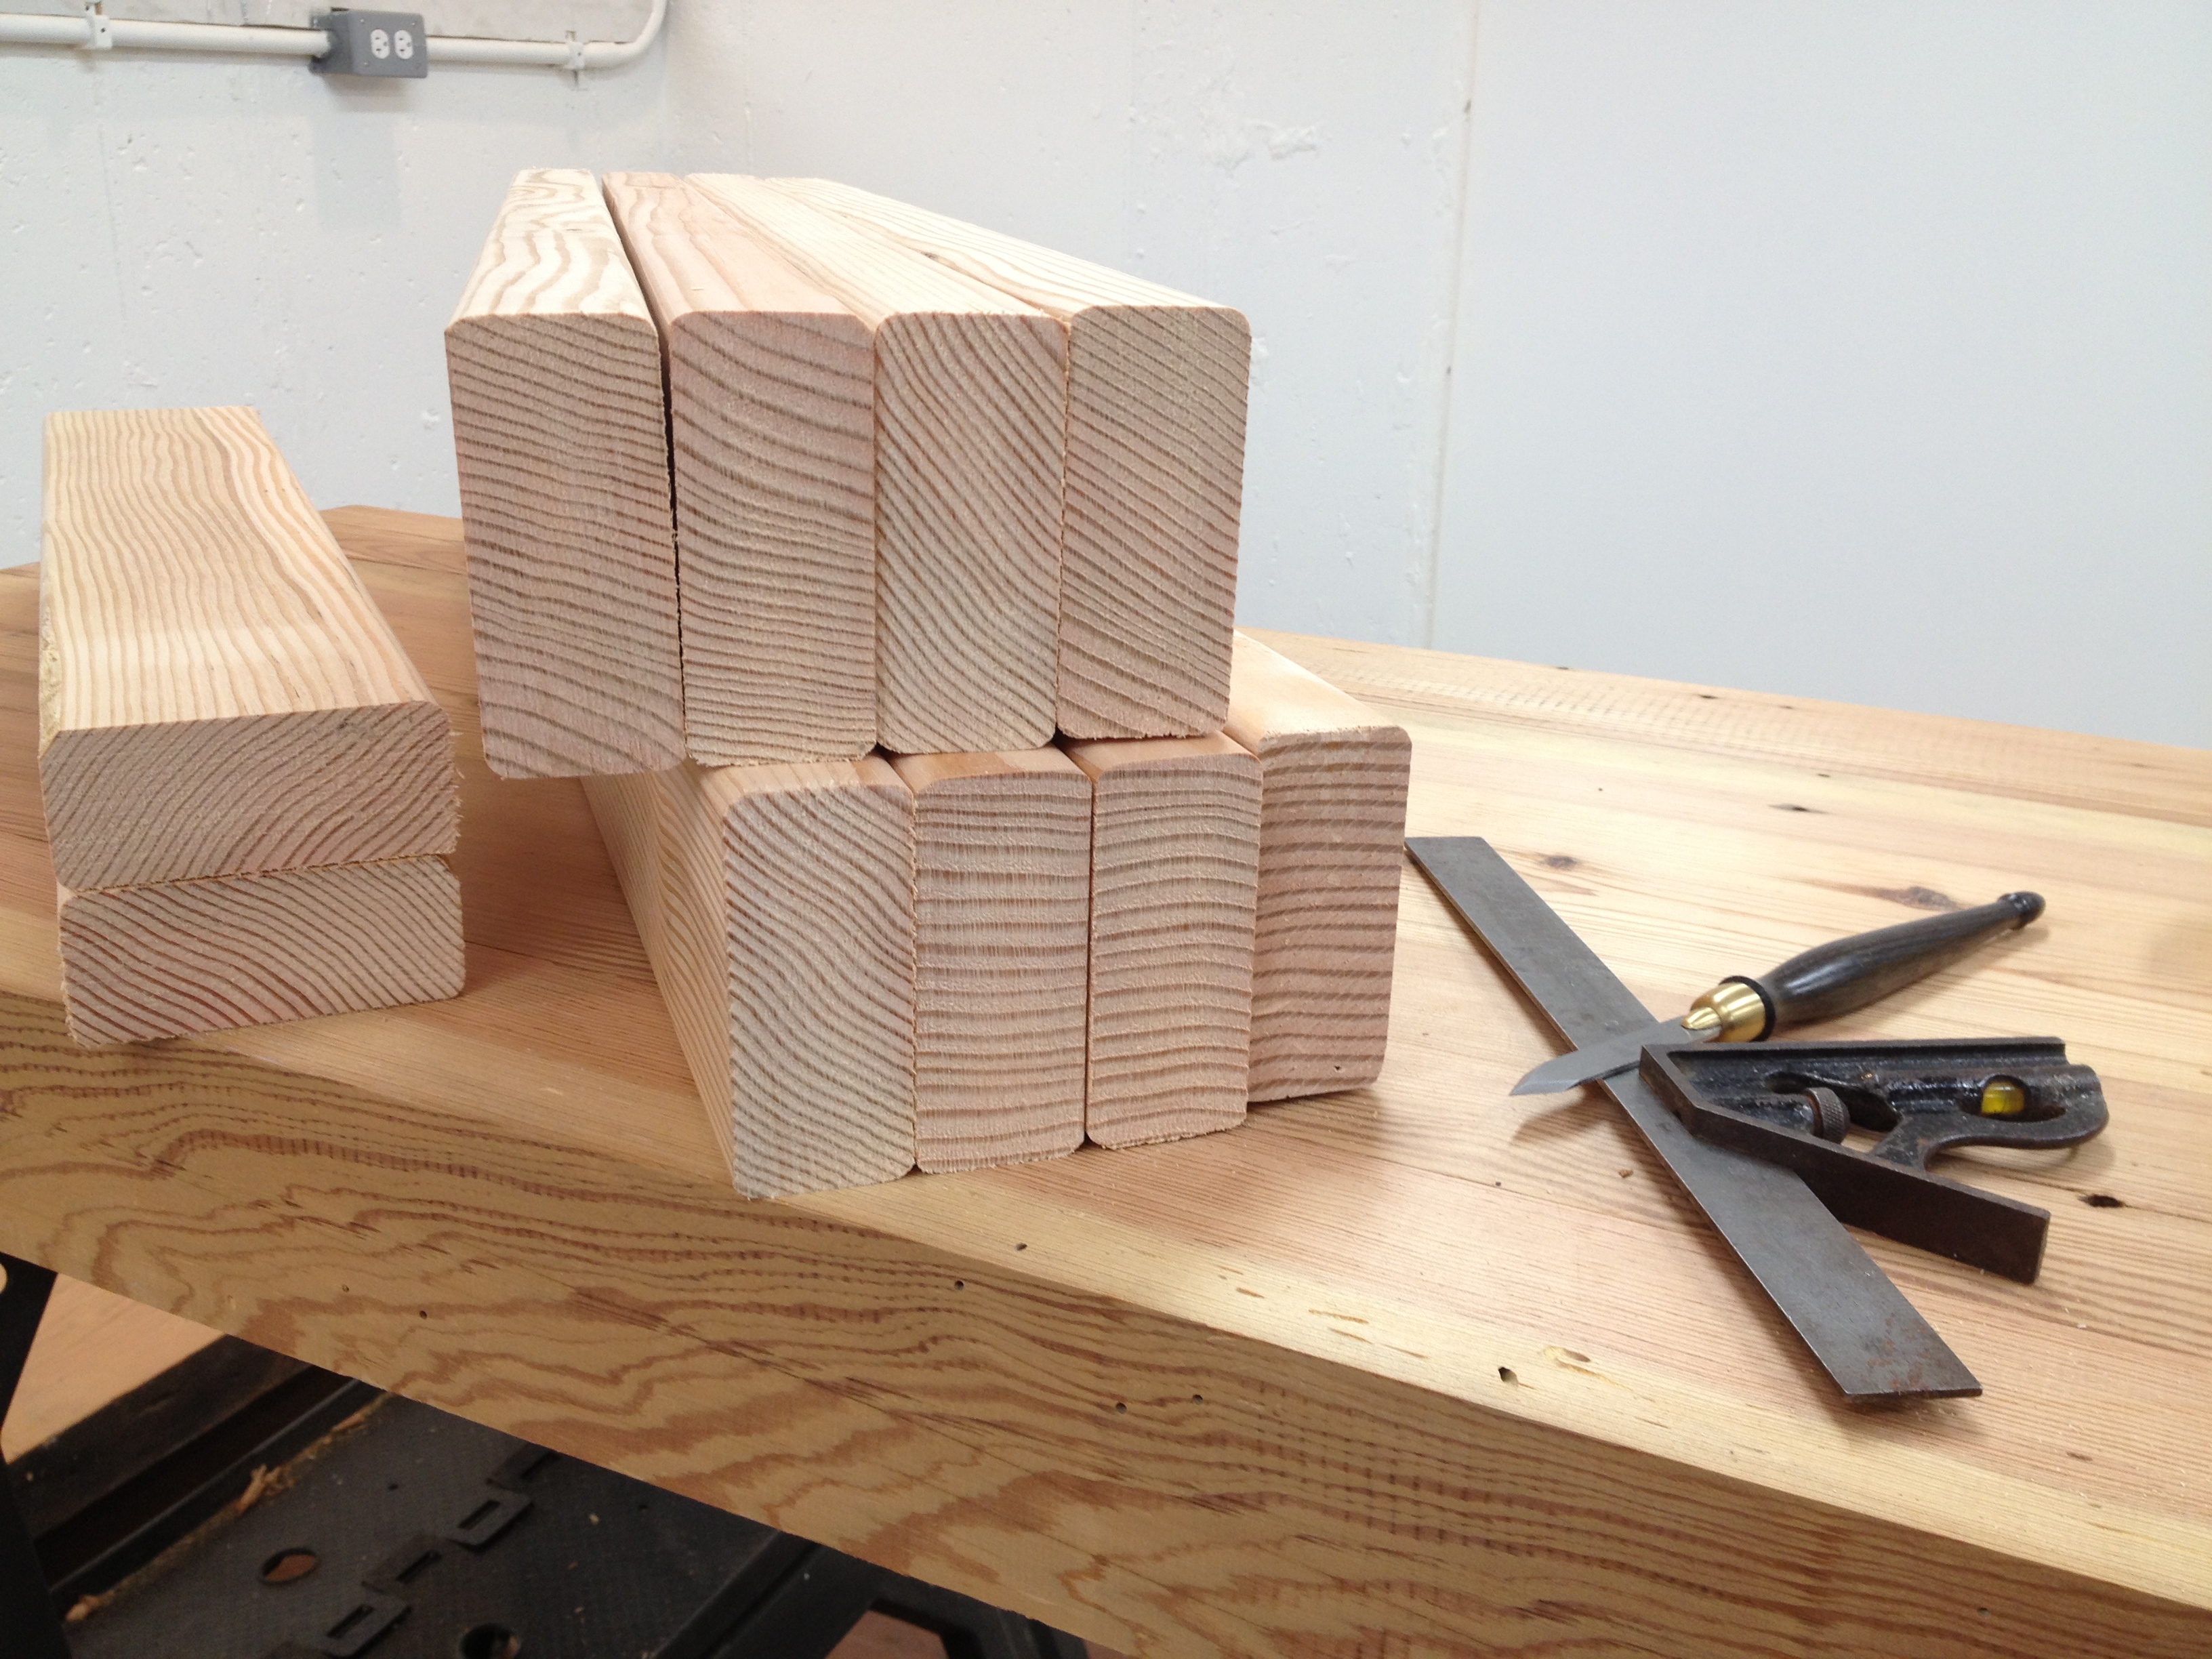
I could quite easily pick up some drawbore pins through an antique tool dealer or from Blue Spruce Tool Works, but buying two sets of them would be expensive. Plus, I’ve wanted to make drawbore pins ever since I read the article about them in one of the first issues of Woodworking magazine. So I decided to give it a go at making them by hand.
I went to Sears and picked up two pairs of drift pins (about $15 a pair). I prepped them with 220 grit sandpaper to remove the black coating and quickly roughed some 6/4 walnut to size (1 ¼” x 1 ¼” x 6”) on the newly tuned up bandsaw. The holes you need to bore into the blanks are a bit unusual – 13/32 for the smaller drift pins and 17/32 for the larger ones. I have a 13/32 bit and picked up a 17/32 bit from a friend. Unfortunately, the latter seemed to have some runout when I chucked it into the drill press, so I’m still trying to figure out what to do for the larger set.
In the meantime, I decided to go forward with the smaller ones.
As much as I love my old 1960’s Rockwell drill press, it is a bench model and I don’t have enough space under it for 6” of handle blank and another 4” of drill bit. So I made a guide block and bored the hole with a brace. This also gives me a chance to use some of my awesome antique C-clamps, which have acme threads and great details that draw me to them at estate sales, like the grips on the ends of the thread posts.


I went back to the bandsaw and tapered the blanks to 7/8” on one end and cleaned up the faces with a block plane.
I ran a groove into the middle of a piece of pine to hold the blank steady and planed the chamfers with the block plane. I later remembered I have the chamfer attachment for my Veritas block plane (*sigh*), so I will use that for the larger drawbore pins to make the chamfers more consistent. But I was quite pleased with how well I did free-handing them.

I sanded the endgrain where the hole was bored so I didn’t have to worry about that after the pin was in place, then I clamped the pin in a metal vice and heated it up with a torch.

I drove the block on with a mallet. It sank onto the pin like butta.

I sat on the back patio and sanded the handle a bit to even everything out…

…and ended with a few coats of General’s satin finish Armor Seal.

You should have them in pairs, though, so I have one more small drawbore pin to go.

Once I figure out what to do about the holes for the larger one, I’ll tackle them, as well. Stay tuned.
Miter Cuts On The Craftsman 3646 Miter Box
Under my last blog post, someone asked how well my Craftsman 3646 miter box did with miter cuts. I responded that I’d recalled making a test cut at 45 degrees and was pretty sure I was happy with it, but that I would make some more, just to verify.
When I went into the shop last night to take a few more pictures of the new saw horses (that blog post has been updated now, by the way), I pulled out the miter box and my miter saw and made a few cuts. I didn’t want to just cut one time and then flip half of the board to make a 90 degree angle, because that will obviously always create a 90 degree angle. Instead, I made one cut and then made a second fresh cut on the cut-off piece at the opposite 45 degree miter setting.
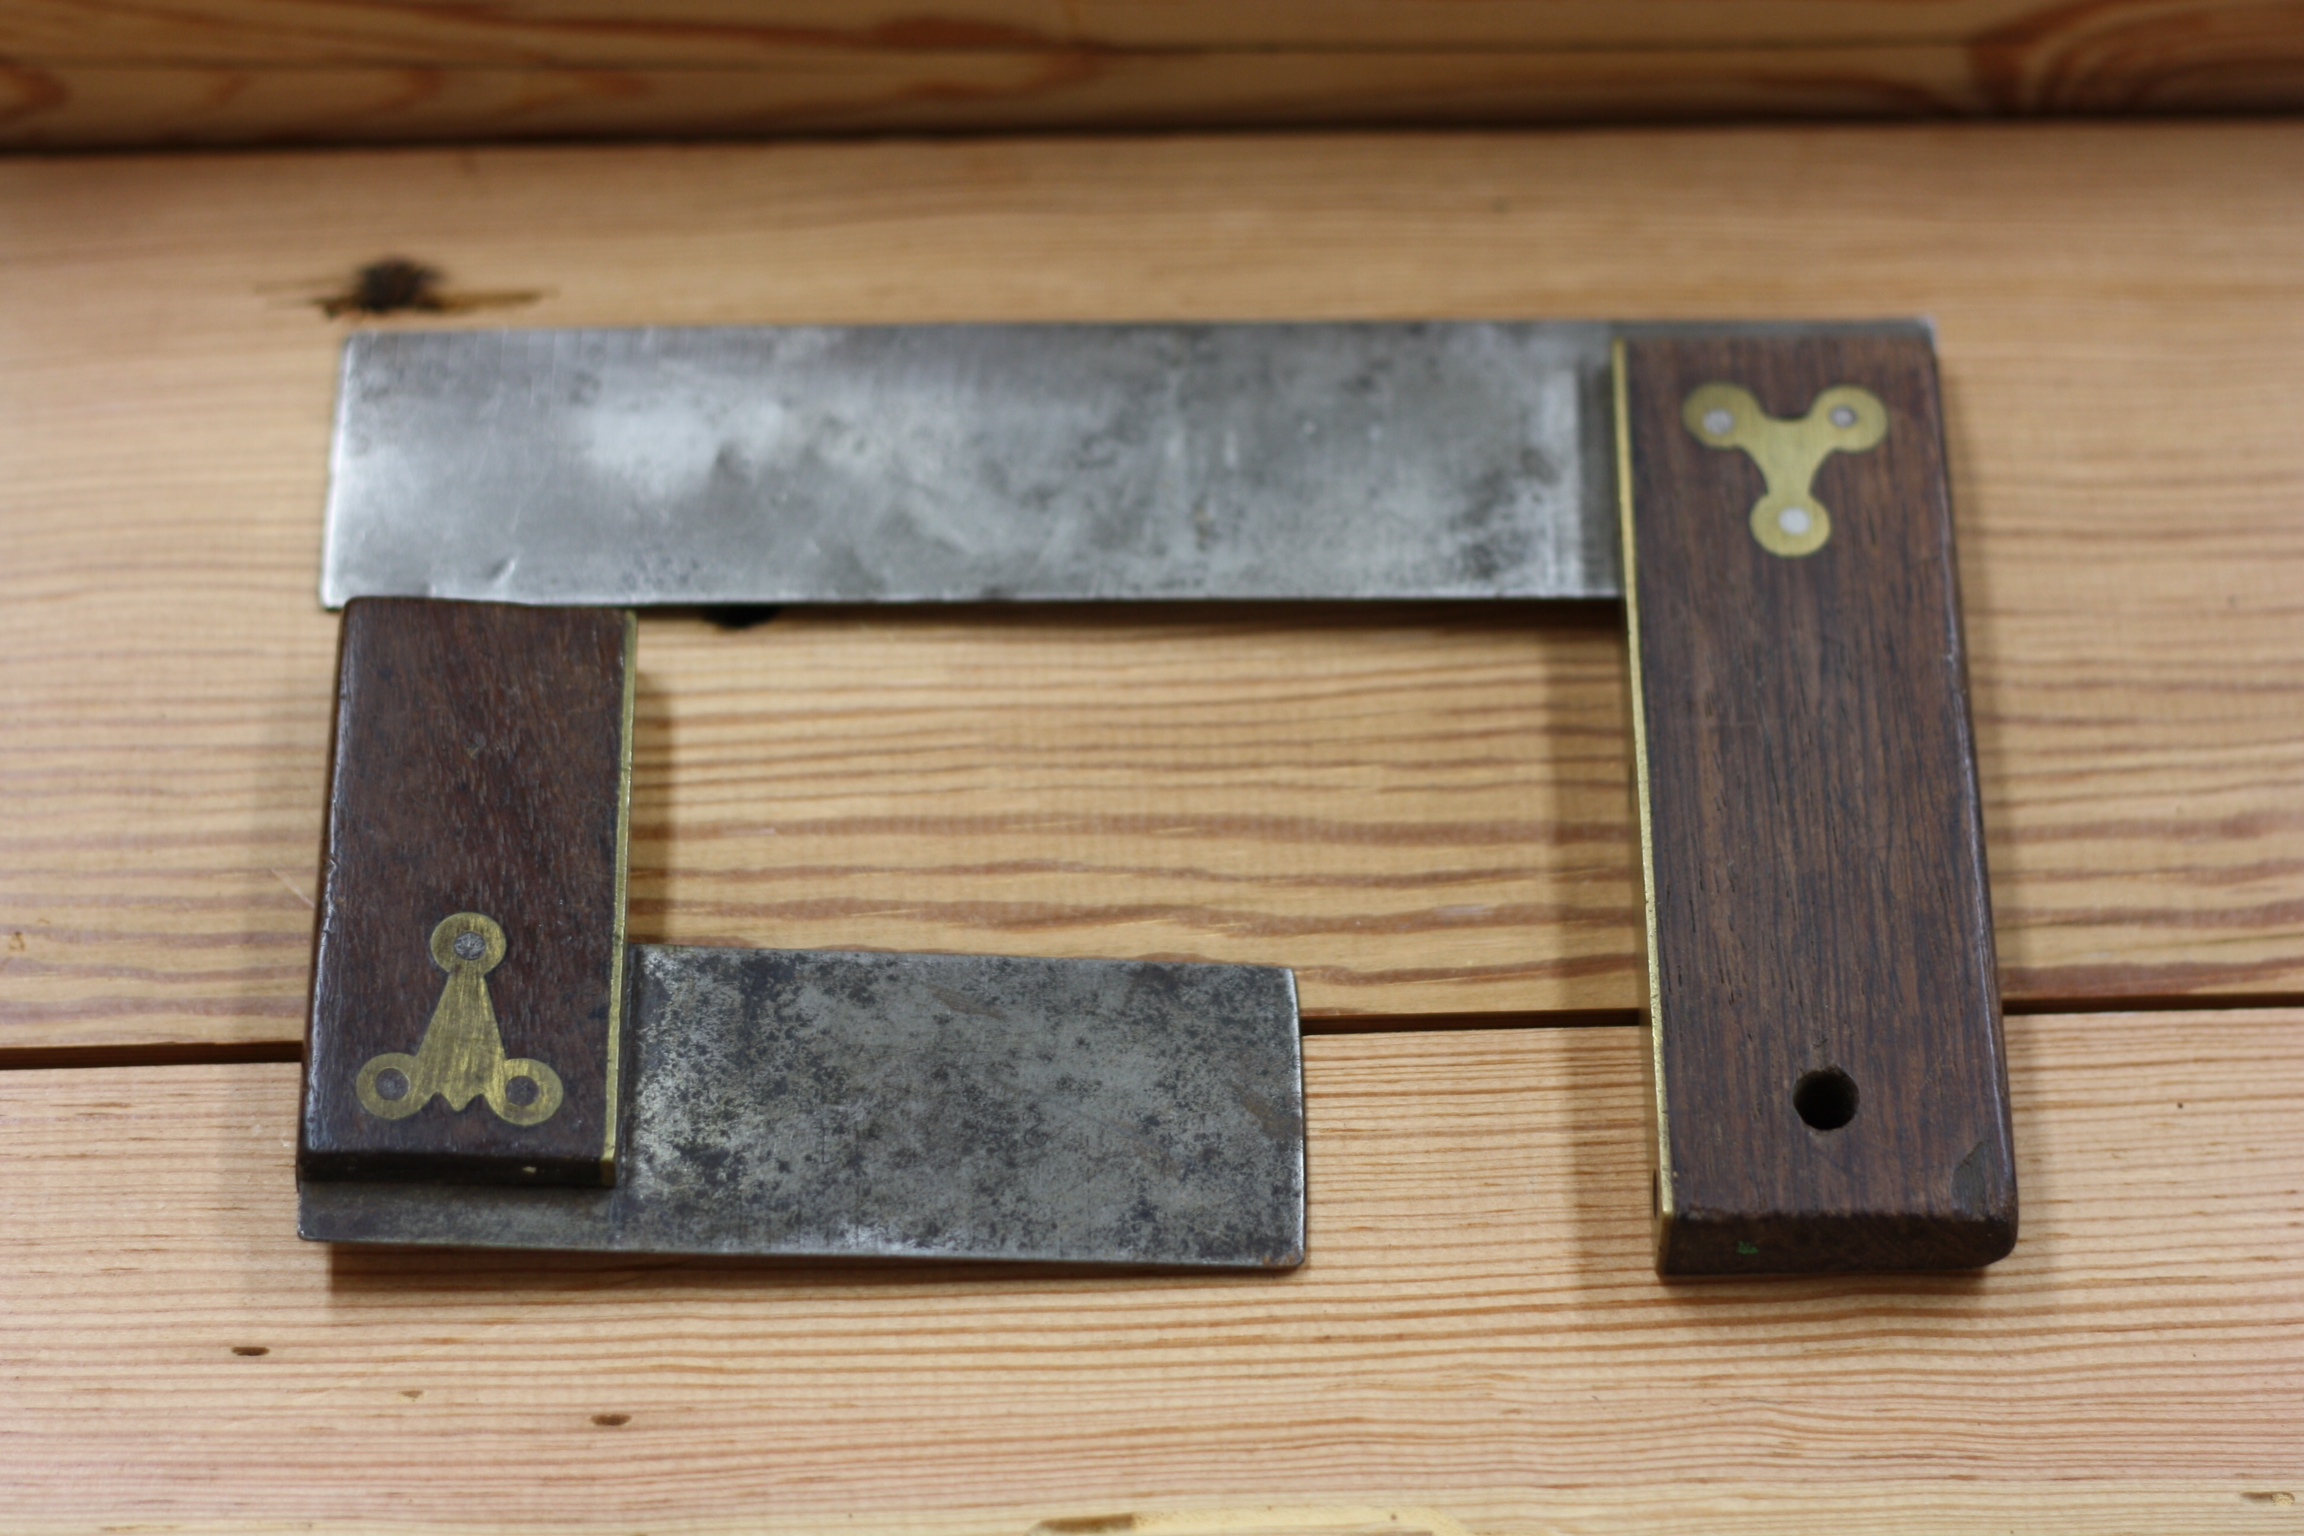
Then I grabbed what I believe to be the most accurate square I own* and checked the miter. For the record, this is fresh off the saw, no trimming with a miter plane (or any bench plane, for that matter)…
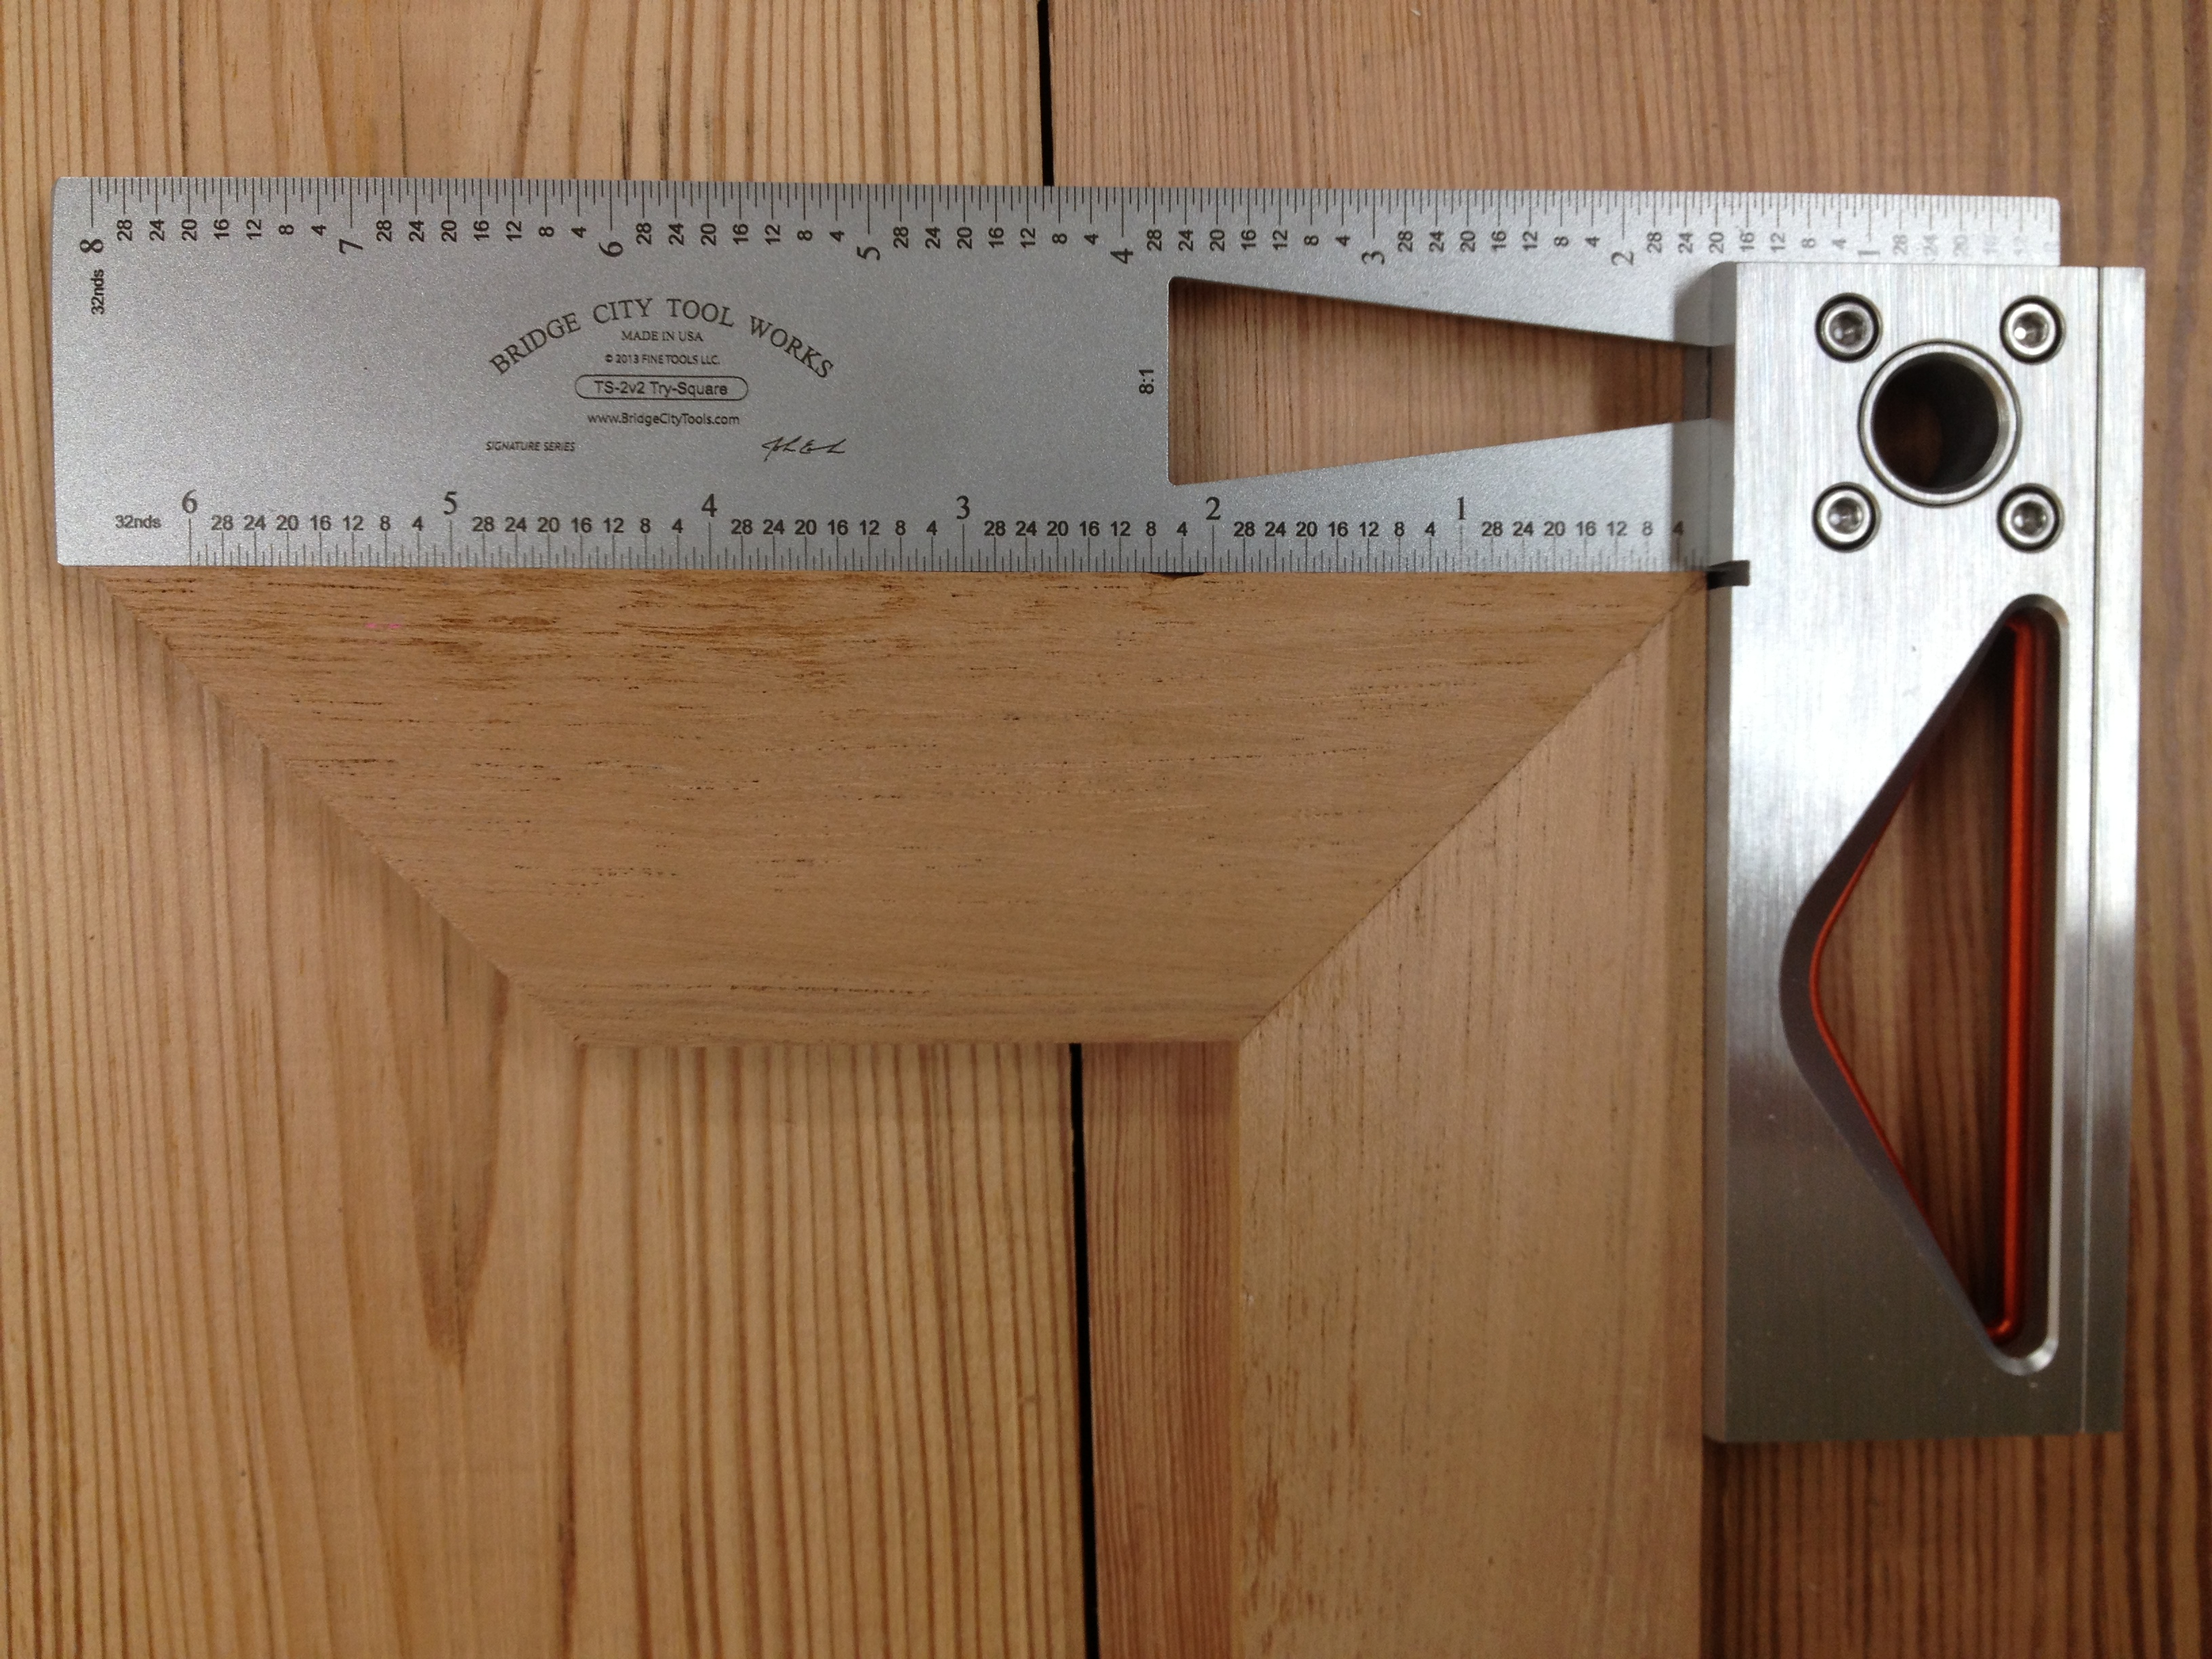
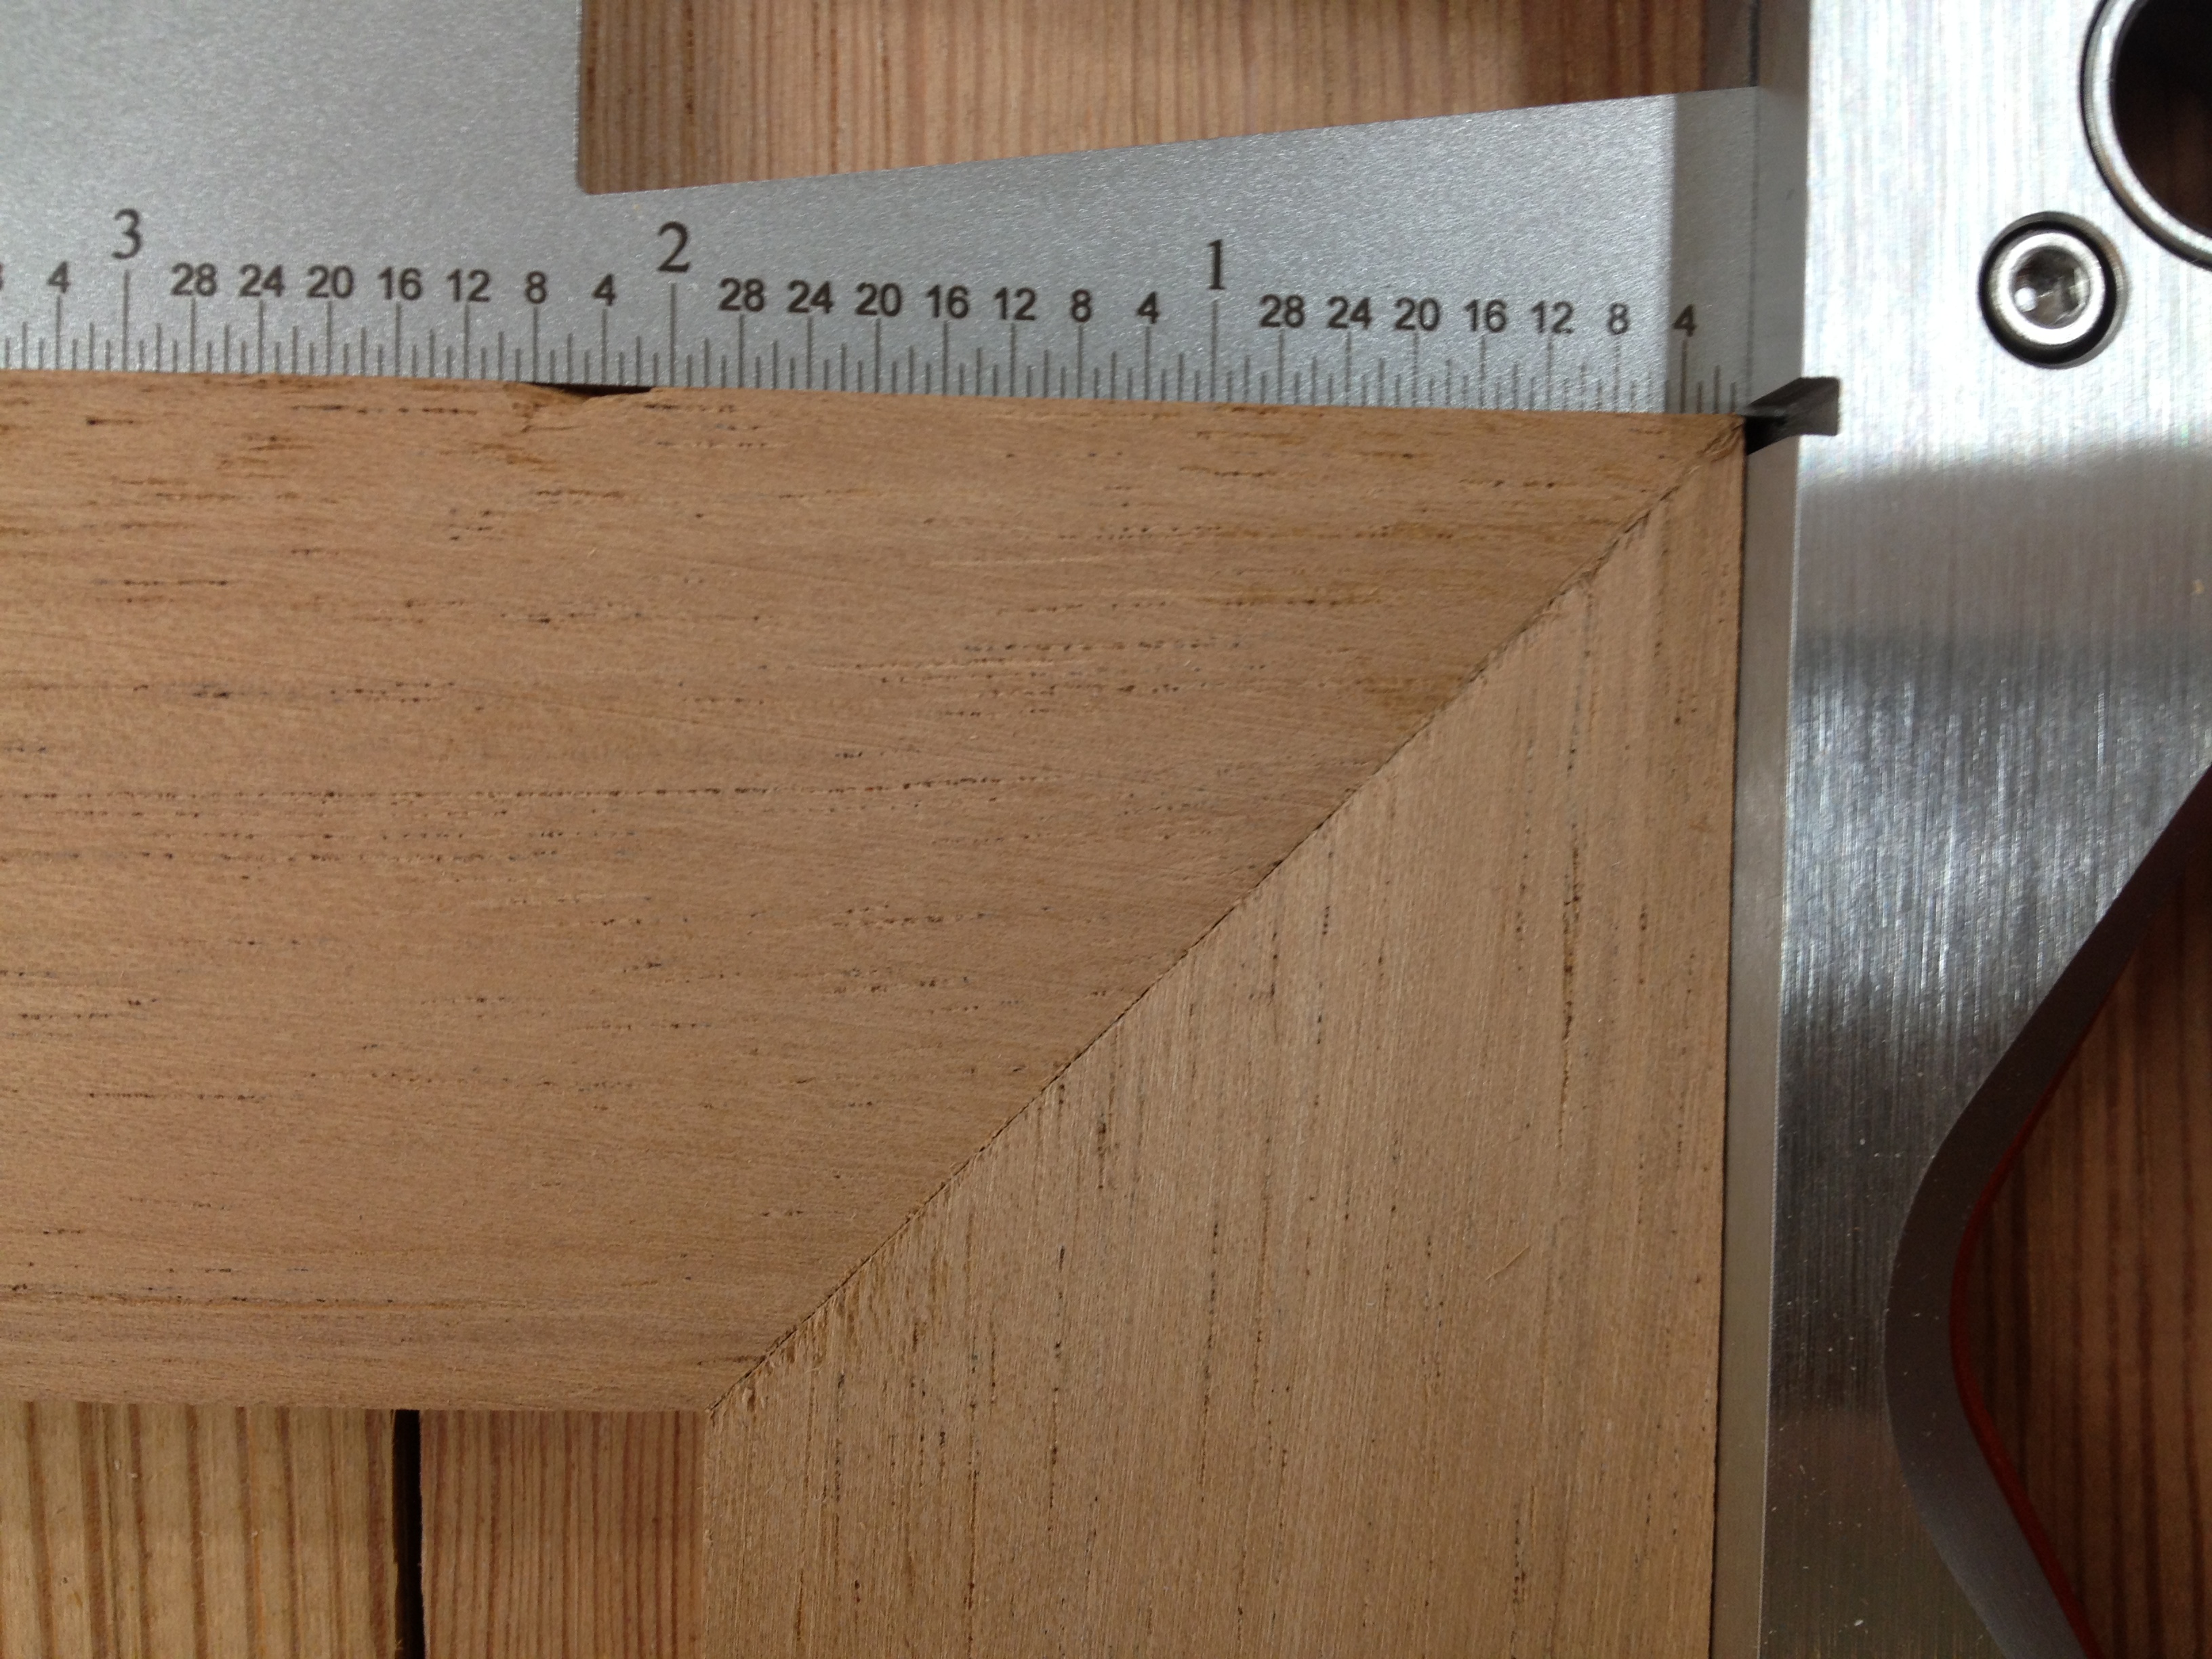
The wood is Spanish Cedar, which is why it is a little chippy on the edges, but I’m pretty satisfied with those cuts. Heck, this makes me down right excited! That there’s a nice miter! Makes me want to make a picture frame! But that will have to wait; I have two benches to finish up, first.
In any case, there you have it, Alan. I’ll be interested to see how well my Stanley 150 miter box does when I finally get around to restoring it. I’m very impressed with my Craftsman 3646, though, so the bar is set high!
*This is one of the few tools I own that I did not buy for myself. It was a gift, from my loving wife, on my 40th birthday last year. Yes, I am blessed with an awesome son AND a great wife! And if I didn’t think she occasionally read my blog, I’d post a picture of what I’m getting her for her very-special-but-unnamed-birthday this year. I think it is just as nice, if not nicer.
When A Woodworker Makes Saw Horses…
It’s weird. When you’re so used to looking at lumber with a critical eye, for grain and condition and quality, it isn’t something you can just turn off, even when all you want to make is a few saw horses.
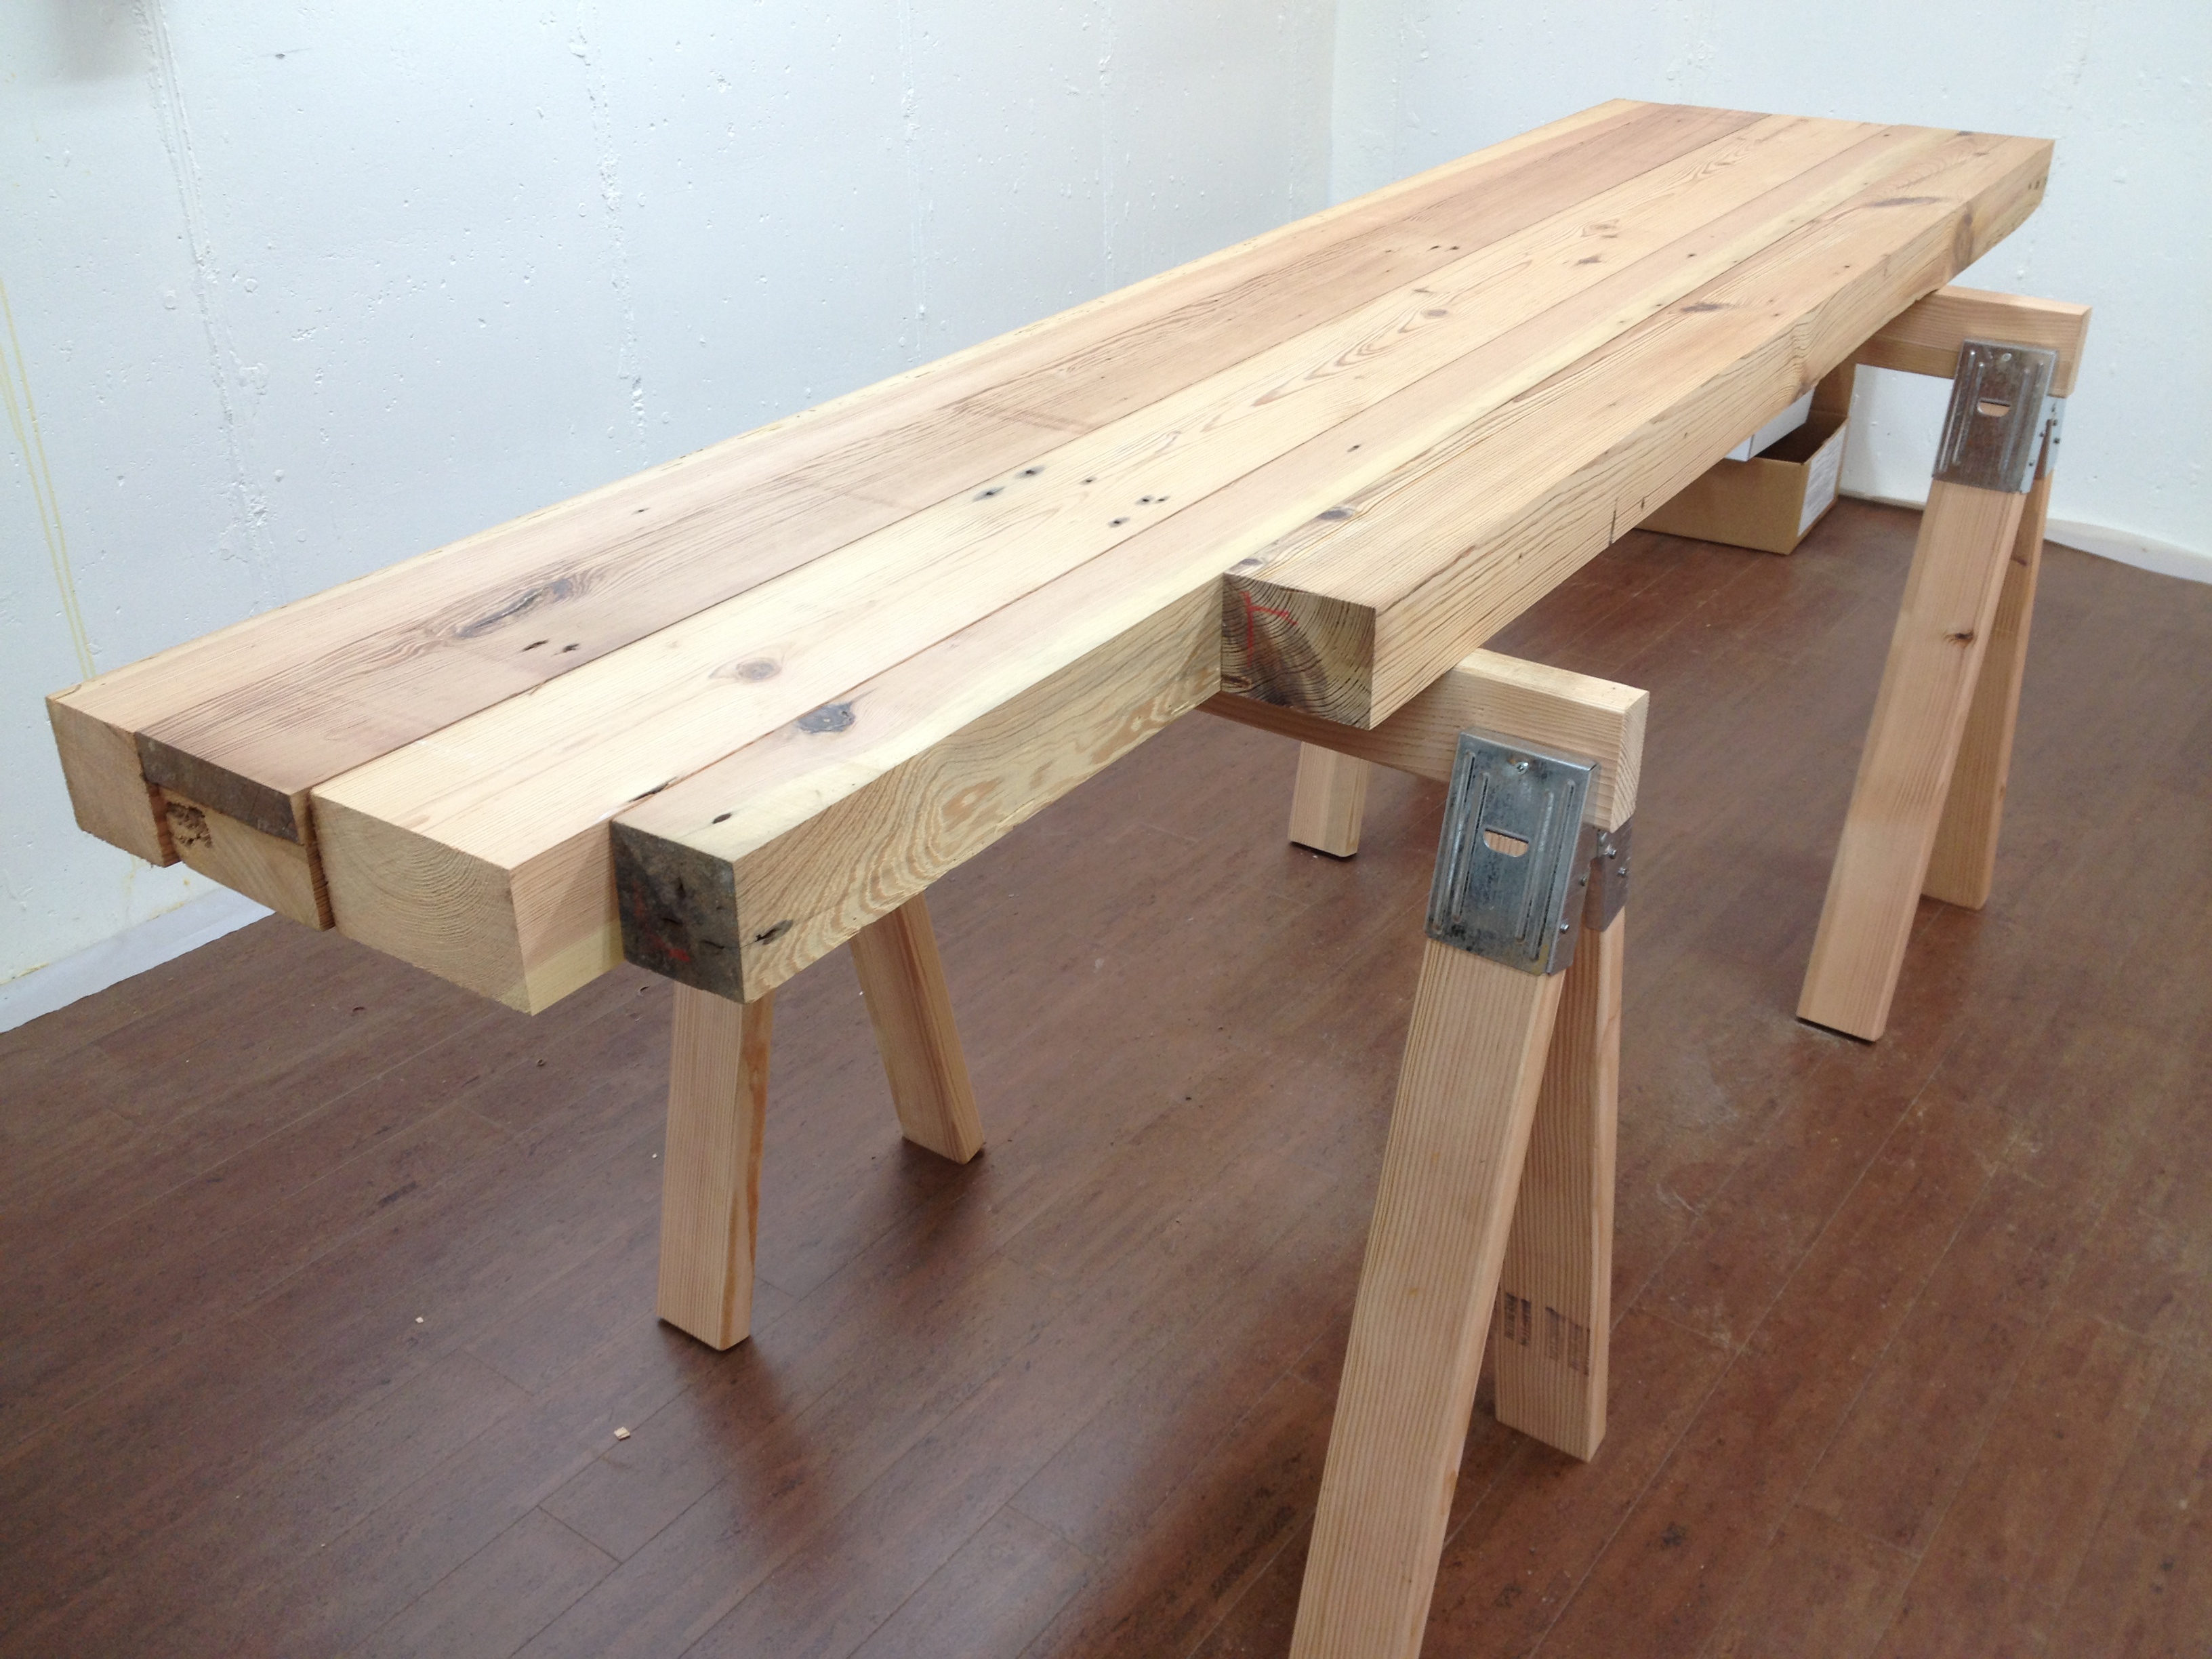
I’ve spent a little bit of my free time jointing edges on the lumber for the top of my workbench. I’m getting there, as you can see. You might also notice I’ve changed out one board from the earlier layouts. I just wasn’t happy with it – it was not heart pine like the others and it obviously wasn’t as old because it didn’t have the tight growth rings. No matter how I laid it out, I was never satisfied. So I took it out. Maybe I’ll use it for the legs.
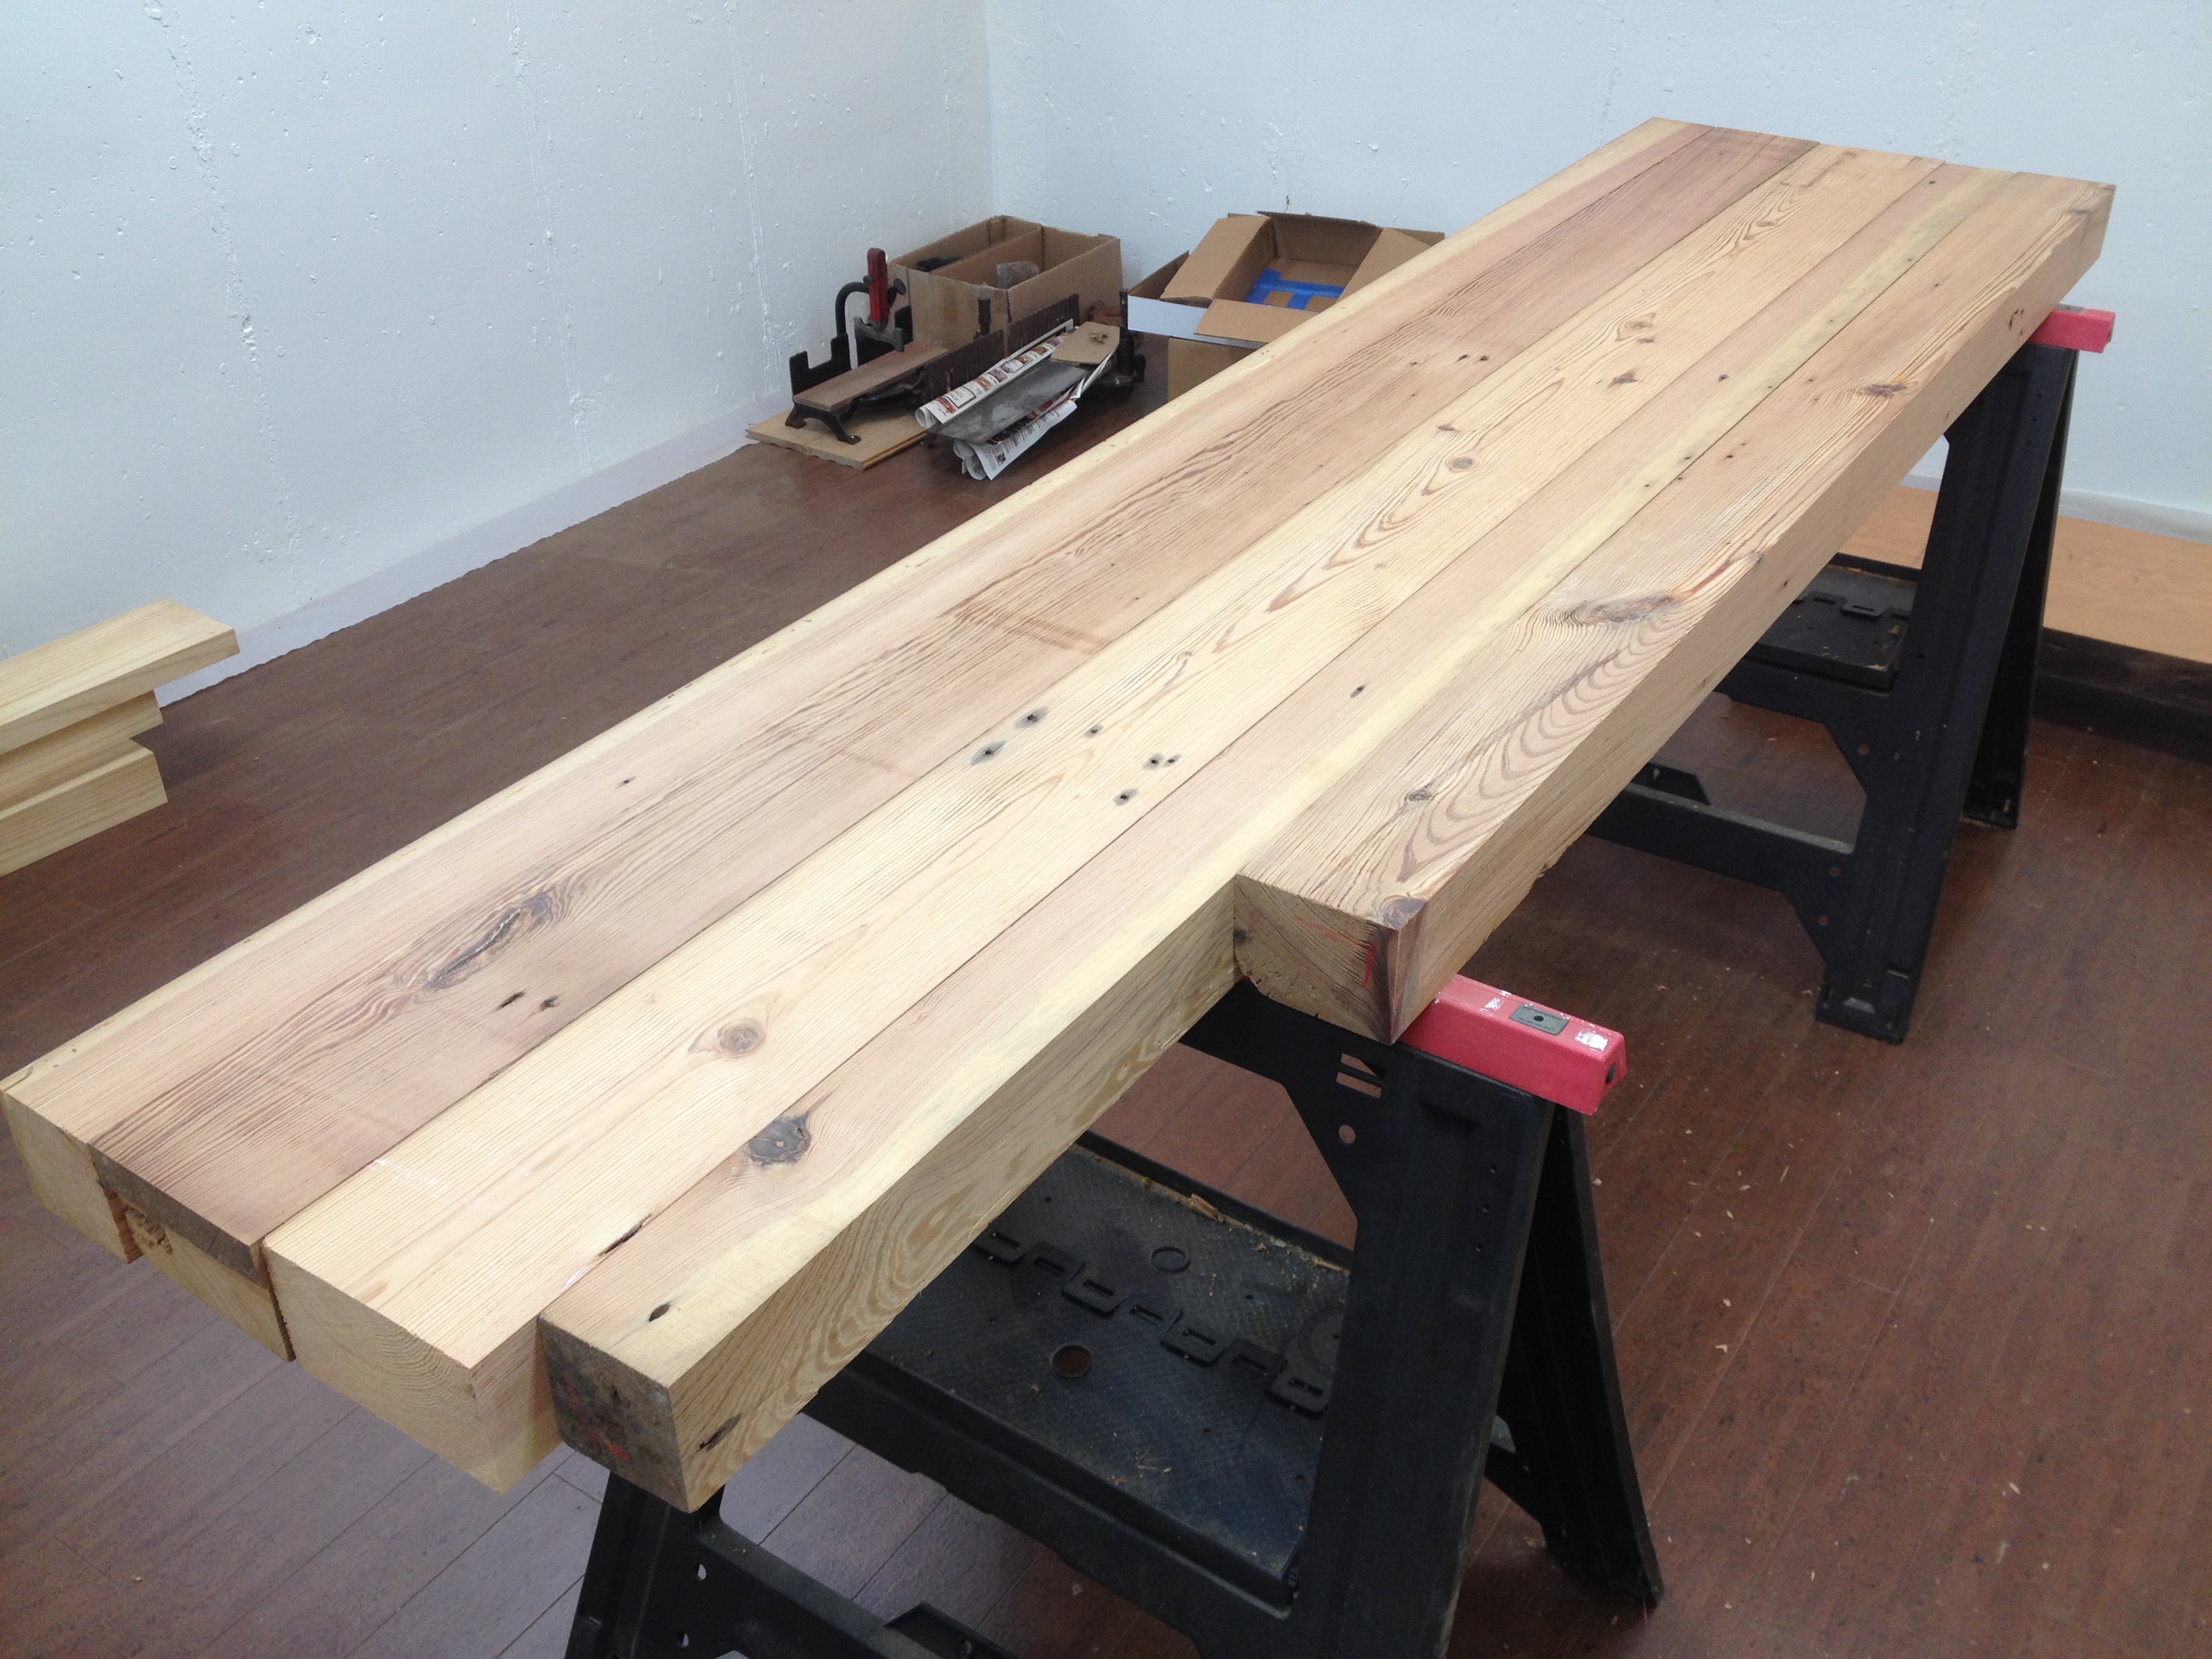
I replaced it with another piece of the good heart pine to bring the width back out to 20”. Anyone with a discerning eye will note the slight difference in length. I wish I had another piece of heart pine that was 7’ long, but I don’t. As my son told me the other day when I asked him why his room was such a mess, “It is what it is, Dadda.”
Hell, it’s my workbench, right? So who cares if one part of it isn’t as long as the rest. Maybe I’ll take the opportunity to add a design element to it and shape the transition into the longer pieces with a cyma to make it more pleasing to the eye. It will be the back right part of the bench, so it won’t interfere with a leg vice. And I’ll mortise the leg just before the blend, so it won’t make my leg joinery any more difficult.
Or maybe I’ll see if I can scarf a smaller piece into that short post. I do have a few other pieces of heart pine I could use.
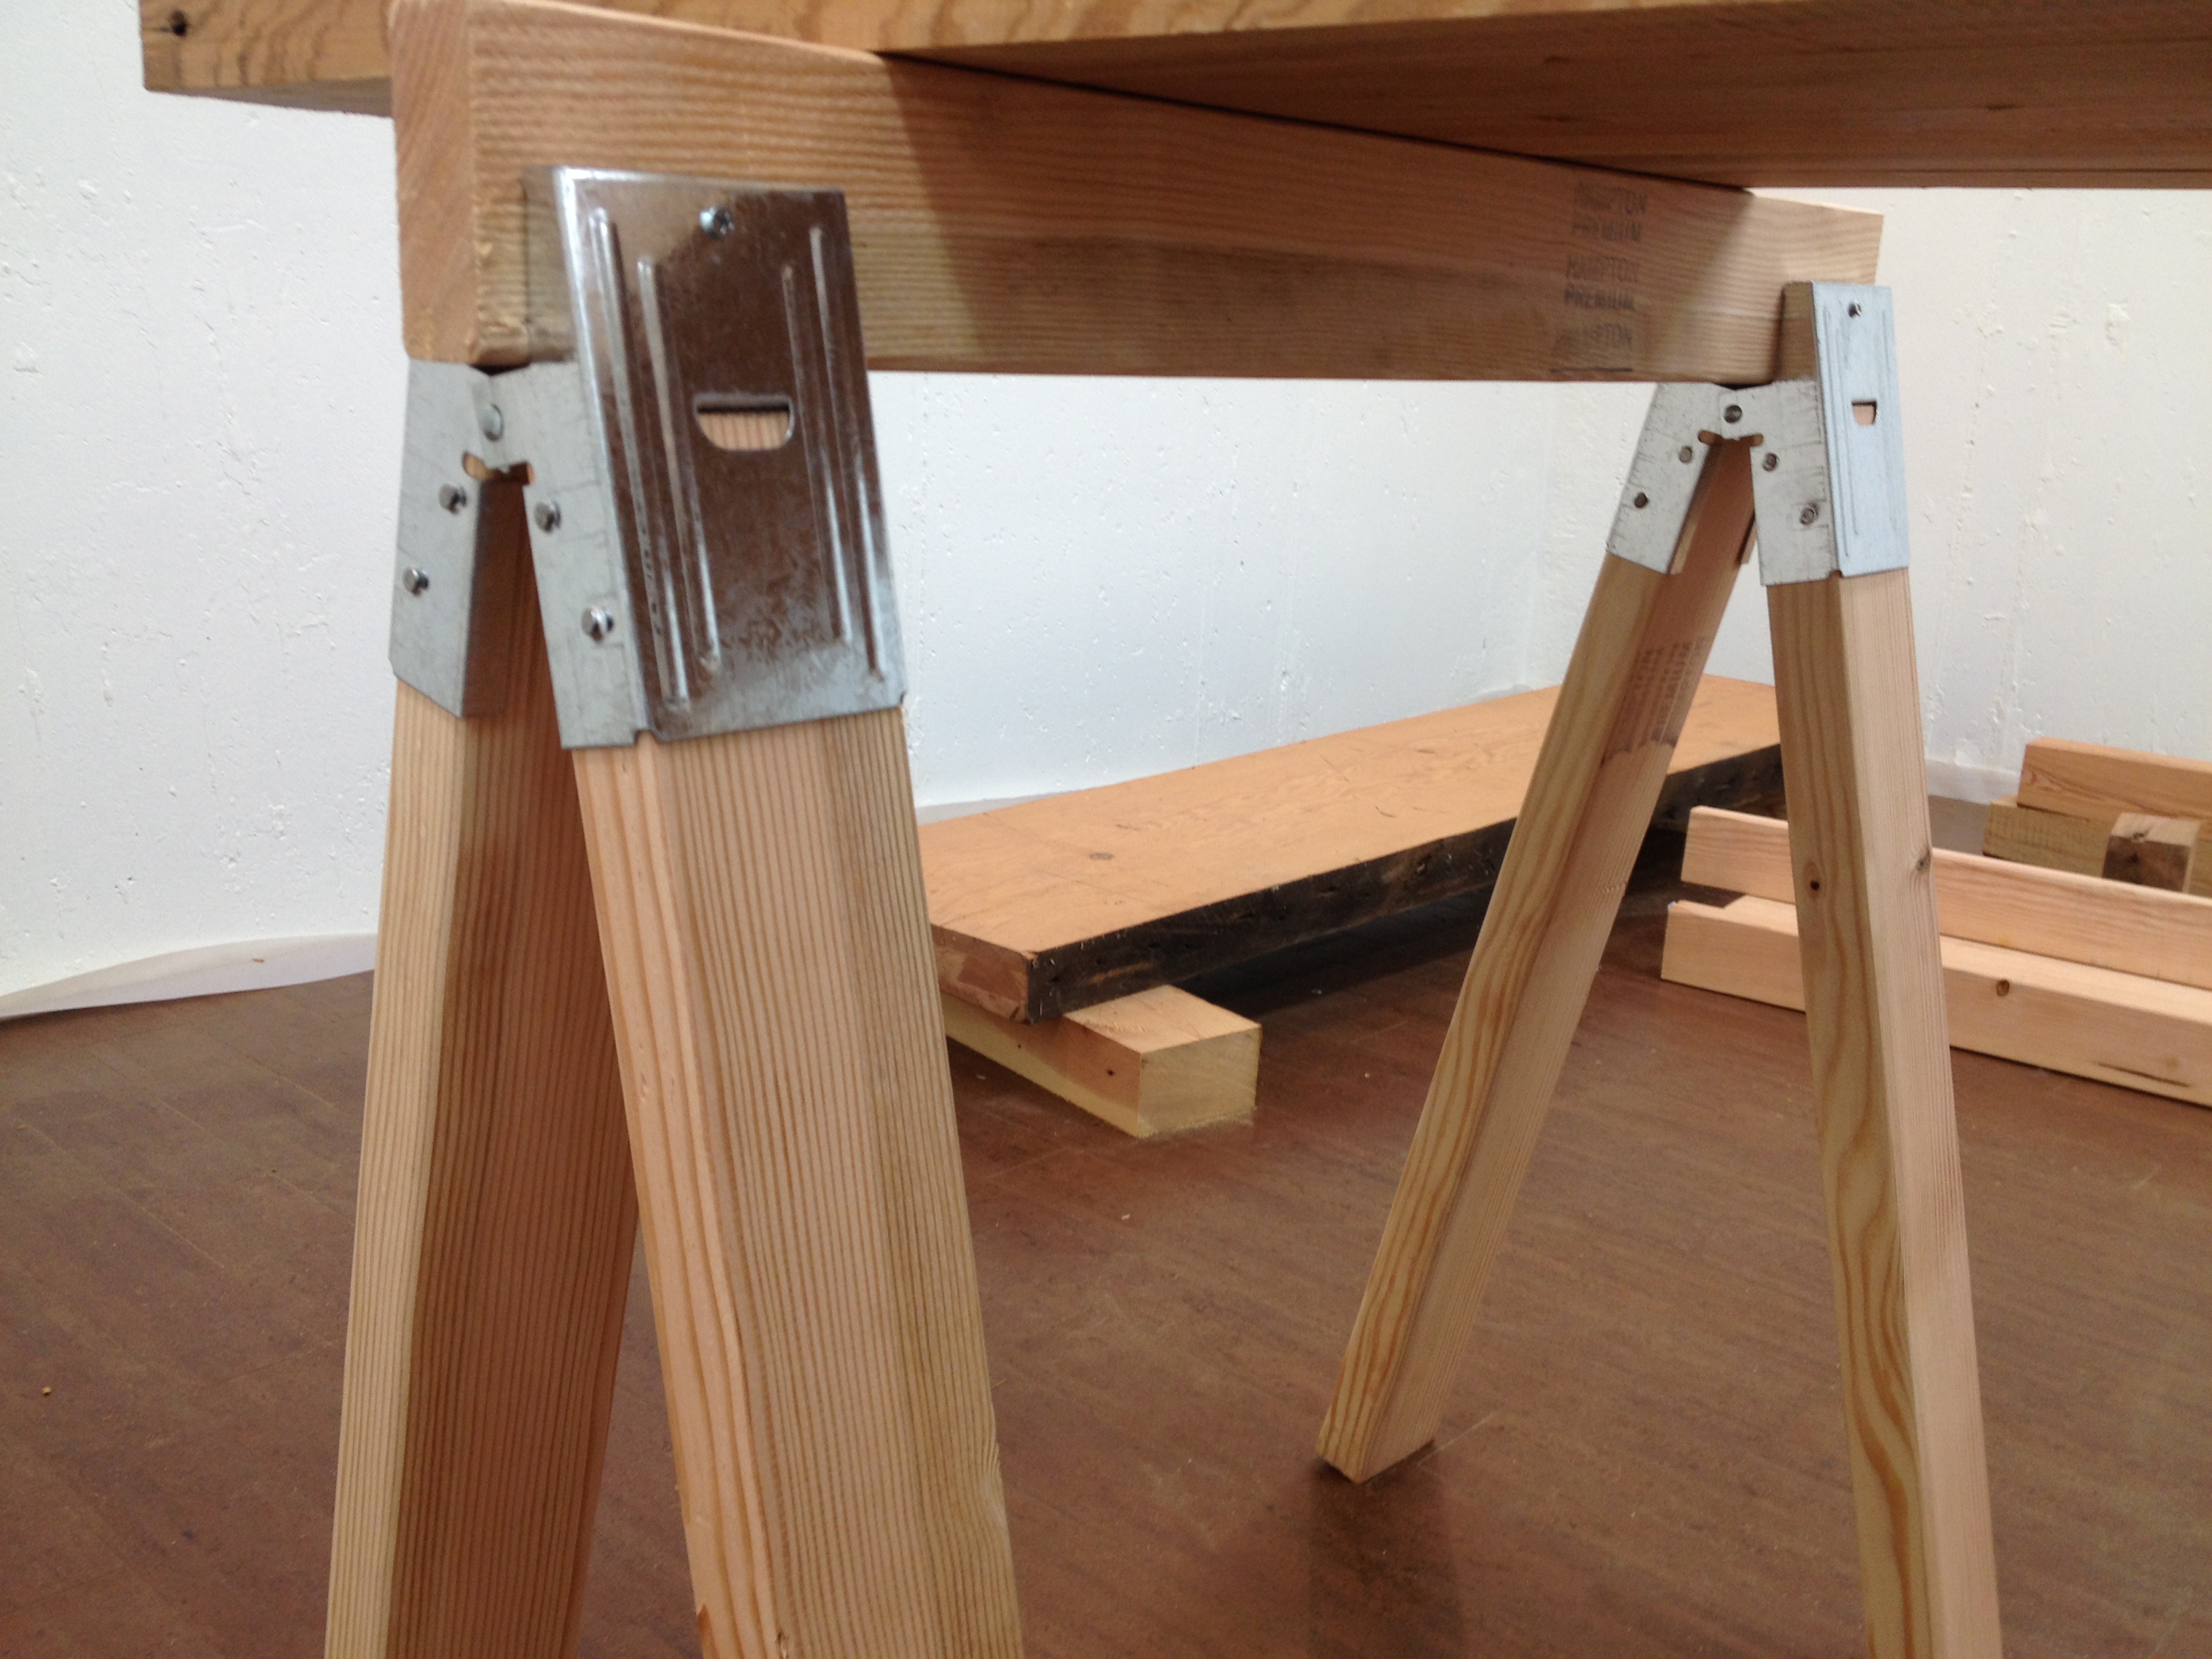
At any rate, as I was working on the top layout, I noticed my plastic saw horses were bowed, taxed probably close to their limit. They are fine for laying a door across when I’m painting it, but a bench top that weighs several hundred pounds might be pushing it. So I decided to throw together some quick saw horses. Quick, as in I was going to make them with the metal brackets where you just have to cut some 2×4 to length and nail them into the slots and then cut a piece for a cross beam.
When I was at the big box store, sorting through the 2x4s, I noticed something right away. I wasn’t just looking for relatively good 2x4s. I was looking for quartersawn or rift sawn, knot-free and perfectly straight 2x4s!
Is it a big deal? Does it make a difference for something so mundane as some quickly-made saw horses? Apparently it does. Or maybe I just couldn’t help myself.
As you can see, the not-even-glued-up top is already getting put to good use, as is my Bad Axe miter saw and my newly restored Craftsman 3646 miter box.
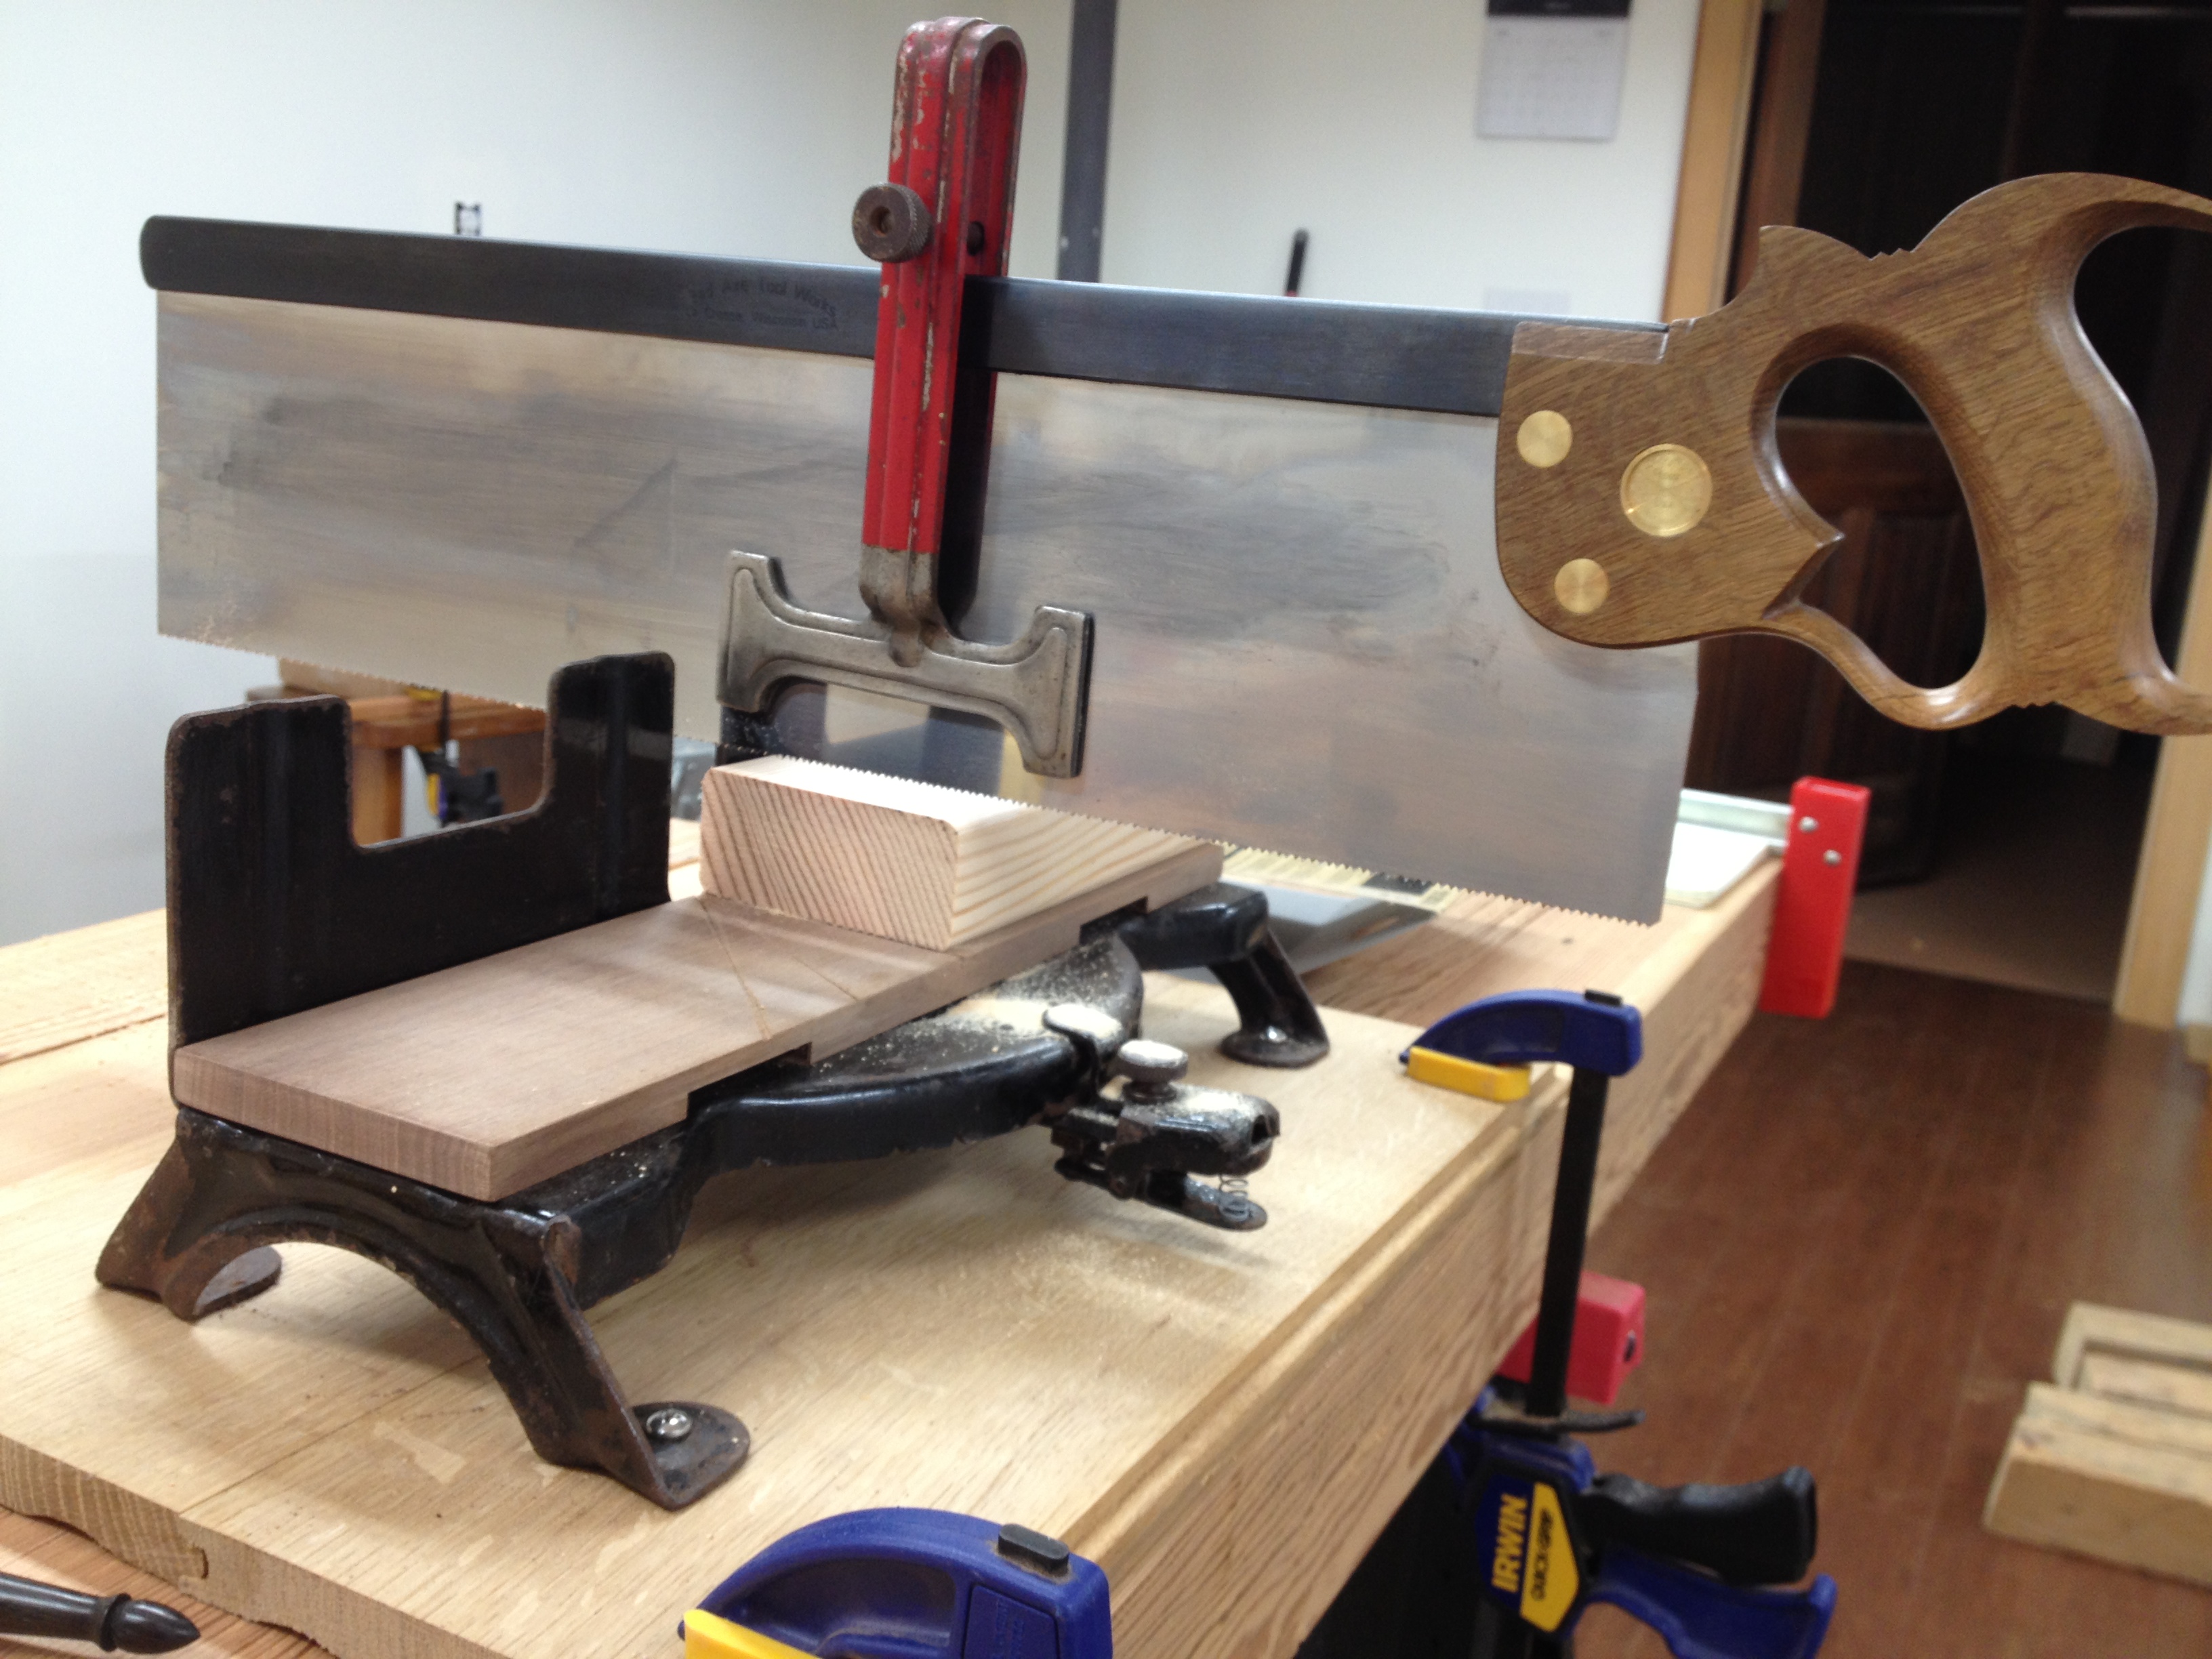
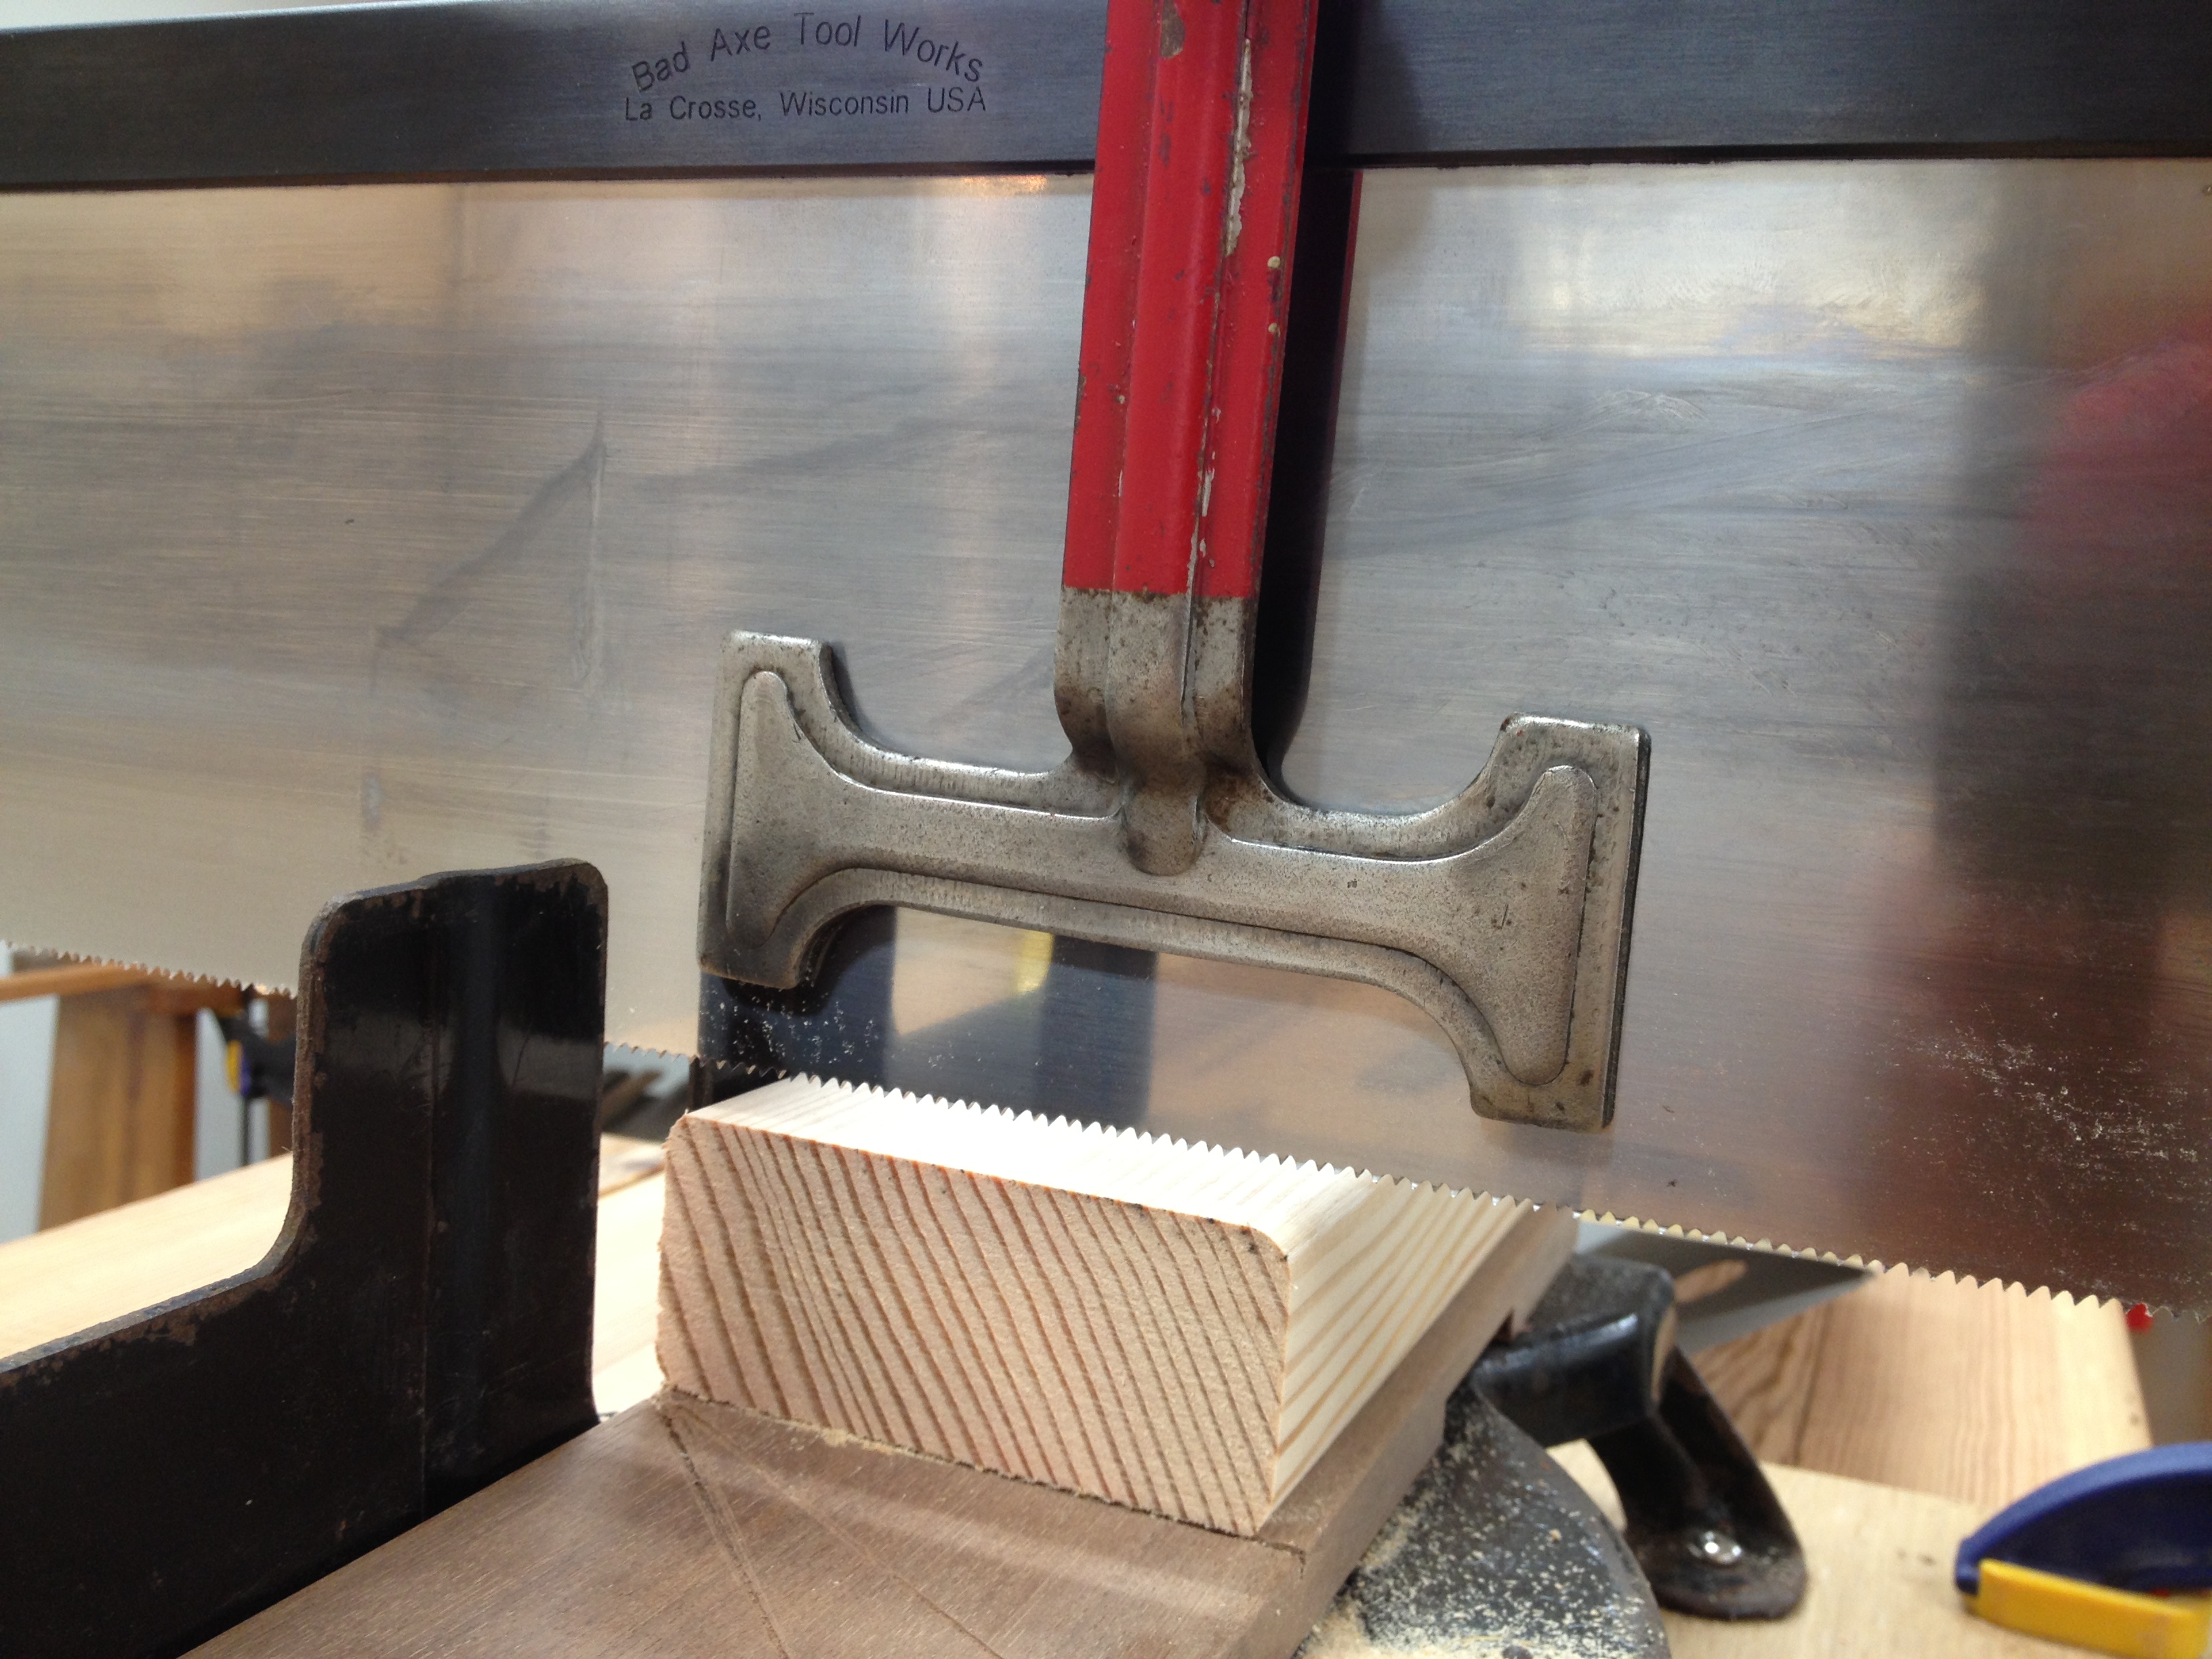
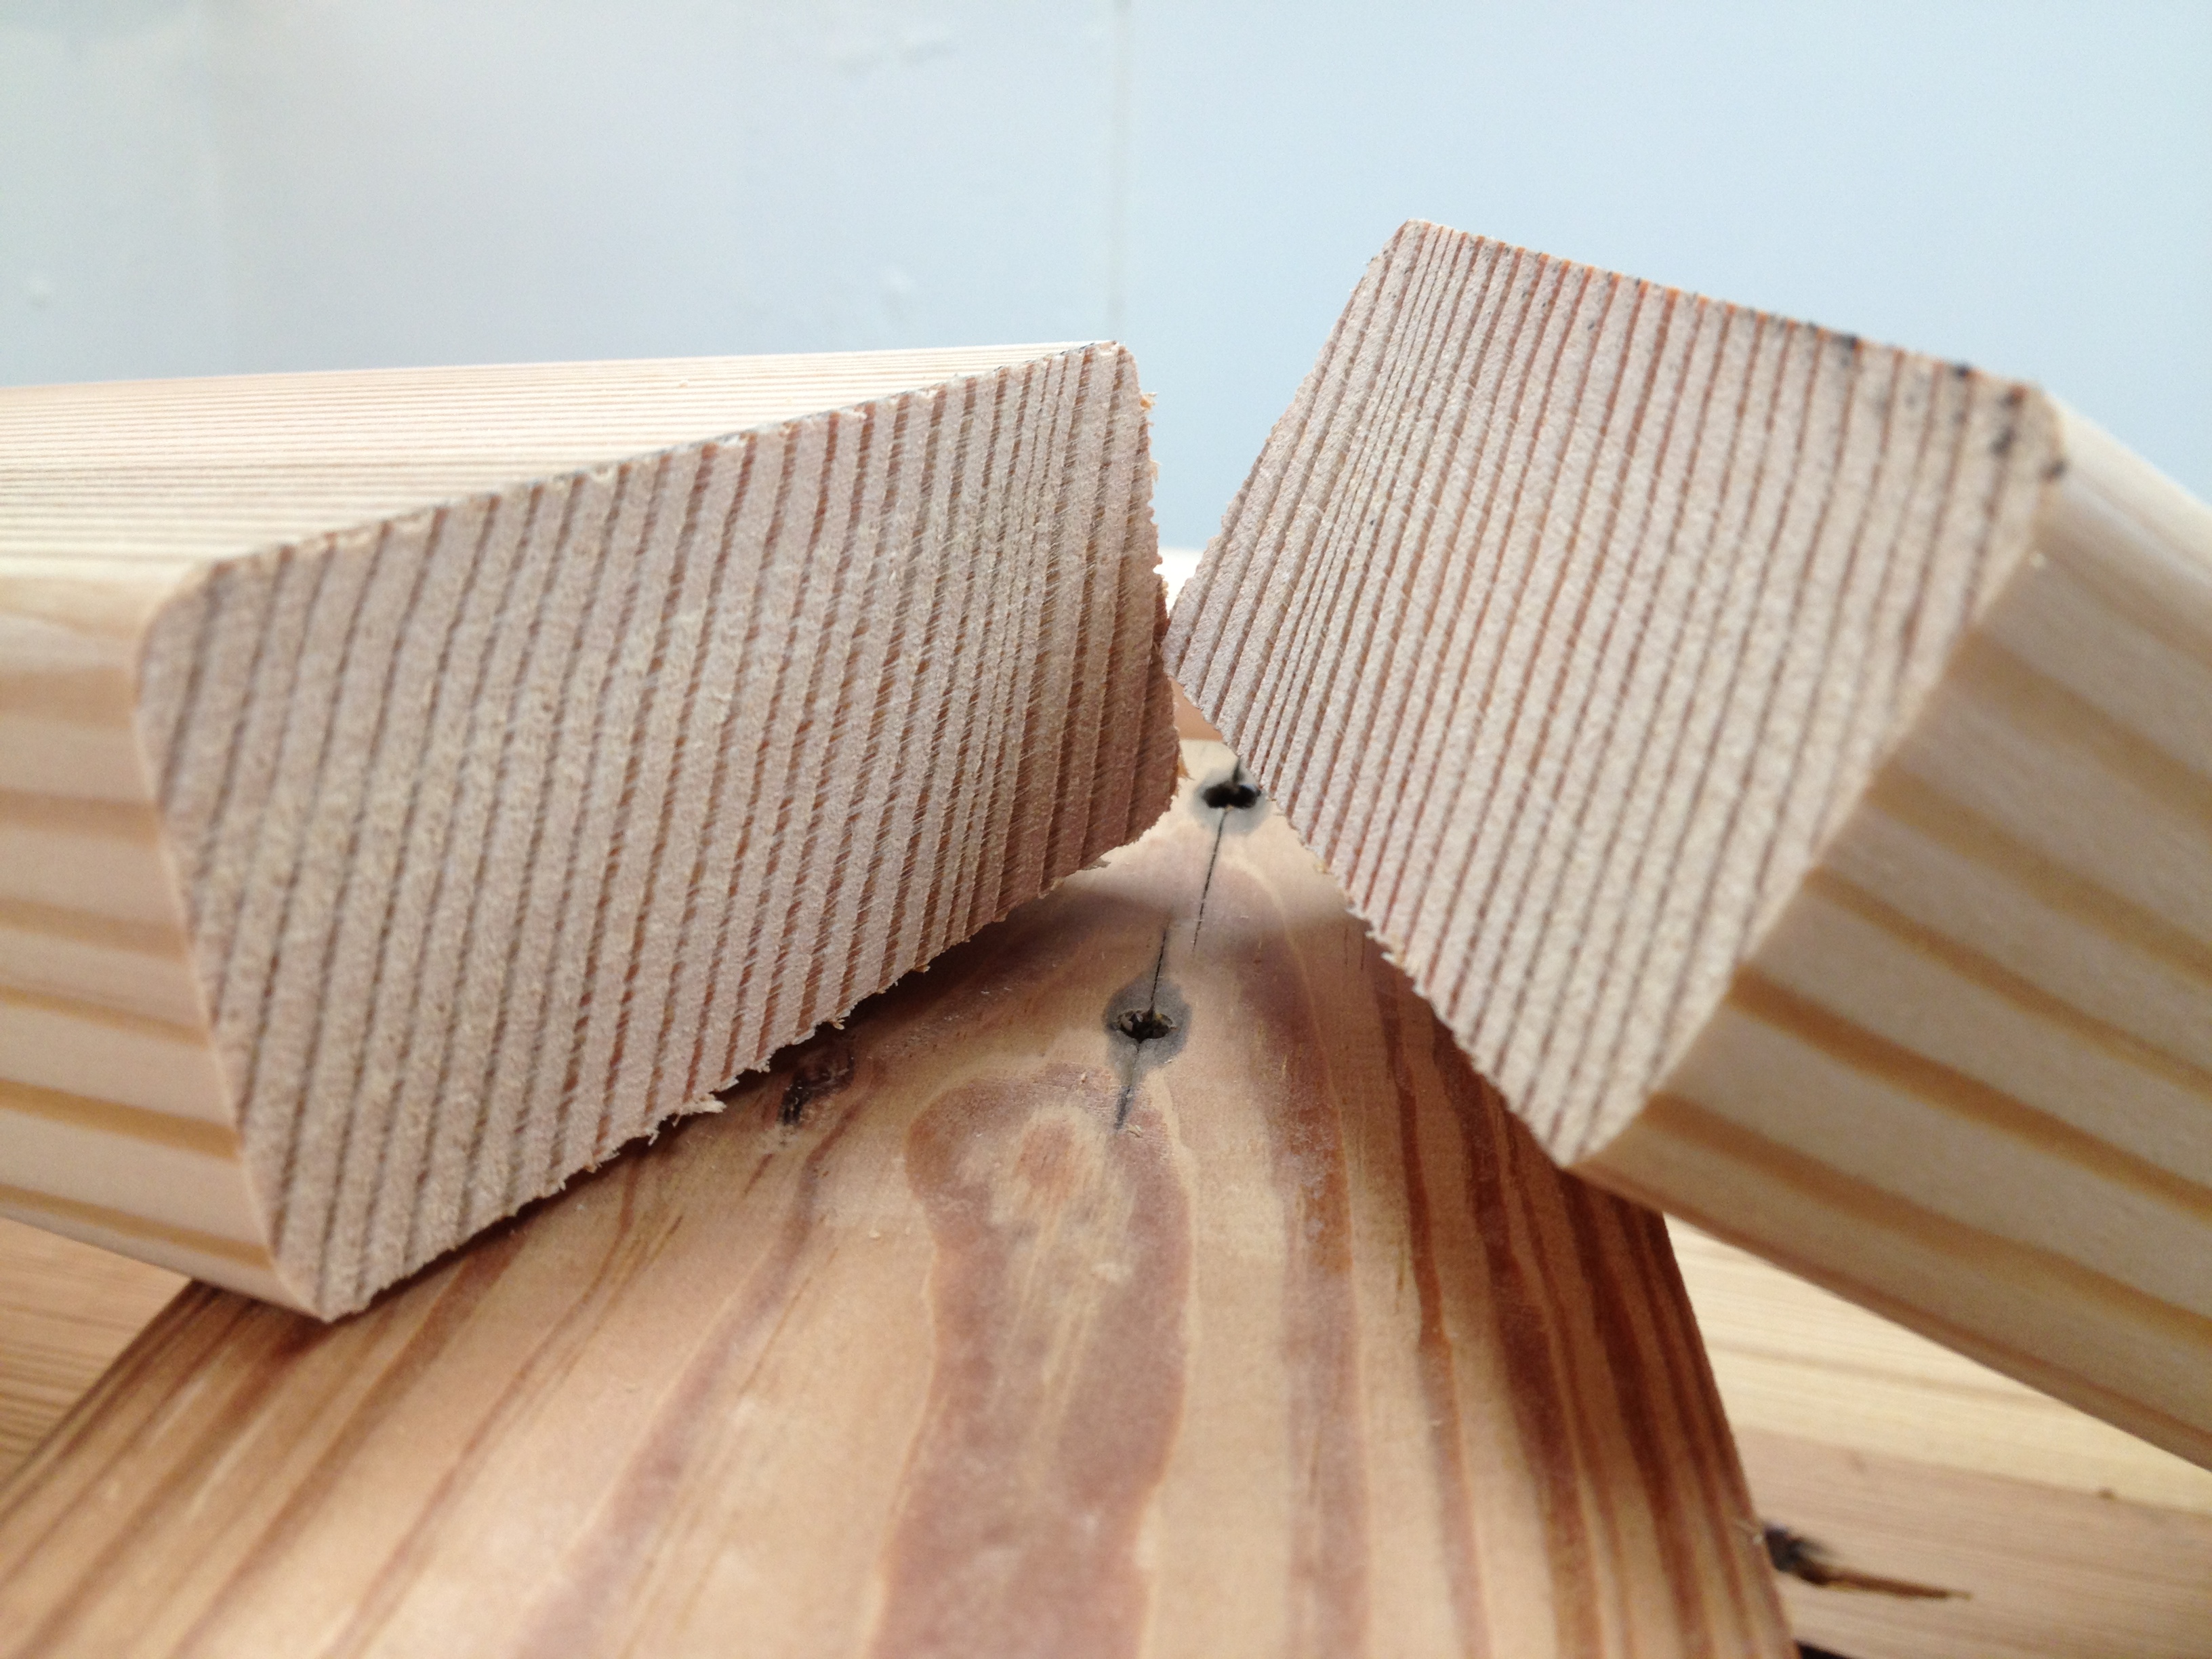
If ever you needed an example of just how cleanly a Bad Axe saw cuts, check out what it does to SYP. Man, that’s a clean cut!
There is something pleasing about all of that endgrain, don’t you agree? I’m also really happy I had Dave Jeske make me a larger marking knife before I dove into all of this bench making. It certainly helps to have the longer blade! Plus, I’ve never been one to turn down an opportunity to add another bog oak handled tool to my shop.
And here are the saw horses in use!

Errr… Sorry about that last picture. Apparently I accidentally deleted the one of the bench top pieces sitting on the new saw horses when I was trying to get a picture of Finley at the Botanical Gardens sitting on a St. Louis city celebratory birthday cake. (Hey, at least it is a picture of something sitting on top of something else!) I’ll take a new picture of the finished saw horses and add it later.
EDIT: OK, I went down into the shop last night and got a few shots of the saw horses…

I’m glad I don’t have to frame out a room any time soon. I’m afraid I’d spend hours just picking out the wood!
The Kilted Woodworking Conference
I was digging through my old blog, looking for something about a hand plane I thought I’d written about a long time ago, when I stumbled across another old blog entry that made me laugh. I guess it was the first time I had the idea for The Kilted Woodworker. (I recall Megan poo-pooing it as a possible PW End Grain submission.)
I bet we could get something going for Handworks 2015. What do you think?
*********
December 08, 2008
Picture this…
A large crowd of galoots (that would be hand-tool enthusiasts), milling about in unbifercated garments (tartan or contemporary), 2″ slicks sticking out from the tops of their right leg stockings, attending demonstrations and classes on hand tool use and techniques. Rivalries aside, a MacDonald shares a workbench with a Campbell, both eager to learn from some of the masters of the trade. After a morning of classes and lectures and a hearty lunch of haggis and shepherd’s pie, friendly competitions begin in a nearby field.
Welcome to the first annual Neanderthal Kilted Woodworking Conference!
Obviously, picking the proper location would be crucial to such a gathering. We could hold it in Dublin, OH, Aberdeen, MD, or Ayr, NE.
In addition to the normal classes on mortise/tenon and dovetail joinery, using hand saws, sharpening, and tuning hand planes, we could have demonstrations with titles like:
Tapering Your Caber With Spokeshaves
How Sharp Is Sharp? Methods Of Shearing Sheep With A Chisel
The Shop Apron vs. The Sporran
Carve Your Own Sgian Dubh Handle
Installing Crown Moulding While Kilted (a lesson from the Modest Woodworker Series)
Finish The Finish – Rubbing Out Shellac With Sheep Wool
Friendly competitions might include:
Maydole Hammer Throw – Like the traditional hammer throw, but with a 16 oz. hammer instead of a 16 lb. hammer. Slightly farther distances should be expected.
Pipe-Clamp Toss – A long, black pipe clamp is stood upright and hoisted by the competitor, where it is balanced in the vertical position. It is then thrown in such a way so that it turns end over end and strikes the ground, falling away from the athlete. Points are scored according to how close the clamp comes to landing in the 12 o’clock position.
Stanley Transitional Plane Put – A take on the traditional stone put, this is a nod to the legendary Patrick Leach and a great way to put some of these old tools to good, and final, use.
Throwing Chisels – Competitors attempt to stick their old pitted chisels in a target at 30 paces. The target? An effigy of Norm Abrhams – this is a neanderthal conference, after all!
Most importantly, we could discuss the pleasures of the complete freedom one can only achieve by using hand tools while being kilted.
A Poll: Woodworking With Kids
I don’t often ask for input from my blog readers as I’m fairly adept at rambling on without much guidance.
However, I’ve received several comments and e-mails (all positive) regarding my last few posts on woodworking with kids and am thinking about a more structured approach to the topic. Before I dive too heavily into it, I thought it might be a good idea to gather a little information and figure out how much interest there is in the subject and the best direction (if there is one) I should take in discussing it.
Thus, I have a short poll for you and a request. Please take just a few seconds (seriously, like 10 seconds!) to give me some feedback, if you don’t mind. Pick as many of the below choices as you want. If you care to expound upon your vote, feel free to leave a comment in the blog post’s comment section.
Cheers,
TKW
Little Hands In The Shop, Part 2
I was back in the shop the other night, boxing up the Adria dovetail saw to go to its new owner…
(That’s right; you gotta be fast around here! If you hear me say something is for sale, and you’re interested in it, speak up quickly!)
… when Finley came down again, wearing his slide-on slippers on the wrong feet like he always does. (I think they stay on better that way, for some reason.)
“Dadda, can you show me how to plane again?”
My first plane. Now Finley’s first plane, as well…
I’d been thinking about it since the first time he asked and realized I had the perfect solution already at hand. I told him I’d do him one better and pulled out a Stanley 220 block plane for him to use! He was very excited.
This was the very first plane I bought when I had the idea I wanted to give hand planes a try. Apparently I don’t really have much sentimental value attached to it, because it was sitting in the box of tools I’m going to sell in the near future, as I’ve since upgraded my block planes.

The new shop assistant gets put to work…
This one is a little off in that the knob is not rosewood, like you’d normally see on a 220 block plane. It is a domestic hardwood (looks to be maple) with a reddish stain on it. After buying the first one, I picked up a second 220 with a broken body that still had the rosewood knob on it for $1, hoping to put a proper one back on mine. But the threaded post on mine was too skinny, which seems odd, so I left the non-rosewood knob on it and didn’t give it a second thought. As it turns out, that was a good thing. The other knob is a perfect gripping size for the hands of a not-quite-4-year-old boy!
Since Finley goes to a Montessori school, I’m trying to give him lessons the way they do. You silently do the task while he observes, breaking it down into as many steps as necessary, then let him do it. The only verbal instructions I gave him were to be mindful of the blade, because it is sharp.

Just like that, his hand plane journey begins…
I clamped some wood into the soon-to-be-replaced workbench and put a large toolbox under it for him to stand on. He gripped the knob with his left hand and the lever cap with his right and… started planing wood! I showed him how to get wide shavings by planing on the edge of the board and then how to get thin, curly shavings by planing the corner. He liked those the best.
After he went back upstairs, I finished boxing up the Adria dovetail saw and then continued with another small task – picking out some tools for Finley to use.
A couple of old squares…

A wooden mallet with a handle that was always too small for me…
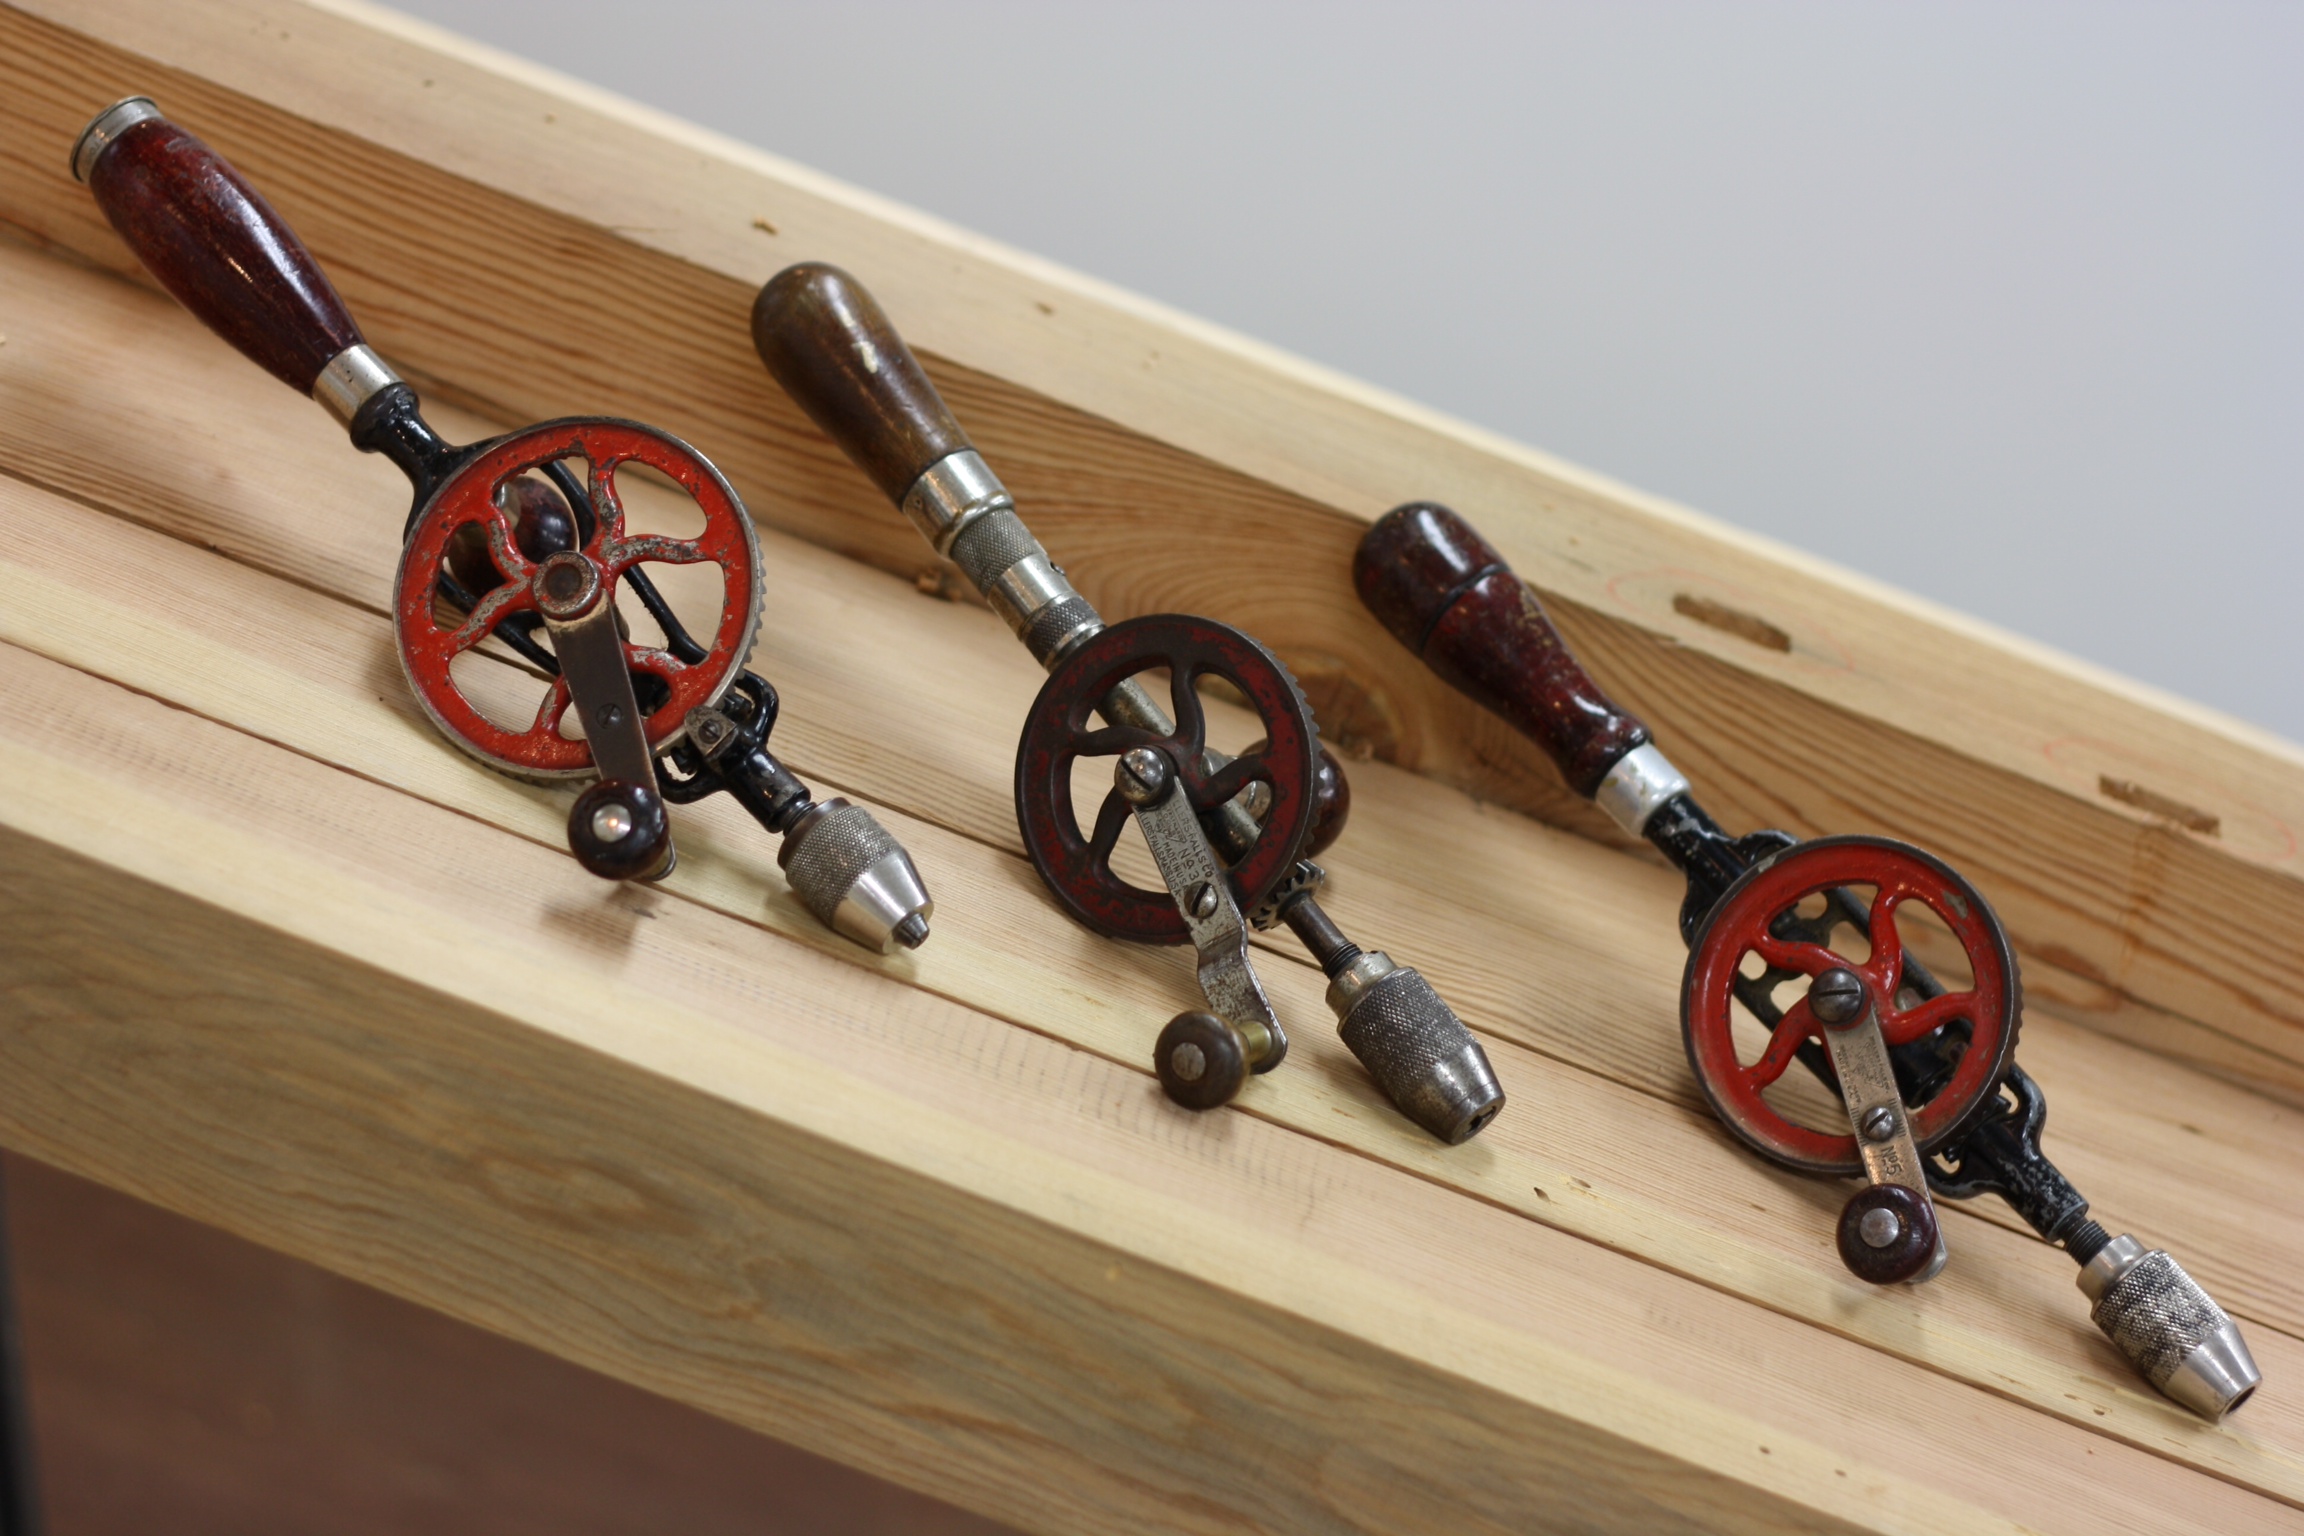
Still trying to figure out which hand drill to give him…
And, in case you think I’m cold and heartless, that 220 block plane most certainly has some sentimental value at this point.
TKW
Little Hands In The Shop

The new shop assistant
I was working in the shop last Sunday, pulling the last of the nails from one of the reclaimed heart pine beams, when I heard a noise behind me. I turned around and saw Finley, my three year old son, standing in the doorway of the workshop, eyes not yet fully opened from his afternoon nap.
“Dadda,” he said in a scratchy I-just-woke-up voice, “Can you teach me how to saw?”
Apparently I’d left a can of finish open somewhere in the shop, because my eyes suddenly started watering. I put down my tools, wiped my eyes, and told him we might not be able to do a proper lesson at that moment, since the shop is a complete wreck, but I would certainly show him how and we could set up a space for him to do some fun things in the shop in the near future.

The saw he ISN’T using…
We went over to my small assortment of saws and I tried to figure out which one might work best. I didn’t even give my good Tyzack dovetail saw a second thought, though it is the smallest backsaw I own. It will eventually need a new plate, but I’d rather it get through a few more sharpenings first. I have a mostly-unused Adria dovetail saw, as well, but I’m going to be selling it shortly, so I’d rather not bugger it up just before I do that. In the end, I decided on one of my smaller panel saws I really haven’t cleaned up yet. It is still sharp, though, so I took it back to the shop and helped him make a few pieces of scrap wood into smaller scrap wood.
After he got tired of that, he said, “Dadda, now can you show me how to plane something?”
Again, I had to dry my eyes before responding (I seriously need to figure out where I left that can of finish…). This was a little harder to let him do, mostly because he just doesn’t have the muscle mass and hand strength yet to hold a plane solidly enough. But I showed him a few planes and told him what they’re for and showed him how they work. I retracted the blade on a Stanley #5 and let him hold it for a minute to see how heavy it was.
At that point, his momma called him up to help her with supper. I put the planes and saws away and followed him upstairs. Ever since then, I’ve been trying to figure out what I can do to encourage his interest in woodworking. I want to provide him a space and some tools to play around and develop better hand/eye coordination and the hand and arm strength he needs to use saws and planes.
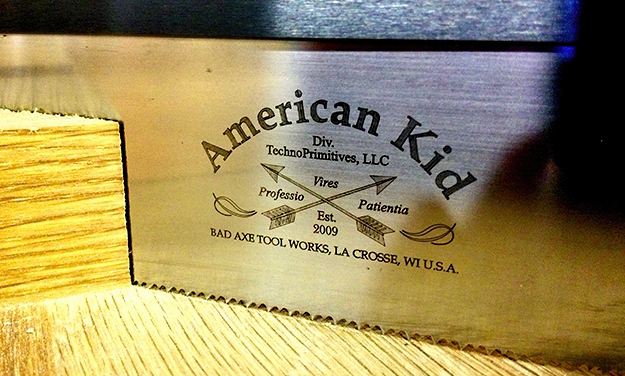
The American Kid Saw (photo courtesy of Bad Axe Tool Works)
Earlier this week, I grabbed some cash from my woodworking stash (none of this money comes from our family budget – it comes from selling boxes, payment for articles I write, tools I sell, etc. – so my wife doesn’t care what I do with it) and deposited it into my checking account. Then I invested it by putting in an order with Mark Harrell of Bad Axe Tool Works for an American Kid saw. (Hoping for some good dividends there…)
The American Kid saw is something Mark came up with a few years ago to help encourage woodworking in youngins (and, I guess, adults with very tiny hands?). I think Finley was about one year old when the model came out and I honestly never expected to be buying one so quickly. Like all other Bad Axe saws, they are very customizable, depending on how much money you want to spend. I figured we’d just go with all of the standard features on Finley’s first saw, which includes an 8″ plate, a black-oxidized back, and a CherryShock shock-resistant tote.

Shock-resistant totes come standard (Photo courtesy of Bad Axe Tool Works)
I ordered it with the smallest tote Mark offers (XX-Small), since Finley’s hand only measures 2.5” across the palm. When he needs to upgrade to a bigger tote, all I need to do is send the saw back to Bad Axe Tool Works. Mark will put a new tote on and sharpen the saw for a paltry $25. So this saw should work for him for quite a few years. I’ll make a bench hook for him and post an update after the saw arrives (looks to be a 6-8 week wait at this point) and we’ve had a few sessions with it.
Then I started going through some of my other tools to see what else he might safely use. (The nice thing about having a basement workshop with only a bandsaw in it is that I don’t really have to worry about power tool safety with him – there is little to even be concerned with at this point.) I have one or two small eggbeater drills that will be perfect and plenty of smaller hammers he can chose from, so hole-drilling and nail-hammering is covered.
Unless someone out there has an extra Stanley #1 (or a Superior Works #601) they’d be willing to donate, I’ll have to ponder the plane challenge to see what I can come up with there. I do have a Lee Valley low angle block plane with the tote and knob accessories on it… maybe that will work, though I’m hesitant to put that not-inexpensive plane in the hands of a not-yet-four-year-old.
For a bench, I was thinking a good starting point might be a saw bench with splayed legs; something he can put a bench hook on and clamp wood to for drilling. He is just too little yet for even a higher raised platform to make working at a normal bench safe. It would have to be a very tall, wide, and stable platform and that would take up a lot of room.
If anyone out there has any additional ideas or suggestions – whether it is about tools or books I should be looking for or workshop ideas – add a comment below or e-mail me! I’d love to hear them.
TKW
Nailed It!
Or, rather, I de-nailed it. If you’ll recall from a few posts back, I’d recently (it’s a relative term) picked up the heart pine beams I was going to use for my new workbench. Most of them were in fairly good shape, except one that still had a few nails buried in it – five, to be precise.
After spending some time sorting beams, flipping and flopping them around to determine the best layout for the top, I had them lined up the way I wanted. I struck a few lines with a square and straight edge and trimmed them to length with a hand saw. Because the beam with the nails still in it was a few feet longer than the others, I used this step to remove two of the nails for me.

Tools: an old nail puller and a new chisel…
That left me with three nails to pull, since I did not want to bury them in the top. Having de-nailed several hundred board feet of reclaimed white oak (which was all clench-nailed when the wood was still green), I know how hard it can be. It isn’t something that causes me to skip to the shop with excitement, to be sure. But, in this case, I saw an opportunity to use a tool I’d picked up at an estate sale about six years ago and had not yet had the chance to use – an old Keen Kutter nail puller!

Ahhh, there it is!
Since all three nails were broken off below the surface, I had to excavate a bit of wood from around the holes to make room for the jaws of the tool. Now, some people might say, “To begin, reach for an old chisel…” I say they’re wrong! All of my old chisels are my BEST chisels. I’ve spent a lot of time rehabbing them into good condition, so why on Earth would I use them to chop into wood around old rusted nails? No, this is when I reach for a NEW chisel – one of the chisels I bought when I first got into woodworking and didn’t know any better – they are perfect for such a task (and the only reason I still keep them around)!
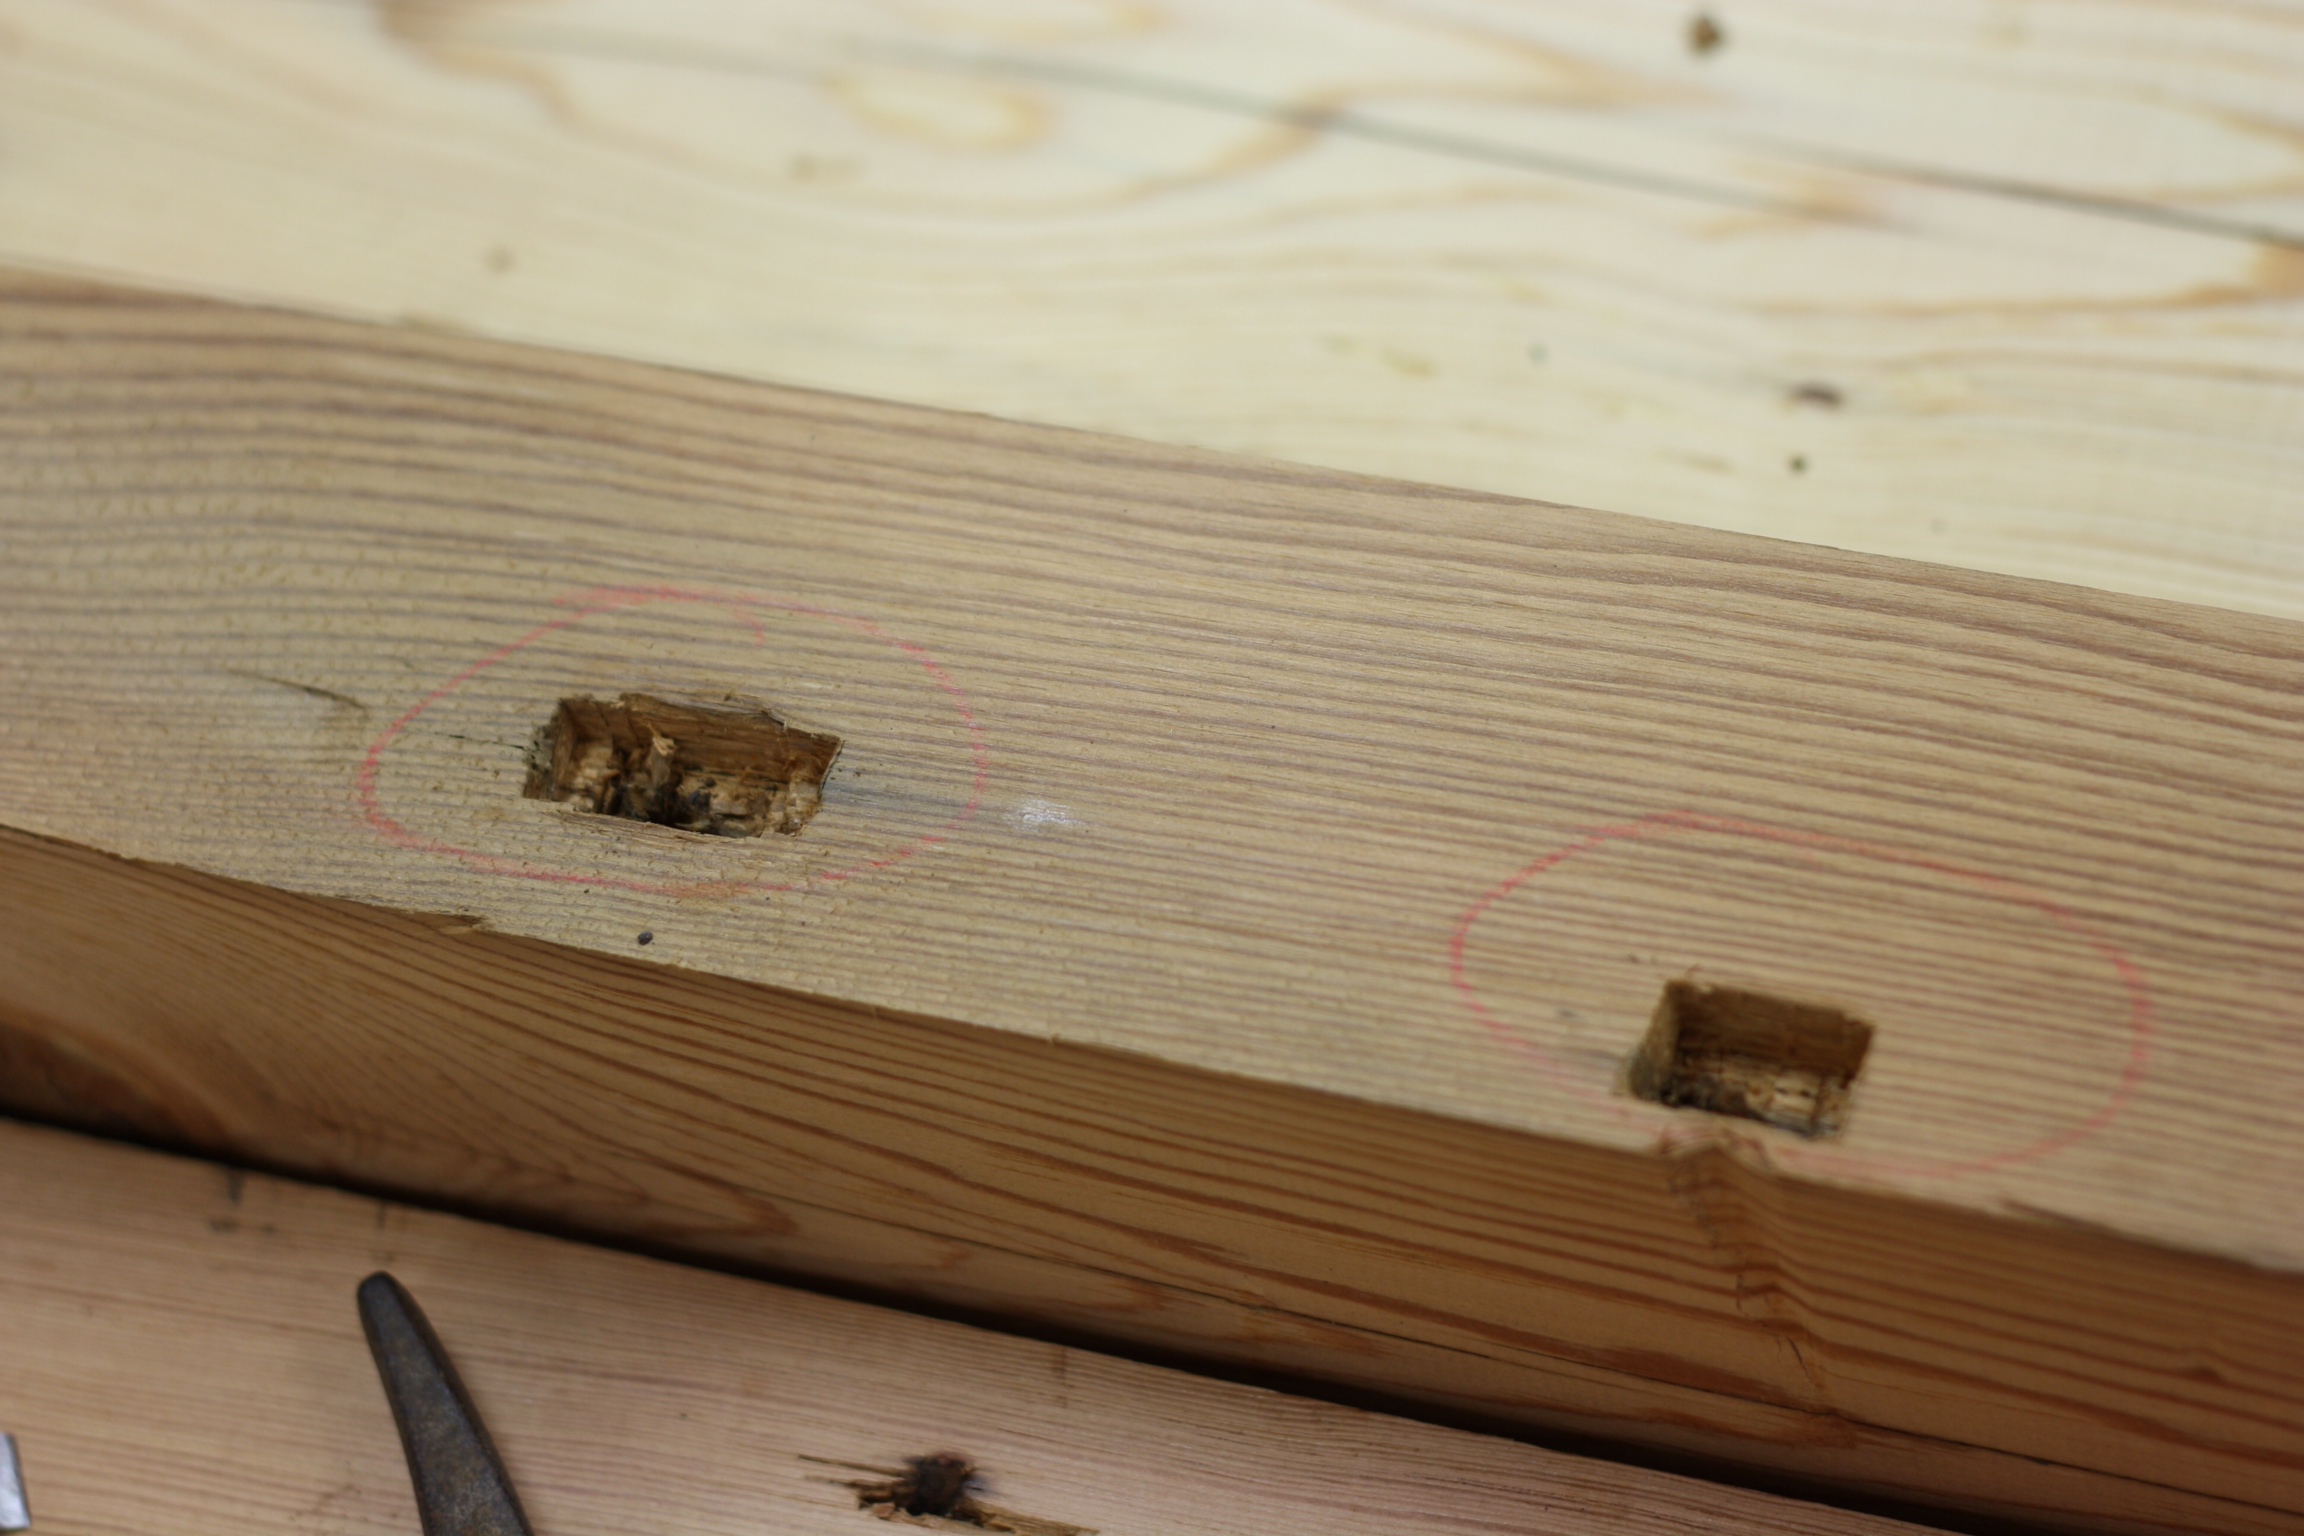
Enlarged mortise and dent on the left; initial mortise on the right.
After a few minutes of work, even being careful, my chisel edge was chipped in several places. It is easy enough to grind the chips out, but it feels better not needlessly grinding a good chisel, you know? With a rough mortise chopped around the nail, things become clearer. For one thing, I clearly needed to make larger openings if I was going to get the jaws around the nails.
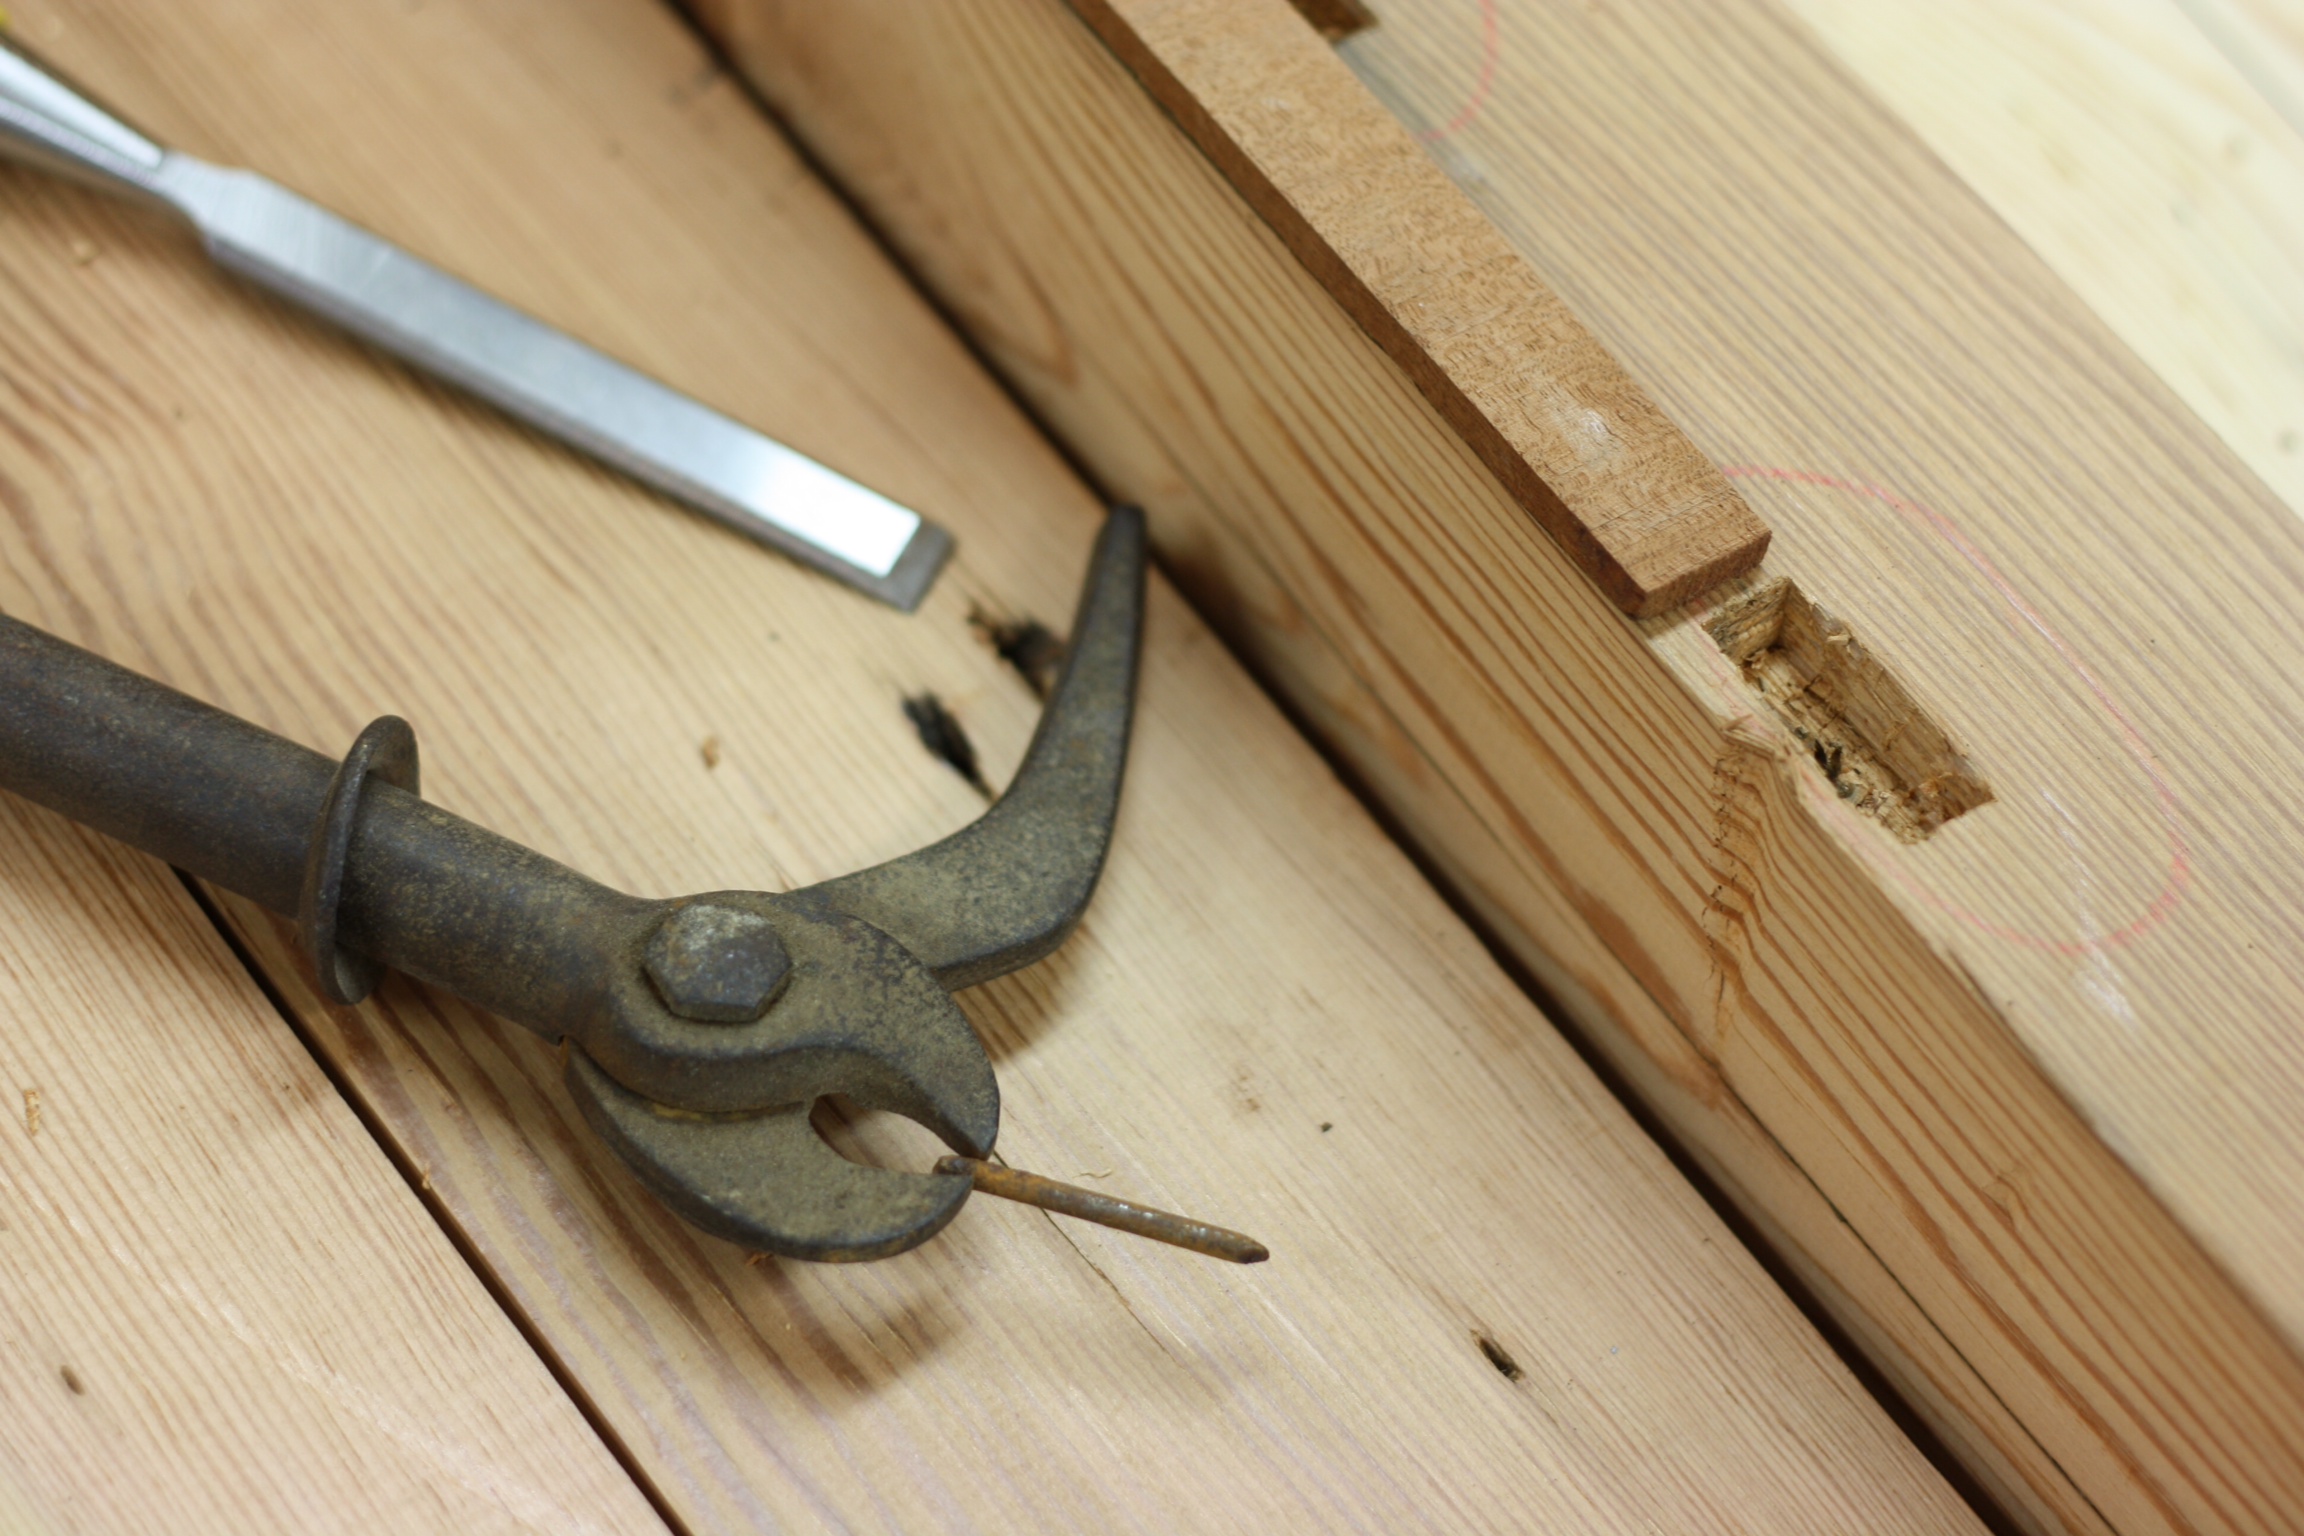
The right tool makes quick work of the job…
Once I had enough clearance, I set the jaws of the tool around the nail and levered into the foot of the tool. The nail immediately started pulling out… and the foot immediately started making an impression in the softer heart pine. Adjusting slightly for a better grip, and inserting a thin piece of wood under the foot, I levered again and the nail pulled free. I repeated the process for the other two nails and…
I was done. Well… aside from patching the holes. That shouldn’t take too long, though I’ll still try to write something up if just to show you how easy it is.
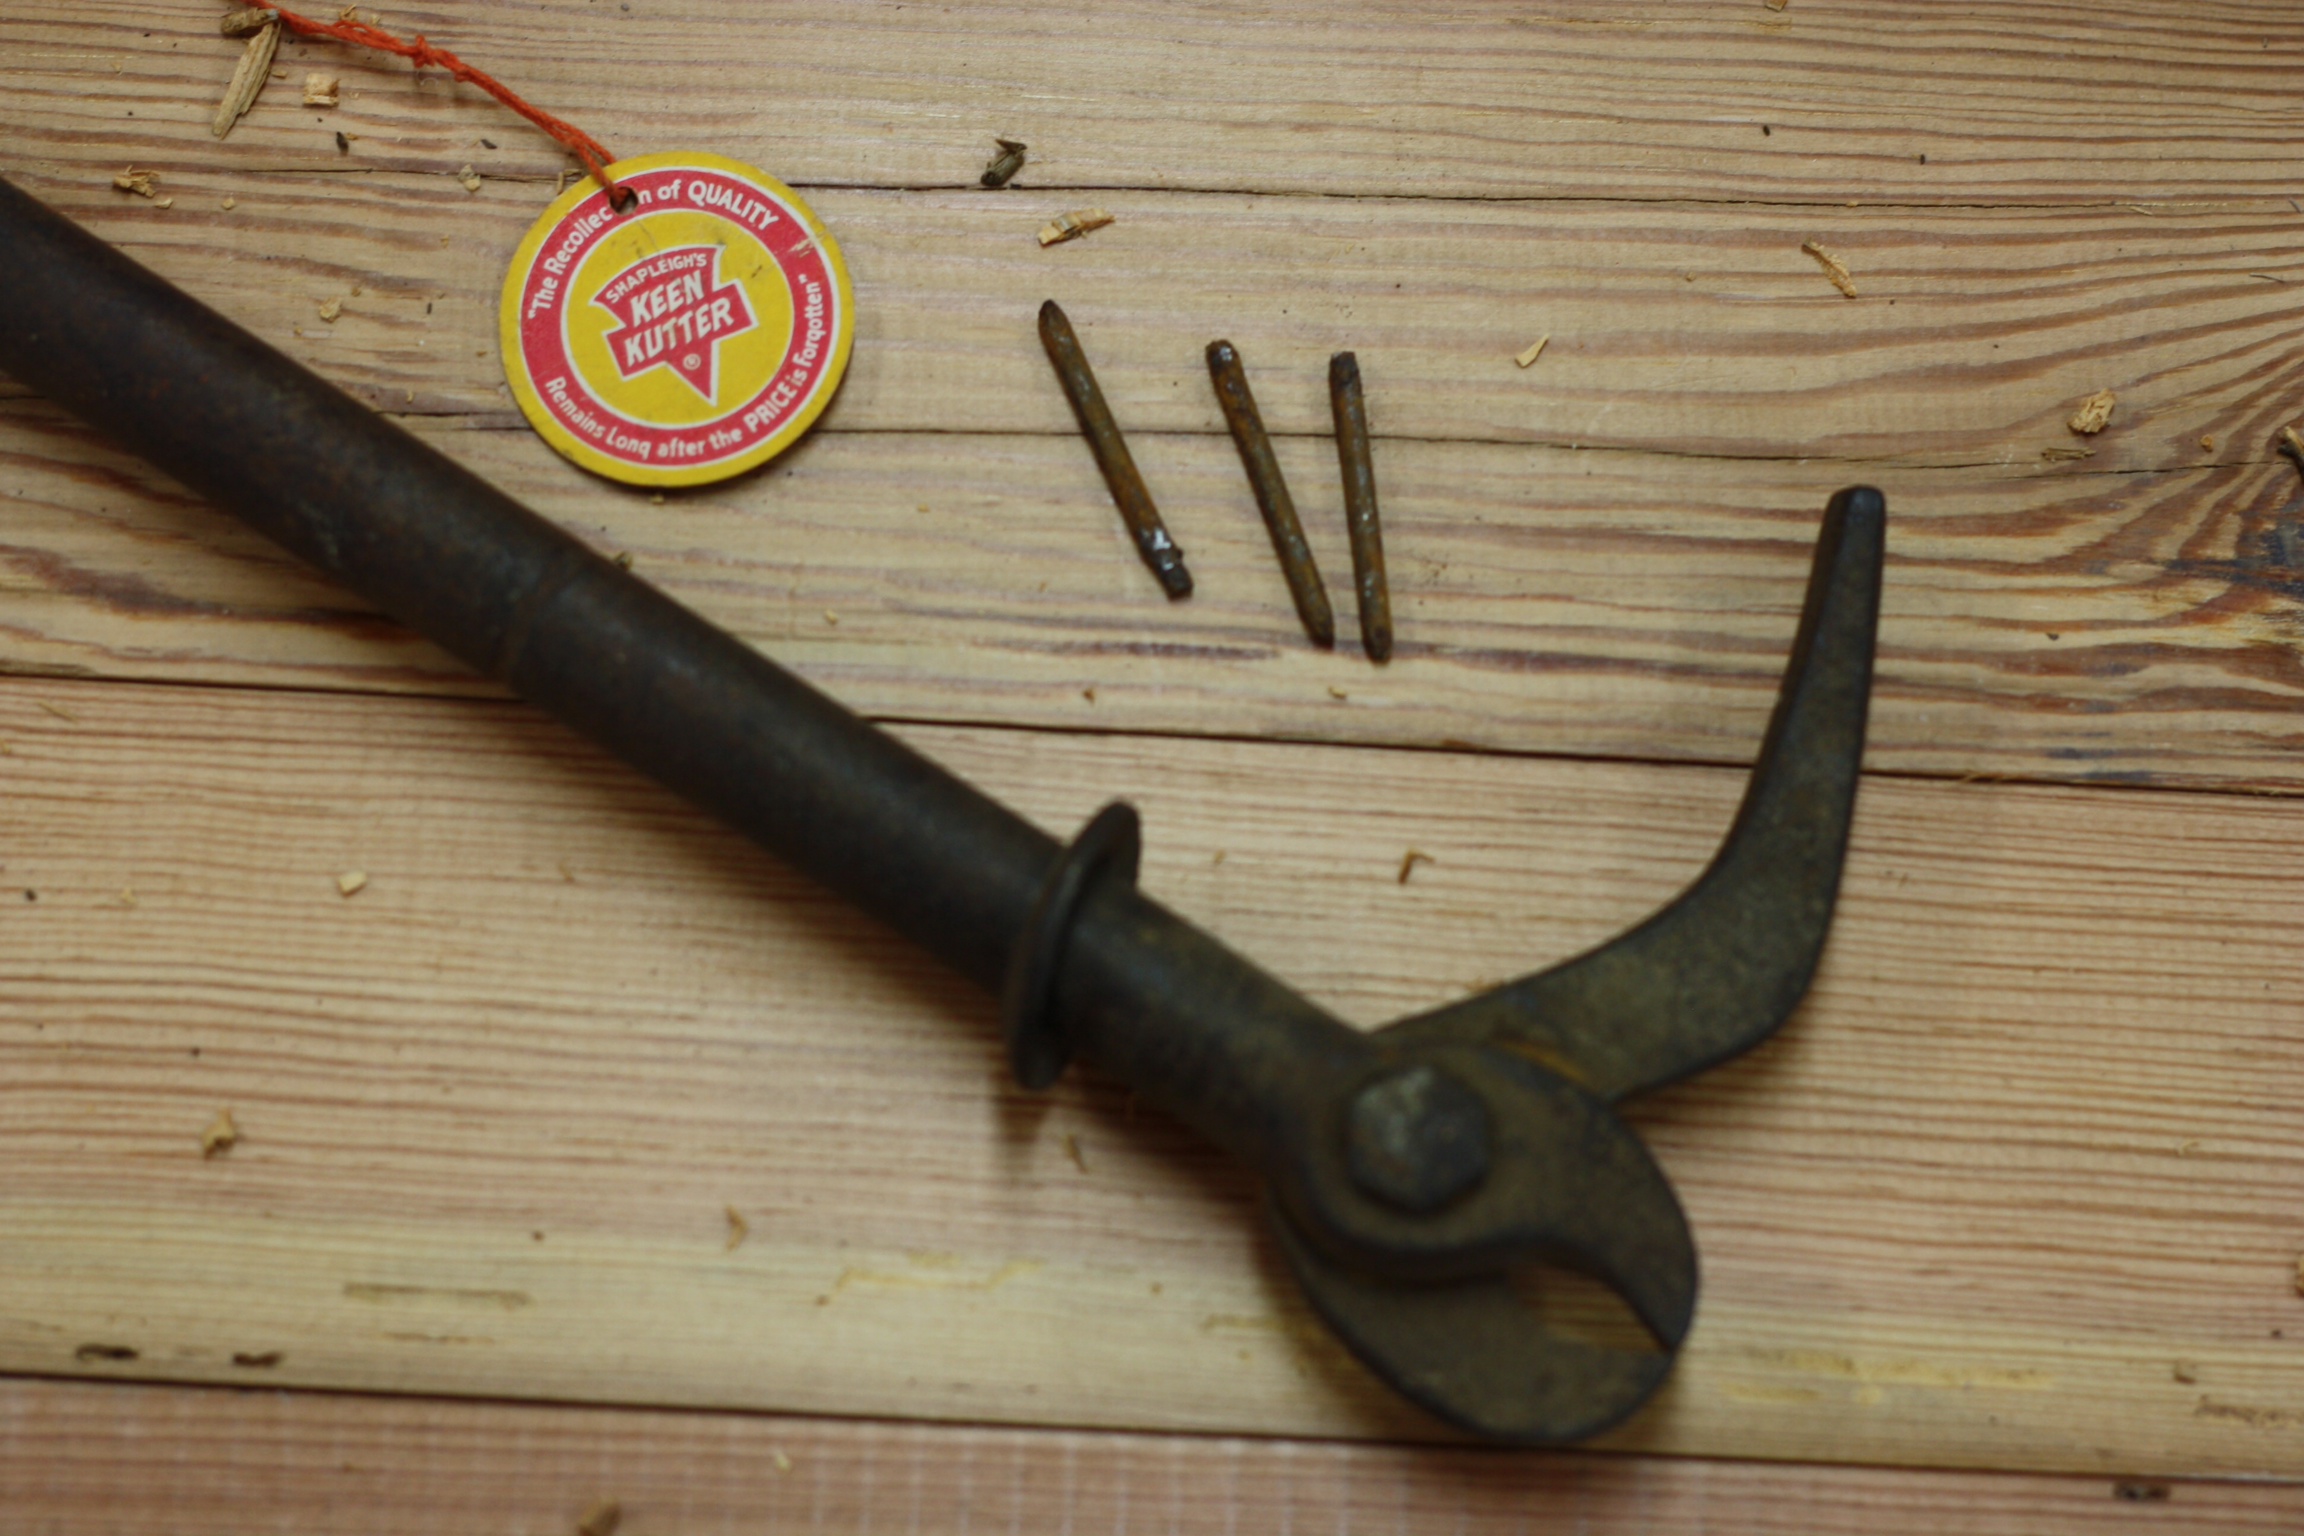
The extractor, the extracted, and the label…
I know, I know, kind of an anticlimactic story. Sorry. I guess I just wanted to reiterate the idea of using the right tool for the job. Or, part of the right tool, anyway. Looking at some on-line pictures, it appears I just have the bottom half of the Keen Kutter nail puller (and the label), but… it still works just fine. And it only cost me $3, so I’m cool with that. If I ever need the extra leverage, I can probably find a piece of iron pipe to slide over the handle.
The next step is to do some jointing so I can glue the top up. Although the faces were all machine-planed, I still have a lot of work to do. I’ve jointed plenty of edges before, but they were always ½” thick and less than two feet long (ahhh, the challenges of being a box-building woodworker). Having never jointed 3” thick 7’ long beams before, I expect it will take a little practice before I get the results I want. But we’re getting there.
Sometimes I feel like I’ve built my workshop in the Shire, because work seems to happen so slowly there, if it happens at all. But when your shop time is limited to a few hours on the weekends, things like a sick child, warm weather better suited for outdoor work, or a visit to the grandparents can reduce those few hours to nothing. As a result, this bench build is going a lot slower than those I read about in other blogs. I hope you’re cool with that, because I am. It is what it is; when you come to terms with that sort of thing, you quickly learn to enjoy and appreciate the limited shop time you have.
Speaking of shop time, I’d planned on doing more on the bench this weekend, but something else happened that cut my shop time short. That story will have to wait until later this week, though…
A Perfect Book

The Anarchist’s Tool Chest
The amount of time I spend in my shop waxes and wanes periodically. At a glance, it would seem to be a simple association with available free time, since I have a lot of priorities above my hobby, but I assume there is more to it than that. (I’ll have to look into that the next time I’m feeling introspective.)
In any case, when I get to a point where I ramp my woodworking back up, I like to maintain the momentum when I’m at work by reading a good woodworking book on my lunch breaks. I have several authors I habitually turn to, like Nakashima and Krenov. This time, however, I went with the Schwarz.
I’m now just about done with my fifth reading of The Anarchist’s Toolchest – not bad for a three year old book. I think I’ve figured out now that I turn to certain authors depending on what kind of motivation I want to generate within myself. I read Nakashima if I want to get inspiration for working with specific wood I have in my shop. I pull out my Krenov books when I’m trying to come up with different ways to enhance a project I have in mind. And I turn to the Schwarz when I need a push to make sure I’m doing the best I can.
It helps me remember the phrase the artist Jan Van Eyke added to the frame of his painting, “Man with a Red Turban” – Als Ik Kan – which is Dutch for “As best I can”. (Every now and again that Art History degree gets a little bit of use!) This is a saying that was adopted by the Arts and Crafts movement as a motto of sorts. Chris, too, makes mention of the phrase in a short article he wrote for his former publication, Woodworking Magazine. Funny how things come full circle like that.
Its meaning varies slightly, depending on who you talk to. It reminds me that I need to work to the best of my abilities, that I shouldn’t be happy with making “acceptable” work, but should push myself to produce the best work possible every time.
Anyway… I was reading the section “Lids and Hinges” when I turned to page 427 and a slip of paper fell out. I immediately knew what it was and started laughing.

My gentle reminder…
My mom left that note for me to find about two years ago when she was babysitting Finley and thumbed through the book during one of his naps. I always forget it is there, though, so this is the third time I’ve turned the page and it has fallen out, surprising me.
Today I needed the laugh. I’ve had a rough week with a three year old who is turning out to be a lot like his father. And while I try to use the Schwarz to help drive myself to do Als Ik Kan, it is also good to have the reminder from my mom that I shouldn’t kill myself trying to be perfect.
Thanks, Mom.

