When A Woodworker Makes Saw Horses…
It’s weird. When you’re so used to looking at lumber with a critical eye, for grain and condition and quality, it isn’t something you can just turn off, even when all you want to make is a few saw horses.
I’ve spent a little bit of my free time jointing edges on the lumber for the top of my workbench. I’m getting there, as you can see. You might also notice I’ve changed out one board from the earlier layouts. I just wasn’t happy with it – it was not heart pine like the others and it obviously wasn’t as old because it didn’t have the tight growth rings. No matter how I laid it out, I was never satisfied. So I took it out. Maybe I’ll use it for the legs.
I replaced it with another piece of the good heart pine to bring the width back out to 20”. Anyone with a discerning eye will note the slight difference in length. I wish I had another piece of heart pine that was 7’ long, but I don’t. As my son told me the other day when I asked him why his room was such a mess, “It is what it is, Dadda.”
Hell, it’s my workbench, right? So who cares if one part of it isn’t as long as the rest. Maybe I’ll take the opportunity to add a design element to it and shape the transition into the longer pieces with a cyma to make it more pleasing to the eye. It will be the back right part of the bench, so it won’t interfere with a leg vice. And I’ll mortise the leg just before the blend, so it won’t make my leg joinery any more difficult.
Or maybe I’ll see if I can scarf a smaller piece into that short post. I do have a few other pieces of heart pine I could use.
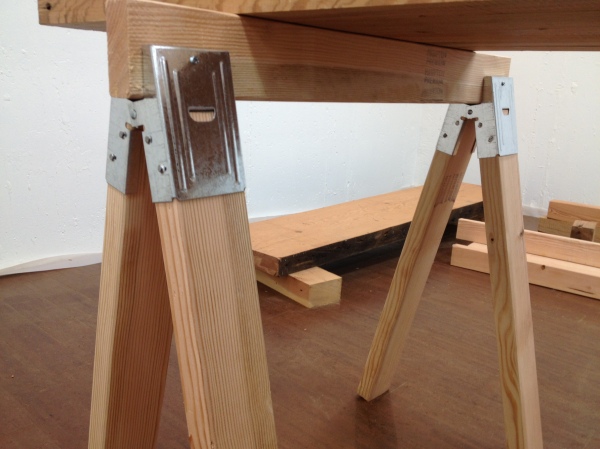
At any rate, as I was working on the top layout, I noticed my plastic saw horses were bowed, taxed probably close to their limit. They are fine for laying a door across when I’m painting it, but a bench top that weighs several hundred pounds might be pushing it. So I decided to throw together some quick saw horses. Quick, as in I was going to make them with the metal brackets where you just have to cut some 2×4 to length and nail them into the slots and then cut a piece for a cross beam.
When I was at the big box store, sorting through the 2x4s, I noticed something right away. I wasn’t just looking for relatively good 2x4s. I was looking for quartersawn or rift sawn, knot-free and perfectly straight 2x4s!
Is it a big deal? Does it make a difference for something so mundane as some quickly-made saw horses? Apparently it does. Or maybe I just couldn’t help myself.
As you can see, the not-even-glued-up top is already getting put to good use, as is my Bad Axe miter saw and my newly restored Craftsman 3646 miter box.
If ever you needed an example of just how cleanly a Bad Axe saw cuts, check out what it does to SYP. Man, that’s a clean cut!
There is something pleasing about all of that endgrain, don’t you agree? I’m also really happy I had Dave Jeske make me a larger marking knife before I dove into all of this bench making. It certainly helps to have the longer blade! Plus, I’ve never been one to turn down an opportunity to add another bog oak handled tool to my shop.
And here are the saw horses in use!
Errr… Sorry about that last picture. Apparently I accidentally deleted the one of the bench top pieces sitting on the new saw horses when I was trying to get a picture of Finley at the Botanical Gardens sitting on a St. Louis city celebratory birthday cake. (Hey, at least it is a picture of something sitting on top of something else!) I’ll take a new picture of the finished saw horses and add it later.
EDIT: OK, I went down into the shop last night and got a few shots of the saw horses…
I’m glad I don’t have to frame out a room any time soon. I’m afraid I’d spend hours just picking out the wood!


Have you been able to cut a good 45 degree cut on your miter box? I have a Stanely 150 and have to spend quite a bit of time at the shooting board to to get it to line up nicely.
Thanks for the great post!
LikeLike
Alan,
You know, I think I did make an initial test cut at 45 degrees with some scrap lumber to make sure it was good and was pleased with the results. But the next time I pull the miter box out, I’ll grab a board and make a miter cut and see what it looks like and post the results.
You might want to consider taking a little time to figure out how to shim out the board so that it cuts a more accurate miter, thus meaning less time at the shooting board.
TKW
LikeLike
Hard to be less than perfectly particular.
LikeLike
You of all people probably understand this predicament the most, mom.
I feel for you, living with my mentor…
LikeLike